

Managed Gateways (Gateway Clusters)
Last updated on March 22, 2024 by Robert Plamondon
Contents
1. Introduction
A Workspot Managed Gateway (also called a gateway cluster or a public cloud gateway cluster) is a group of one or more identically configured Internet authenticating gateways providing secure access to your Workspot desktop and application pools. Each gateway in a cluster is a virtual machine running Microsoft Windows Server and acting as an RD gateway and running the Workspot Gateway Agent, which coordinates operation with Workspot Control for configuration and monitoring.
1.1. What is a Gateway Cluster?
The gateways in a cluster are created and managed as a unit, keeping their configuration in sync.
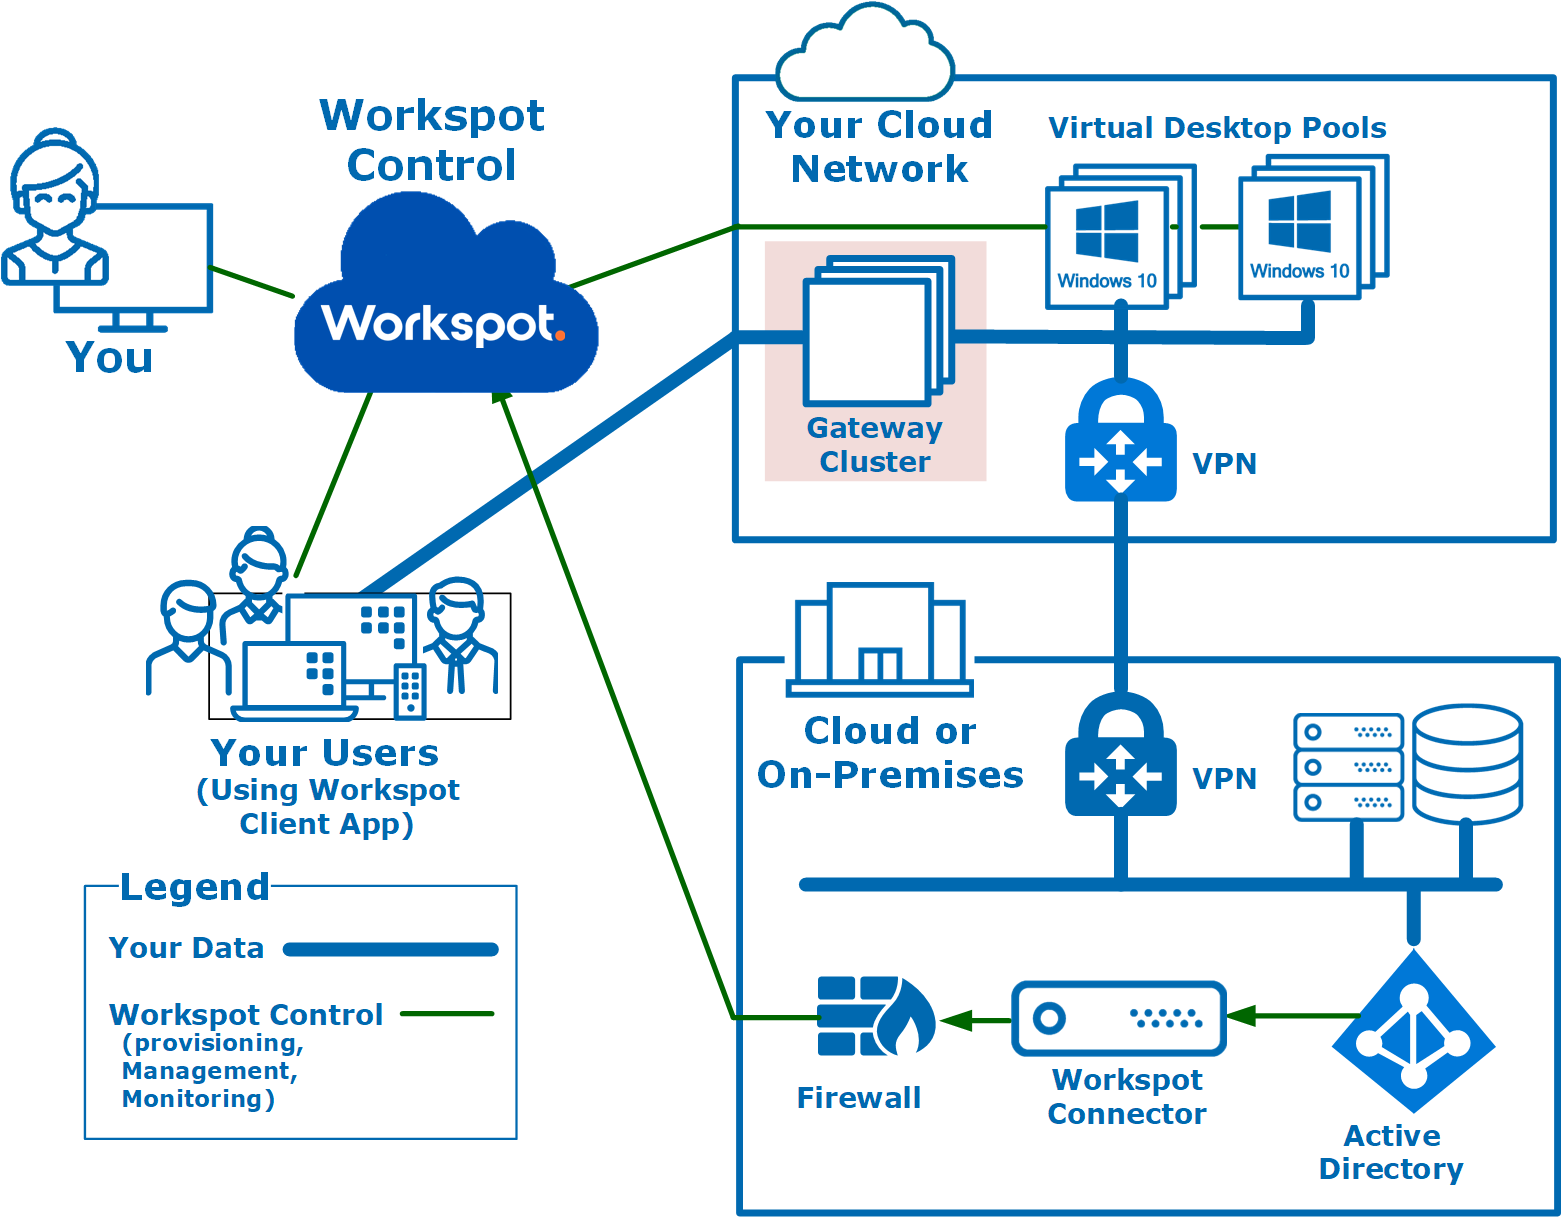
Network block diagram, showing a Gateway Cluster at the boundary between your Workspot desktops and the Internet.
1.2. How Gateway Clusters Work
From the point of view of Workspot Control and your IT administrators, gateway clusters act as a unit. From the point of view of the Workspot Client, each gateway is independent. For every Workspot desktop or application pool, Workspot Control sends the Client a list of gateways that can be used to reach the pool.
1.3. How the Workspot Client Chooses a Gateway
Whenever the Client needs to open a connection to a pool, it selects a gateway from the list at random. If the connection fails, it picks another gateway at random. This provides both fault-tolerance and capacity scaling.
This mechanism works both for individually provisioned gateways and gateway clusters. Gateway clusters provide a way of keeping the gateway configurations in sync and are the recommended solution.
Gateway clusters can be created and brought online by the Workspot customer, where the older, non-clustered gateways cannot be managed except by Workspot.
Clustering simplifies the deployment of such gateways by grouping them and making more of their management access to your own organization’s IT administrators.
2. Gateway Cluster Navigation

The main gateway cluster page: “Setup > Gateways.”
Gateway clusters are controlled on the “Setup > Gateways” page.
Navigation includes two sections: “Gateway Clusters” and “Gateway Status”
2.1. “Public Cloud Gateway Clusters” Section
The “Public Gateway Clusters” section has information and controls for the gateway cluster as a whole, including:
- The “Create Cloud Gateway Cluster” button.
- A table listing existing gateway clusters, including:
- The Cloud Region hosting the cluster.
- Whether the cluster is unavailable, available (one active gateway), or highly available (more than one active gateway).
- Cluster status: (Provisioning, Preview, Published, and Deleted). Only clusters that with Preview or Published status are used by the Workspot Client.
- Actions menu for each cluster, allowing you to delete, edit, or publish the cluster.
| Gateway Cluster Status | Description |
| Provisioning | The cluster is being created. |
| Preview | The cluster has been created and is ready for any manual configuration. |
| Published | The cluster is configured and available to Workspot Clients. |
| Deleted | The cluster has been discarded. |
Gateway cluster status.
2.2. “Gateways” Section
Each gateway is a VM. The “Gateways” section lists the individual gateways in the selected cluster, including:
- The name of the gateway. Clicking on the name will show more details (shown below).
- The public URL of the gateway.
- The mode of the gateway. Unlike the status, the model is (mostly) determined by the administrator.
- The current status of the gateway (Ready, Rebooting, etc.)
- An Actions menu for the gateway, allowing you to delete, enable, or reboot the gateway, or put it into maintenance mode.
| Gateway Mode | Description |
| New | The gateway is being created. |
| Setup | The gateway is online (on the private network) but is not yet ready for user traffic (over the public Internet). |
| Enabled | The gateway is ready for user traffic. |
| Maintenance | Control informs the Workspot Clients to avoid this gateway for new sessions. Existing Client sessions using this gateway are unaffected. Clients poll Control every five minutes (the “Client heartbeat” period), so there is a five-minute period where new sessions may still use the gateway. (The gateway itself is not involved in this process.) |
List of gateway modes.
| Gateway Status | Description |
| Provisioning | The gateway VM is being created. |
| Online | The gateway is online but is not yet ready for user traffic. |
| Configuring | The gateway is running configuration tasks. |
| Ready | The gateway is ready for user traffic. |
| Error/Failed | The gateway detected a problem and is not available for user traffic. |
| Rebooting | The gateway is restarting. |
List of gateway statuses.
2.3. “Gateway Details” Page

Gateway details page.
When you click on the name of an individual gateway, you are taken to the gateway details page. In a gateway that is not fully configured, the “Gateway Properties” section of the page is the most important. This shows IP, DNS, geographic, URI, and certificate information about the gateway, plus the OS version of the gateway, the Workspot Gateway Agent version, and a list of the desktop pools and RD apps that use this gateway.
Two other sections, “Operational Details” and “Performance,” are of interest once the gateway is configured.
3. Creating a Gateway Cluster

“Setup > Gateways > Create Cloud Gateway Cluster > New Cloud Gateway Cluster” page.
-
Have Workspot enable the Gateway Clustering feature if these pages aren’t visible.
-
Sign into Workspot Control as an Administrative user. Create the cluster via “Setup > Gateways > Create Cloud Gateway Cluster. ” The “New Cloud Gateway Cluster” page appears.
-
Fill in the fields as shown below. Note: Fill in the form from top to bottom, since some fields may change according to the selections made so far.
-
Cloud. Select one of the Clouds defined for your account. Usually you will have only one Cloud.
-
Region. Your Cloud has one or more regions and virtual networks. Select the Region/virtual network combination the Workspot pools that will use this gateway cluster. Virtual networks are associated with desktop templates. To verify that you’re using the right virtual network for an existing pool, expand the listing of the templates used by the pool (at “Setup > Cloud > Public Cloud > cloudname > templatename”).
-
Cluster Name. This is an arbitrary string that identifies the cluster in listings, reports, and messages.
-
Instances in Cluster. The number of Gateways to create for the cluster. The valid range is 1-5. Cluster VMs can be deleted later, reducing the size of the cluster, and new gateways can be added.
-
VM Name Prefix. Individual gateways are named “vmnameprefix-region-gwnn, where vmnameprefix is the string you specify, the region is the abbreviation for the Azure region the gateway resides in, and nn is a sequence number. The VM Name Prefix must consist of character that is valid in an Azure hostname.
-
Override Public Domain. Since the user-facing interface of the gateway is on the public Internet, it needs to be accessible through a valid DNS mapping. By default, the gateways will use one of the Workspot’s DNS domains, such as daas20.net. This allows Workspot to manage the public DNS records and install a valid certificate automatically. If you wish to use your own domain and certificate, check the box and enter the domain name you wish to use. This will require that you update your own DNS records manually and install your own certificate on each gateway VM.
-
Description. A note was seen by other administrators.
-
Authentication Type. One of Active Directory (AD), Azure Active Directory (Azure AD), Okta, or Network Policy and Access Service (NPS).
-
NPS is beyond the scope of this document.
-
Active Directory and Azure Active Directory. Choose AD or Azure AD to match the settings in “Setup > Configuration > Registration and Authentication > Directory Services > Azure AD Authentication.” If it says “Enabled,” select “Azure Active Directory” for “Authentication Type.” Otherwise, choose “Active Directory.”
-
Okta: If you have configured Okta under "Settings > Identity Providers," you can use Okta on a per-gateway-cluster basis.
-
Note: Additional authentication configuration will pop up after you hit “Create” at the bottom of the page.
-
-

-
Connection Authorization Policy > General Policy. This specifies a Gateway Policy. Gateway policies are filters on Workspot security policies that can optionally make the policies stricter.
- Most customers use the “Default Gateway Policy,” which leaves security policies untouched.
- You can change the gateway policy changed later.
- Review your entries, then click “Create.”
- Go to Join the Domain (Active Directory Clusters) if you selected Active Directory authentication.
- Go to NPS Setup (NPS Clusters Only) if you selected NPS authentication.
- Go to Create the Local Admin Account.
- Go to Add a Gateway Certificate if you selected “Override Public Domain.”
- Go to Register Gateways on DNS.
- Enable each Gateway VM through "Setup > Gateways > clustername > gatewayname > Enable."
- Publish the Cluster with “Setup > Gateways > clustername > Actions > Publish.”
- Go to Testing the Cluster.
3.1. Join the Domain (Active Directory Clusters)

Joining an AD gateway to your domain.
Note: For Azure Active Directory, skip to Create the Local Admin Account. Azure Active Directory gateways don’t need to join a domain.
When used with Active Directory, the gateway cluster must be joined to your domain. To join the cluster to the domain, you will need:
- The name of your domain.
- The destination OU (the same OU that you use for the Workspot pools serviced by the cluster).
- Domain Admin credentials. These are not saved but are used once to authorize the gateway cluster to join the domain.
Fill in the “Domain Join” form and press “OK.”
3.3. Create the Local Admin Account

Each gateway cluster has a local admin account.
- You’ll be asked to create a local admin account for the cluster. These credentials will be the same for all gateways in the cluster and allow you to sign in to the gateway VM as an admin (so use robust passwords).
- Assign an appropriate username and password for the gateway cluster and hit “OK.”
- You will be taken back to the “Setup > Gateways” page, where you can monitor the provisioning progress.

Display after the cluster is created but before the gateways are provisioned.
- Click your new gateway cluster to ensure that its details are shown in the bottom table on the page.
- The cluster status will start with “Provisioning” and end with “Preview.” The individual gateways will start with “Not Started” and end with “Online.”
- In the Preview state, the cluster is already available to end-users, just as it is in the Published state. Whether user traffic actually passes through it is controlled by whether the cluster is listed in any pool definitions. Three management actions are available for the cluster as a whole: “Delete,” “Edit,” and “Publish.”
- “Delete” deletes the cluster.
- “Edit” allows you to change cluster parameters. Currently, only the Gateway Policy can be changed.
- “Publish” marks the cluster as production-ready but this is just a notation: it is identical to Preview otherwise.
3.4. Add a Gateway Certificate
Note: If you chose to use a Workspot DNS domain for your gateway cluster, this has been done automatically and you can skip to Testing the Cluster.
Before the gateway cluster using your own domain can be published, it must have a valid gateway certificate for your organization.
If you try to publish the cluster without installing a certificate first, you’ll get an error message saying that publication failed.
The individual gateways will be marked “Error” or “Failed.” Clicking on their status will pop up a balloon giving the failure reason.

If there is no RD Gateway Certificate, this will be shown under the gateway status.
Certificates are installed individually on the gateway VMs using Microsoft RD Gateway Manager. To do this, you log onto each gateway VM using the local administrator account (set earlier in the procedure) or, for domain-joined gateways, a domain admin account.
3.4.1. To set a Gateway Certificate
- Acquire a suitable SSL certificate for an RD Gateway in the configured DNS domain. The certificate properties should be as follows:
- It should cover the gateway’s public URL and the private resources accessed through the gateway.
- It should be a wildcard certificate.
- It should use an authority known to all Client devices.
- It should be saved in.PFX format.
- Perform the following steps for each gateway VM in the cluster:
- Because the gateway’s public IP is not accessible at this point, you need to sign into any convenient jump server with access to the same virtual network as the gateway VM. The purpose of this is to give you a platform from which to sign into the gateway.
- For example, use the Workspot Client to sign in to an existing Workspot desktop that is accessed by a gateway other than the cluster you just created.
- Using Microsoft Remote Desktop Client, sign into the gateway VM as the local administrator you set up in a prior step.
- You will see a certificate warning from the gateway VM. This is normal. Accept the certificate and continue.
- Copy your SSL certificate to the gateway VM by the method of your choice.
- For example, open Notepad on the gateway VM, paste the certificate text into it and save.
- On the gateway, VM, Launch Microsoft RD Gateway Manager, and select the local gateway in the left-hand pane. RD Gateway Manager will report that the Gateway is not fully configured and needs a certificate:

RD Gateway Manager before certificate installation.
- Right-click the hostname and select “Properties.” The properties sheet appears.
- On the “Properties” sheet, click the “SSL Certificates” tab, select “Import a certificate,” and click “Browse and Import Certificate...”

SSL Certificate tab on RD Gateway Manager.
- Browse to select the file with the certificate. You will be prompted for the certificate’s private key password. Enter this and press “OK.”

Entering the certificate’s private key password.
- Press “OK” twice more to complete the certificate installation.

Completing certificate installation.
- In Workspot Control, reboot the gateway from the “Actions” menu for the individual gateway.

Rebooting a gateway after installing the certificate.
- Repeat for the other gateways in the cluster.
- Once the gateways reboot, Workspot Control should show the status of the cluster as a whole as “Highly Available” if there are two or more VMs, or “Available” if there is only one.

Availability status.
3.5. Register Gateways on DNS
Each gateway must have a DNS entry that resolves to its public IP address, to allow Clients to connect to it.
3.5.1. Using Workspot-Provided DNS
If you are using a Workspot DNS domain such as daas20.net, this has been done automatically and you can skip to Testing the Cluster.
3.5.2. Using Your own DNS
If you have specified your own DNS domain, the site name given in the “Public URI” field on the Gateway Details page needs to be added to your public DNS server.
- The Public URI should be a CNAME record pointing to the DNS Name of the gateway.
- Repeat for each gateway in the cluster.
Verify DNS settings are set to Automatically Assigned in the Enterprise connector when there are DNS changes in Azure, or if any VM is not picking up new DNS servers defined in Azure on reboot.
3.5.3. Testing DNS Registration
A nslookup on the hostname portion of every Public URI should be performed to test each DNS record in the cluster. The nslookup should return the Public IP address of its gateway.
The nslookup should use a public DNS service such as 8.8.8.8 or 9.9.9.9 to avoid the excessively slow update times and other peculiarities of some DNS resolvers.
If the DNS entry is correct, the nslookup will return the Public Name, DNS Name, and Public IP, as shown in this example:
C:\>nslookup JohnS-usw-gw01-x-x-46ea-8834-6d57547f3eb3.daas20.net 9.9.9.9Server: dns9.quad9.netAddress: 9.9.9.9Non-authoritative answer:Name: johns-usw-gw01.westus.cloudapp.azure.comAddress: 104.42.77.135Aliases: JohnS-usw-gw01-x-x-46ea-8834-6d57547f3eb3.daas20.net
If the DNS entry is not correct, the lookup will not fail due to matching a wildcard record, but the DNS Name Public IP will be obviously incorrect and the correct-looking alias will be subtly wrong:
C:\>nslookup JohnS-usw-gw01-x-x-46ea-8834-6d57547f3eb3.daas20.net 9.9.9.9Server: dns9.quad9.netAddress: 9.9.9.9Non-authoritative answer:Name: y-y.us-east-1.elb.z.comAddresses: 23.21.62.62 50.19.220.109 54.225.152.154Aliases: JohnS-usw-gw01-x-x-46ea-8834-6d57547f3eb3.daas20.net.workspot.com tochigi-8126.herokussl.com
4. Testing the Cluster

- In Workspot Control, Create or edit a desktop pool and assign cluster as its gateway.
- If the pool is newly created, assign desktops in this pool to a group by editing the group properties, or to individual users by editing the user properties.
- Sign in as one of the users using a cluster-aware Workspot Client such as the Workspot Windows Client 3.5.0 (or higher) and launch a desktop from the pool. This should work.
- Repeat with other users or by repeatedly closing the desktop and reopening it with the same user. The gateway VMs should be chosen at random. Repeat until you have seen successful sessions pass through every gateway VM in the cluster.
Note: The Gateways page is updated after a delay. A client may consume one connection (TCP) or two (TCP and UDP).

The cluster should show connected Clients and highly available status.
5. Gateway Policies

Gateway Policies.
Gateway policies allow you to use more restrictive permissions for connections coming in through an RD Gateway (and hence presumably the Internet) than users in a more controlled environment, such as your premises.
Like other Workspot policies, gateway policies are created on the “Policies > Add a New Policy” page and edited on the “Policies > policyname > Edit Policy” page.
Gateway policies override some of the utility rules for the users’ security policies. Security policies are group-dependent, but gateway policies are path-dependent. Each gateway cluster can have its own gateway policy if desired.
Gateway policies can only place restrictions on end-users. They cannot grant permissions that end-users did not already have. If a feature is disabled in the gateway policy, it is disabled for all the end-users using the gateway, regardless of whether it is enabled in their security policy. If a feature is not disabled in the gateway policy, it is enabled for end-users only if it is also enabled in their security policy.
A gateway policy allows you to disable functions in the Workspot desktops and apps, as follows:
- Disable printing: Workspot desktops/apps will not print to Client-side printers.
- Disable copy and paste: Workspot desktops/apps will not copy or paste data to the Client system.
- Disallow local drive: Data cannot be transferred from Workspot desktops/apps to Client-side drives or vice versa.
- Disable port redirection: Ports on the Workspot desktop/app cannot be redirected to the Client system. (Typical uses are for access to LPT: or COM: ports on the local system.)
- Disable plug-and-play: Plug-and-play devices cannot be redirected to the Client system. “Plug-and-play” has its usual Remote Desktop definition.
6. Related Documents
- The Workspot Gateway Agent.
- Workspot Compatibility Matrices.
- Internet Firewalls and Workspot.
- Workspot Managed Gateways and Zero-Trust Control Model.
- Benefits of Using Public Cloud Gateways over Private Cloud Gateways.
- Q&A: What Ciphers are Used for the Virtual Session and How are They Enforced?
- Workspot Components and Anti-Virus Exclusion.
© 2020-2024 Workspot