

Workspot Client for the Web (“WebApp Client”)
Last updated April 23, 2024, by Robert Plamondon
Workspot Client for the Web (also called the "Web Client" and sometimes the "WebApp Client"), allows users to access their Workspot desktops from a browser without having to install a stand-alone Client application. Implemented as a progressive Web app (PWA), the Web Client is downloaded and run automatically in your browser. It is a true Workspot Client that uses the same protocols as native Workspot Clients.
This document describes how to use the Web Client and provides information about recent updates.
Overview
- A true Workspot Client that runs from a Web browser.
- Uses the same network and security protocols as any other Workspot Client.
- No additional configuration is required on your Workspot gateways.
- Only one parameter to update in Workspot Control.
- Performance that rivals native Workspot Clients.
- Uses local GPU when present.
- Runs great on Chromebooks.
- External Chromebook monitor is supported.
- Use on systems such as Chromebooks where installing a native Workspot Client is impossible or inconvenient.
- No installation is required: Just enter the URL.
- Both production and beta URLs are available.
- Always uses the latest release.
Recent and Upcoming Release Highlights
Current Release
- Current Production version: Release 4.5.0.
- Current Beta version: Release 4.5.0.
Release 4.5.0
- The Client now reports information about its network adapter and IP settings to Control.
- The auto-reconnect settings in the Protocol Policy (if any) are now honored.
Release 4.4.0
- Bug fixes.
Release 4.3.1
- Added support for the Chromium browser on IGEL.
Release 4.3.0
- Improved reconnect logic when the current gateway fails and an alternate gateway is available.
- Improved reconnect logic after closing and reopening the lid on a laptop or Chromebook and causing a sleep/wake cycle.
Release 4.2.0
- Bug fixes and backend enhancements.
Release 4.1.0
- The Display Settings options have been simplified.
- Automatic reconnect works smoothly in more network failure cases.
Release 4.0.0
- Users are now warned that they are using an unsupported browser and given the option to continue (if the browser isn’t known to be unusable with the Web Client). This can be useful as a method of last resort. Users should not rely on unsupported browsers routinely.
- User Surveys are now supported for Cloud Applications in addition to desktops.
Tested Browsers
Workspot Client for the Web supports the browsers listed below. The listed versions were recently tested:
Chromebook
- Chrome 121.0.6167.188
IGEL
- Chromium 119.0.6045.159
Mac
- Chrome 121.0.6167.85
Windows
- Chrome 121.0.6167.161
- Microsoft Edge 121.0.2277.128
Other
- Other browsers may also work. Use at your own risk.
Client System Requirements
Mac and Windows
- Memory: At least 4 GB of RAM (all operating systems).
- Processor: At least dual-core (all operating systems).
Chromebooks
- 8 GB RAM recommended (4 GB minimum).
- 2.0 GHz, 2-core/4-thread CPU recommended (1.6 GHz, 2-core/2-thread CPU minimum).
Gateway Requirements
- Supported on connections using a Workspot Managed Gateway.
Configuration in Workspot Control
Configuration is simple:
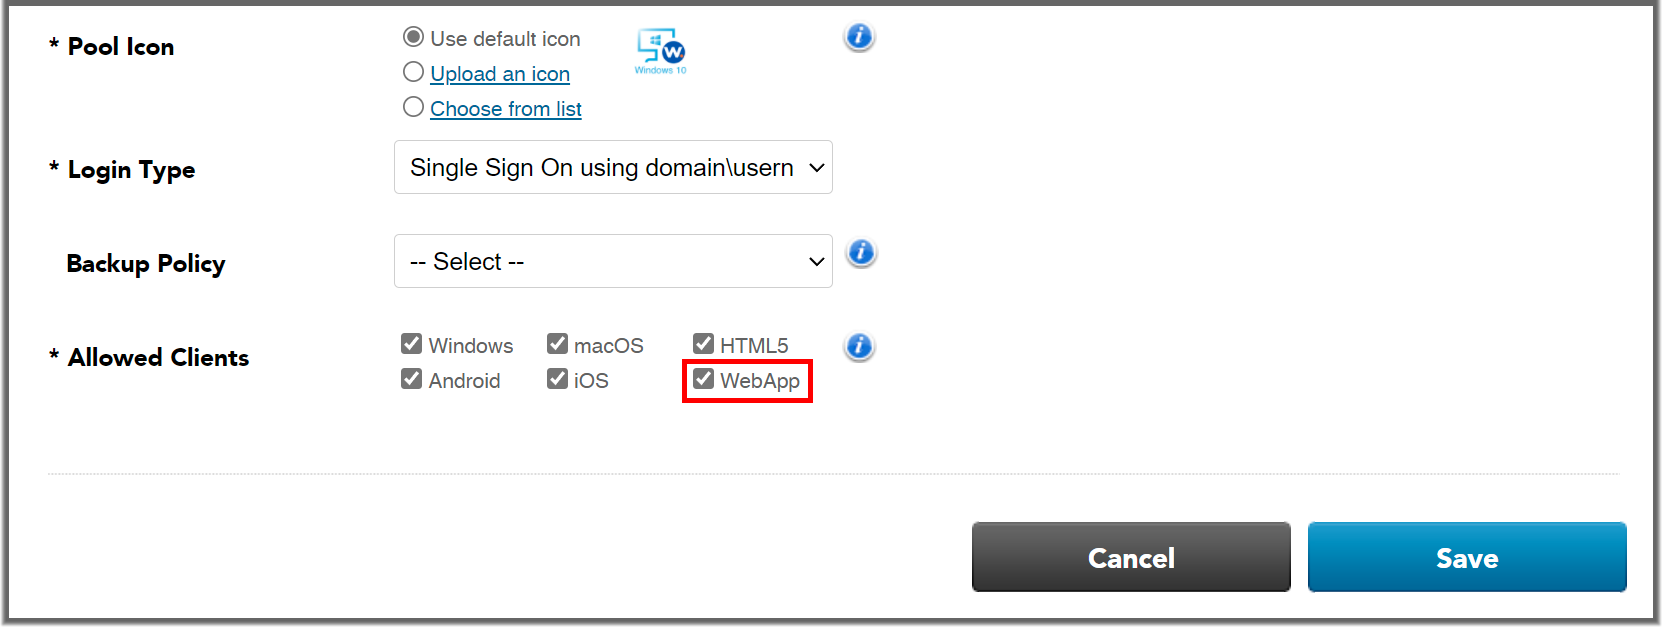
- In Workspot Control, verify that your individual desktop pools show "WebApp" in the list of allowed Clients in "Resources > VDI Pools > poolname > Action Menu > Edit."
- Enable the "WebApp" checkbox for every pool that you want to be accessible via the Web Client.
Note: Unlike the Workspot Windows, Mac, Android, and iOS Clients, the Web Client is disabled by default. You must enable it manually for every pool.
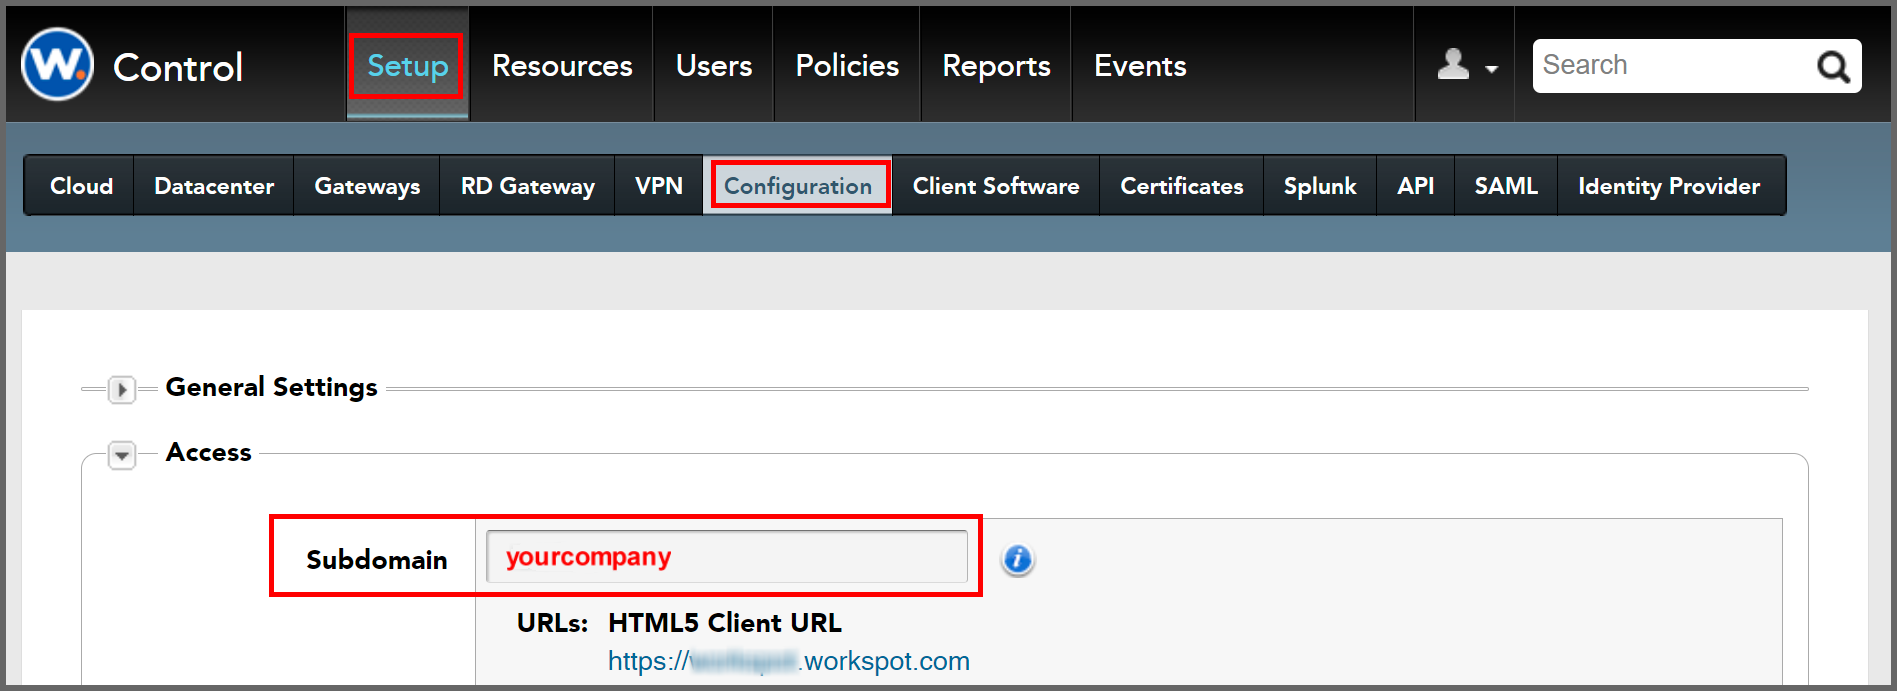
- Also in Control, note the "subdomain" field in "Setup > Configuration > Access > Subdomain." This is usually your company name or something like it. This string makes up part of the URL when accessing the Web Client.
Configuration in Virtual Machines
A bug that causes Workspot desktops or apps to show only as a blank blue screen can be avoided as follows by making the following changes in Group Policies:
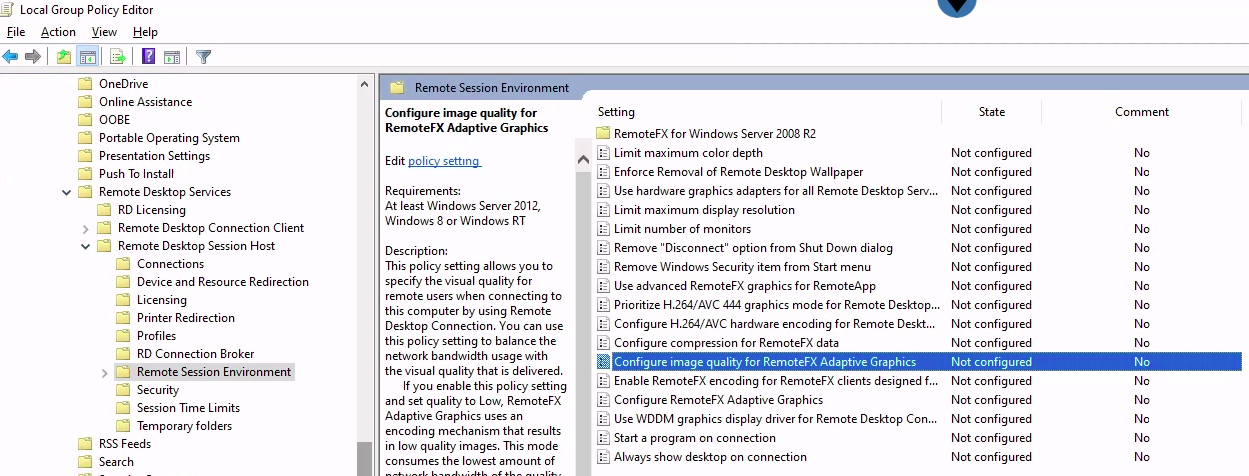
- On the Workspot desktops, set “Administrative Templates > Windows Components > Remote Desktops Services > Remote Desktop Session Host > Remote Session Environment > Configure image quality for RemoteFX Adaptive Graphics” to “Not Configured” (the default).
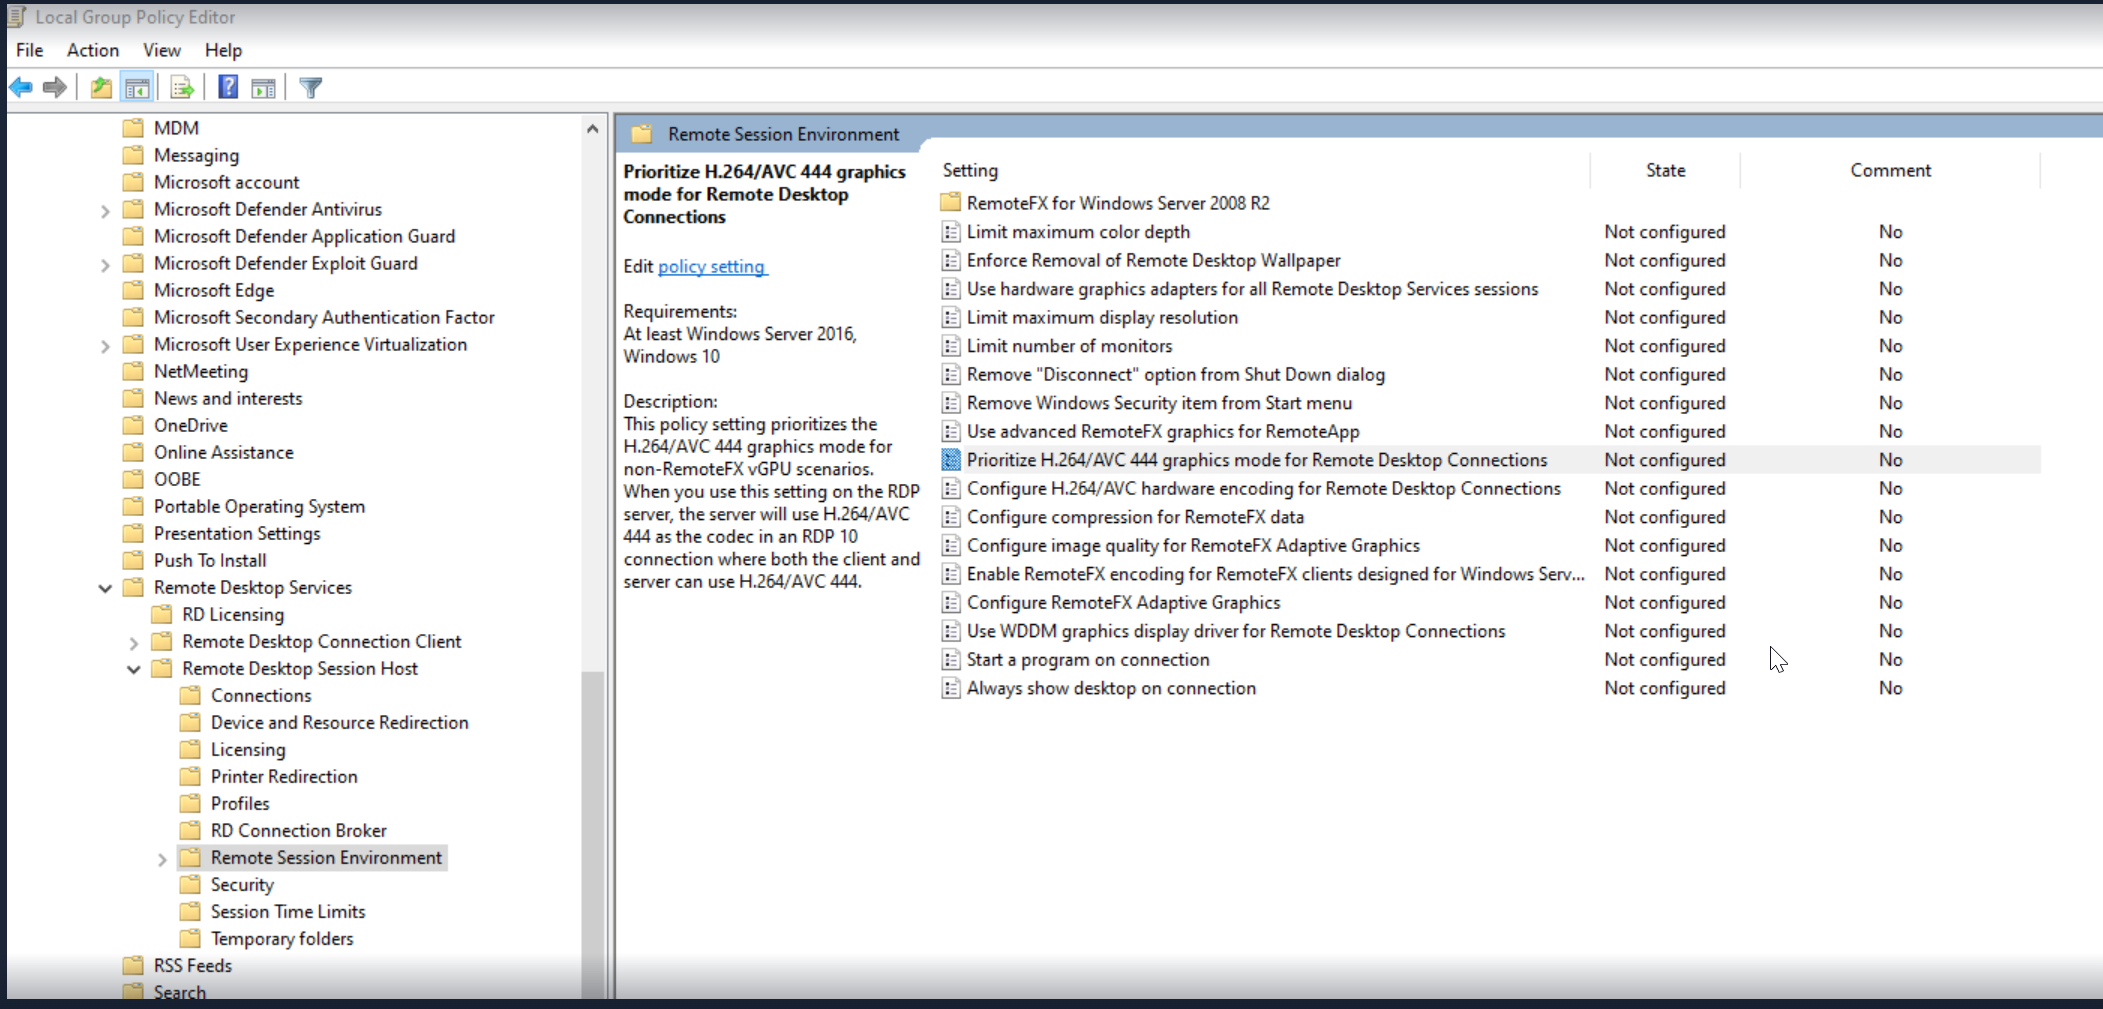
- On Workspot RD Servers, set et “Administrative Templates > Windows Components > Remote Desktops Services > Remote Desktop Session Host > Remote Session Environment > Prioritize H.264/AVC 444 graphics mode for Remote Desktop Connection” to “Not Configured” (the default).
Using Workspot Client for the Web
Signing In
- In a supported browser (currently Chrome and Edge), enter the URL https://web.workspot.com/subdomain.
- To use the beta version, enter the URL https://betaweb.workspot.com/subdomain. This will give you either the latest beta or the current production version, whichever is newer.
- The value of subdomain was described above.
- For example, if your subdomain is listed in Control as "acme-anvils," the URL is https://web.workspot.com/acme-anvils.
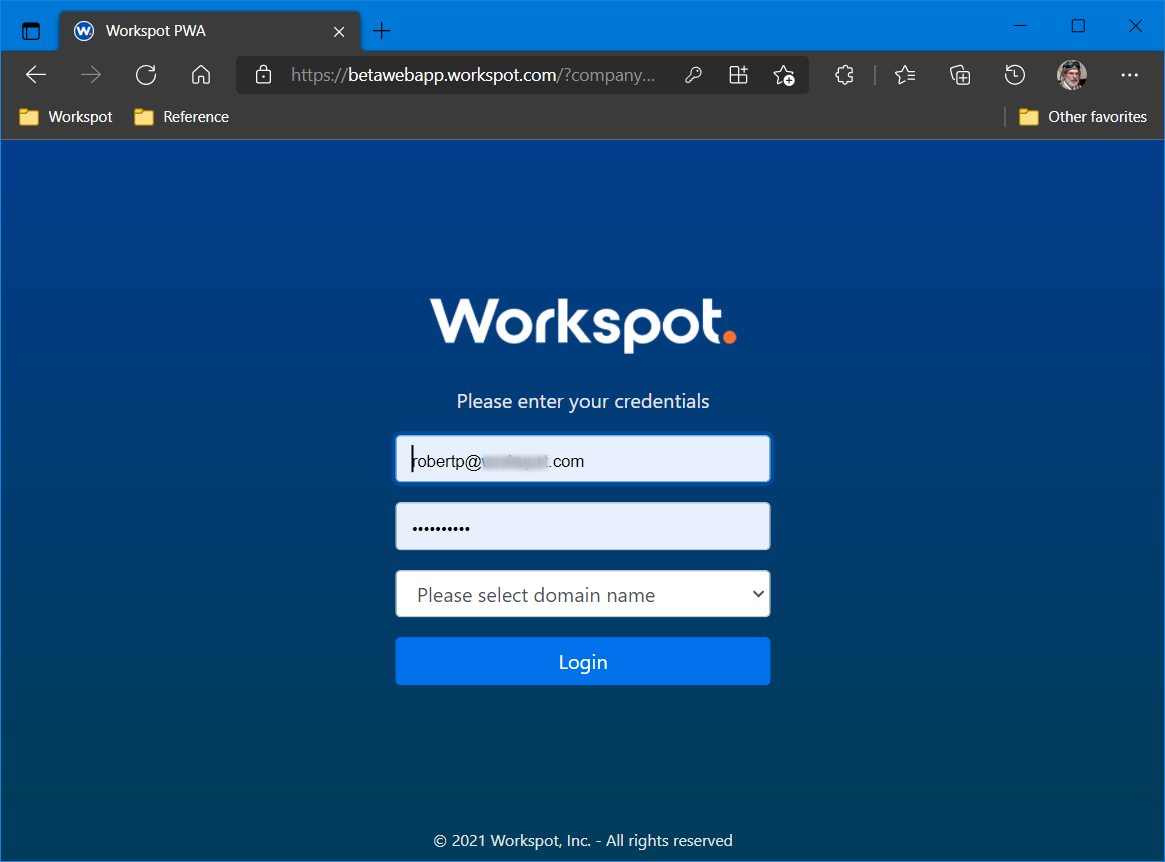
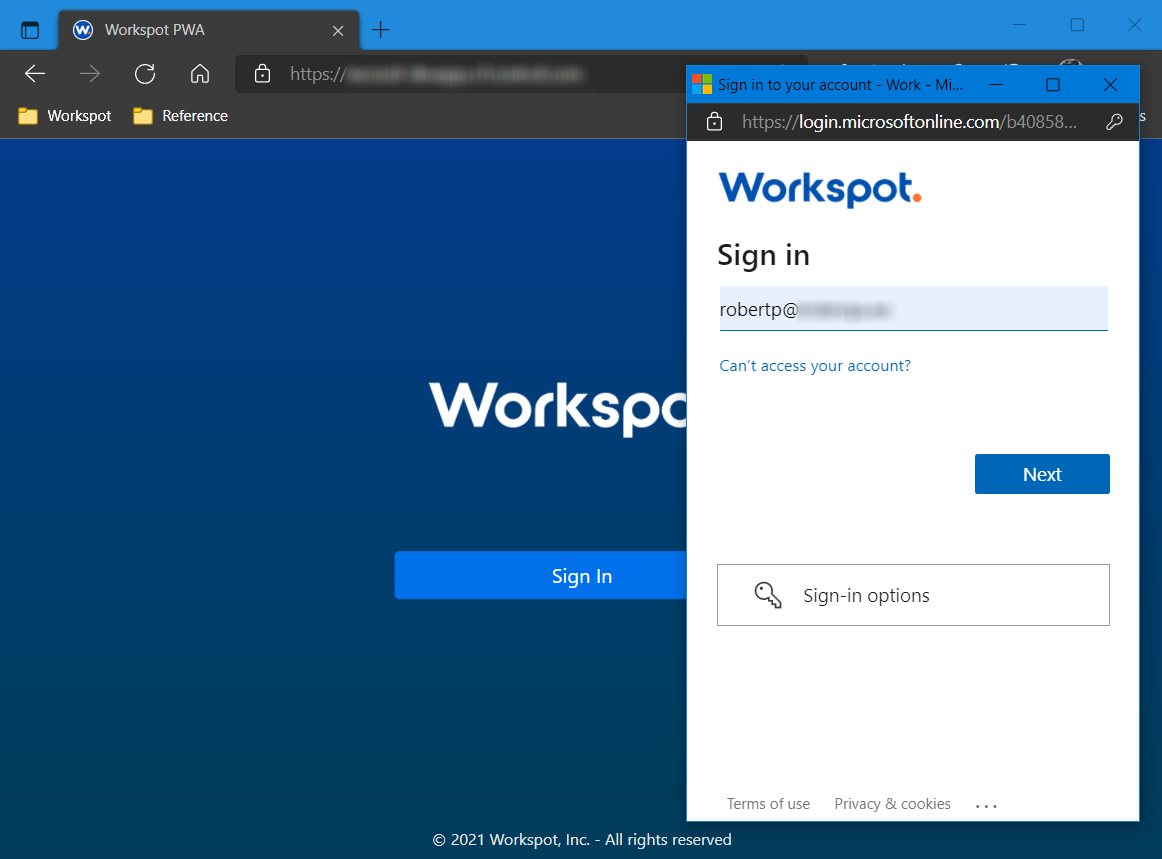
- You will see either a sign-in screen like the one below, or an Azure AD sign-in popup, depending on how you have configured Workspot Client sign-in in Workspot Control.
- On Azure AD deployments, if you see the Workspot page but not the Microsoft Login popup, you may need to disable popup blocking on the URL.
- On Azure AD deployments, if you see the Workspot page but not the Microsoft Login popup, you may need to disable popup blocking on the URL.
- When the user signs in, they are presented with their Client dashboard, as with any other Workspot Client (unless autolaunch is enabled: see below).
Launching Workspot Desktops and Apps
Normal Launch
- To launch a desktop or app, click its icon and then follow the sign-in prompts.
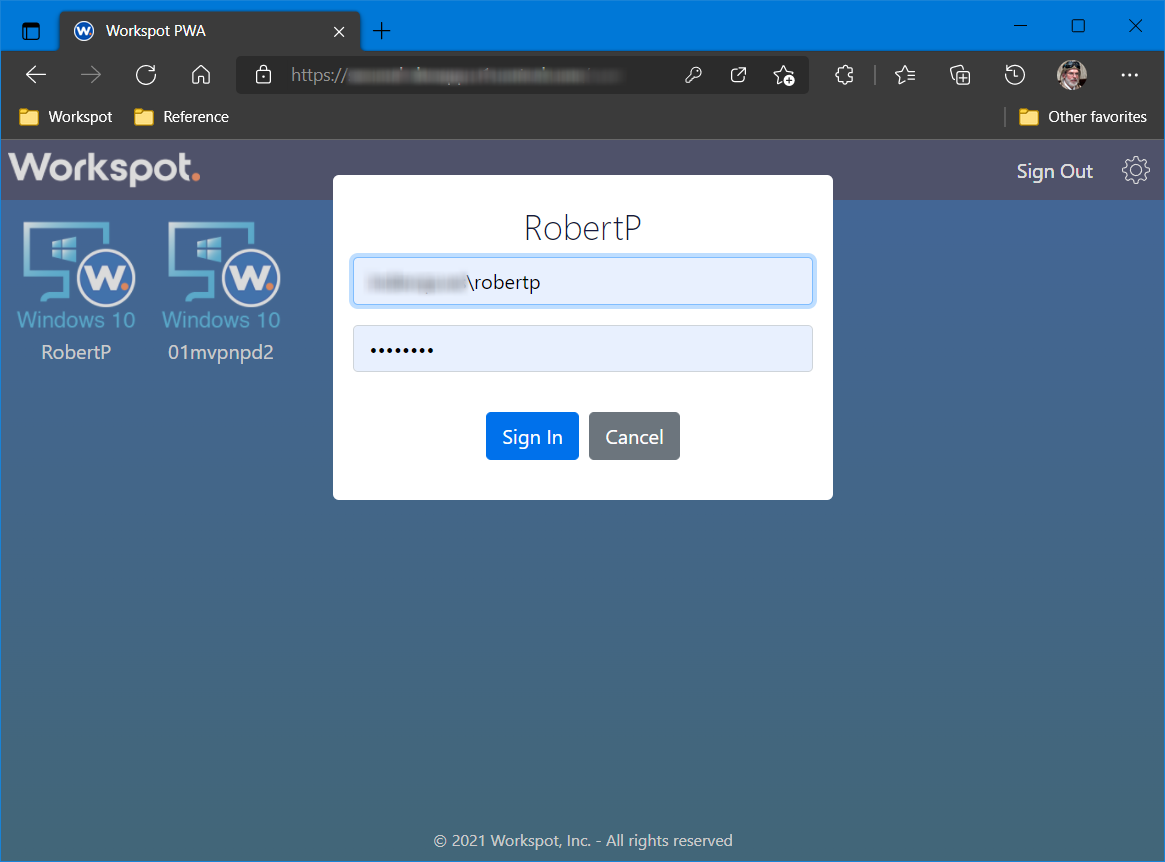
- The selected desktop or app will appear.

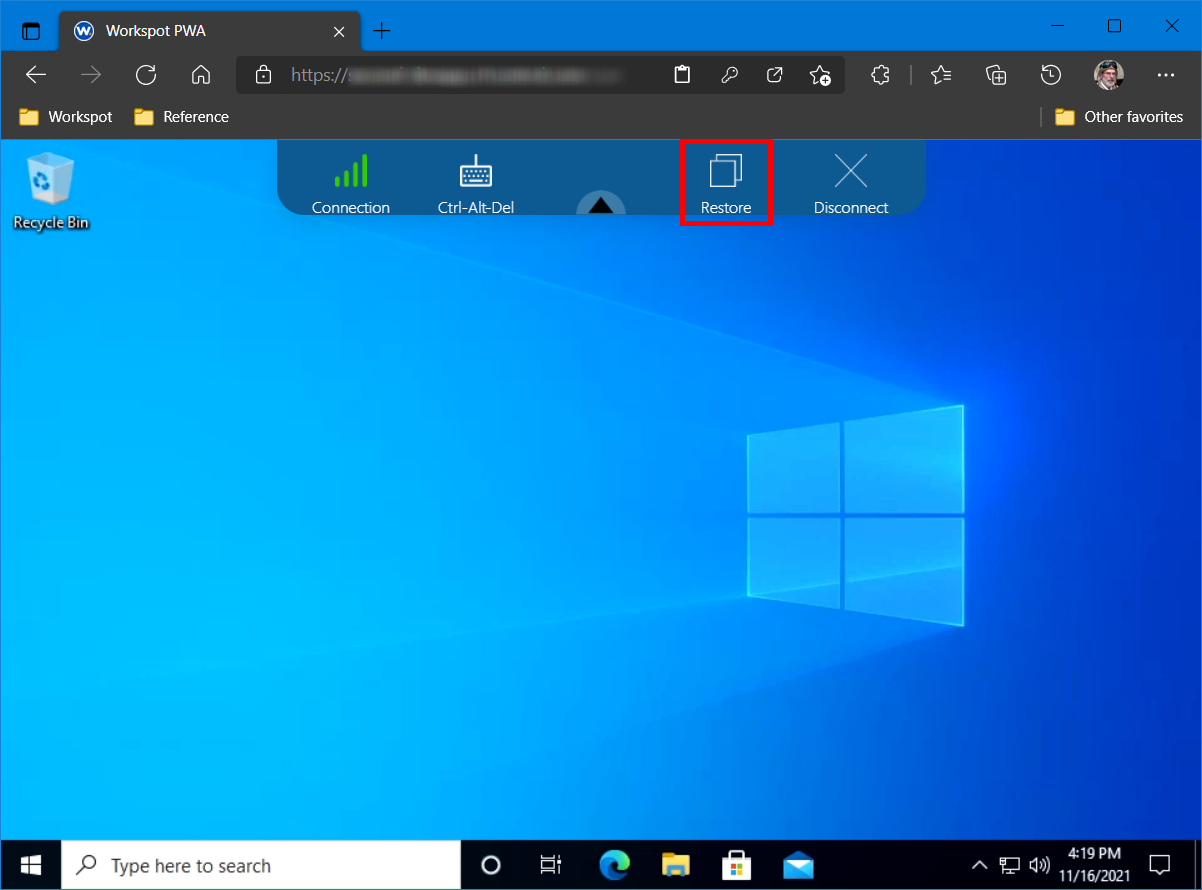
The Client toolbar is at the top of the screen. Clicking it shows the available options. You can also move it left or right if it’s in the way. Here are examples of the tool bar when closed and when open:


Autolaunch
Note: Autolaunch is not generally recommended.
If autolaunch is enabled, the Client dashboard is hidden and the user is connected immediately to the sign-in dialog of their desktop or app. This only works if the user is entitled to exactly one desktop or app. Otherwise, the Client dashboard is displayed normally.
Autolaunch is disabled by default in Control. It can be enabled in the "Utility Rules" section of the user's Security Policy.
Because autolaunch skips the client dashboard, it conceals the Settings and Sign-Out controls there. To reach the Client dashboard, cancel the automatic connection or disconnect.
Auto-launch can be disabled with the "autolaunch=no" URL option. For example, https://web.workspot.com/subdomain?autolaunch=no.
Display Modes
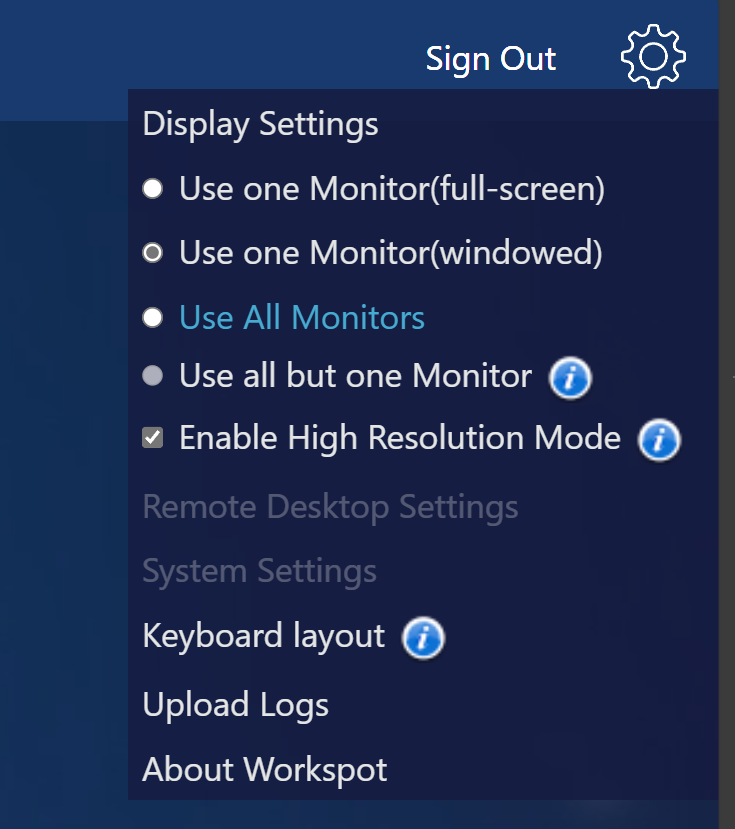
By default, the desktop session is launched in full-screen mode. To change this default, go to the Settings (gear) menu on the Client dashboard and deselect "Full Screen Session."
Multiple Monitors
By default, the desktop session uses only a single monitor, either in the browser window or full-screen. To use more monitors with your Workspot desktop, select the "Use All Monitors" setting. Multiple monitors require full-screen mode.
- Use All Monitors: every monitor on your local device is used by your Workspot desktop (or app).
- Use all but one Monitor: every monitor except one on your local device is used by your Workspot desktop (or app). The remaining monitor is available for local use. This monitor is the rightmost or the bottommost monitor, depending on your monitor arrangement.
- Switching between windowed and full-screen mode works, but going to windowed mode leaves you with just one window. The contents of all your Workspot monitors are moved to this surviving window. Switching back to full-screen mode restores all your monitors but doesn’t move the contents back.
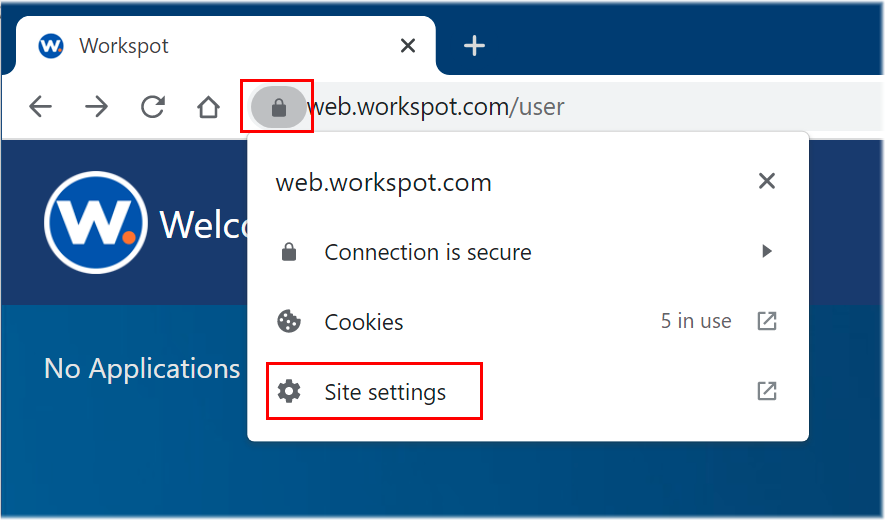
Enabling multiple monitors. Your browser will probably ask if you want to allow the Client to create and position windows. Allow this. (If you don't, your desktop won't work even on your primary monitor.)
If you deny window placement or popups, you can correct it from the padlock icon on the browser's URL bar. Edge is shown below, then Chrome:
Windowed mode. When not running in full-screen mode, the desktop appears in the same browser window or tab as the Client dashboard.
- The browser window can be resized up or down normally.
- The options menu at the top of the window allows you to enter and exit full-screen mode.
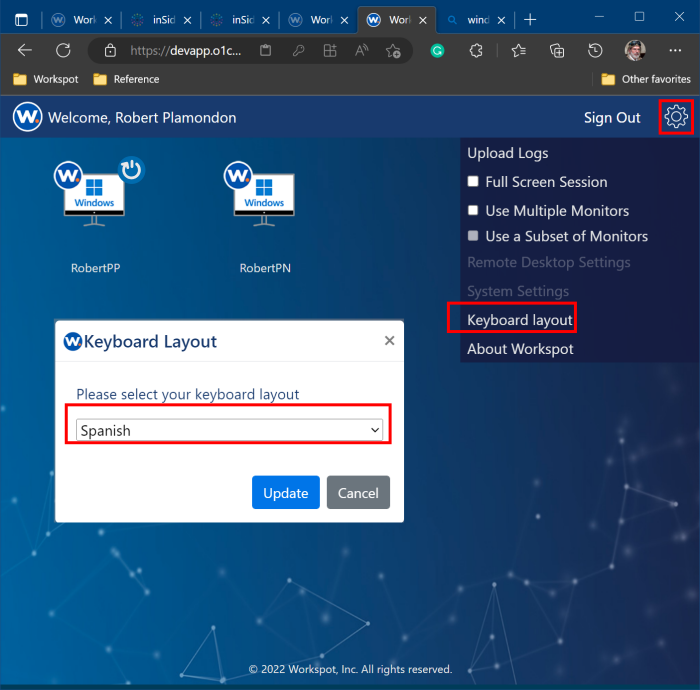
Keyboard Language Support
You can select your local keyboard type from the “Settings” (gear) menu. This informs your remote Workspot desktops and apps will use the same layout automatically.
Changes to your keyboard selection will not take place until the next time you sign out and then sign in to your Workspot desktop. (Note that signing in isn’t the same as reconnecting to the same session.)
Limitations of Keyboard Mapping
Keyboard selection works best when the local device is a Windows system, because it tells the remote devices that you are using a Windows keyboard with the specified layout.
The keyboards on a Chromebook, MacBook, etc. do not map perfectly to Windows. Typically, some keys present on a Windows keyboard are missing on other platforms. In addition, the Windows keyboard layout may differ from that of other vendors for the same language and region.
This issue exists with all software that connects to a remote Windows device, not just with Workspot. The same alternate keypresses that work elsewhere also work with Workspot.
Chromebook Key Mapping
- The "Search" key on a Chromebook now functions as the "Windows" key when you are connected to your Workspot desktop. (Chromebooks do not support the "Windows" key directly.)
- When you use a full-sized external keyboard on a Chromebook, the numeric keypad now works consistently; however, it is always in numeric mode, ignoring the Num Lock key. This is due to inherent limitations in the ChromeOS keyboard architecture.
- On Chromebooks, the state of the Caps Lock key remains consistent across the Chromebook and the Workspot desktop. On Chromebooks, the state of the Caps Lock key remains consistent across the Chromebook and the Workspot desktop.
Troubleshooting Keyboard Mapping
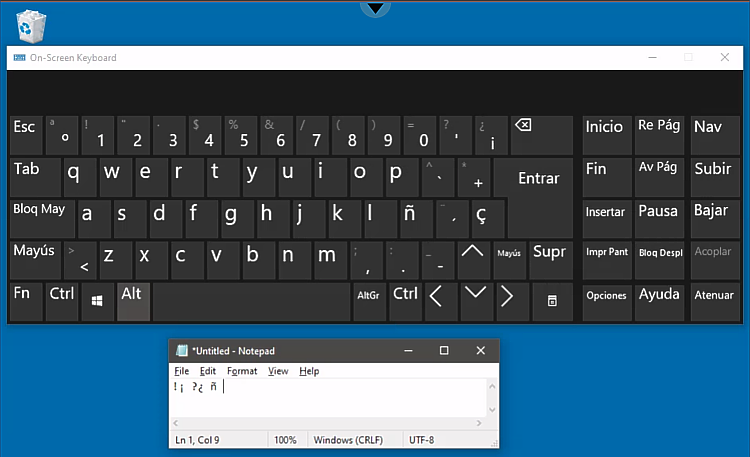
To test your settings, launch the On-Screen Keyboard (osk.exe) utility on your Workspot desktop and verify that the keyboard has the keys you expected. Then open up Notepad.exe and verify that the keys on your local keyboard are interpreted correctly by the remote Workspot desktop.
Client-Side Printing
On your Workspot Windows desktop, the applications' Print dialogs will list "Workspot Remote Printing" as a printer. When you select this printer and print a document, the data is transferred to the local (Client) device.
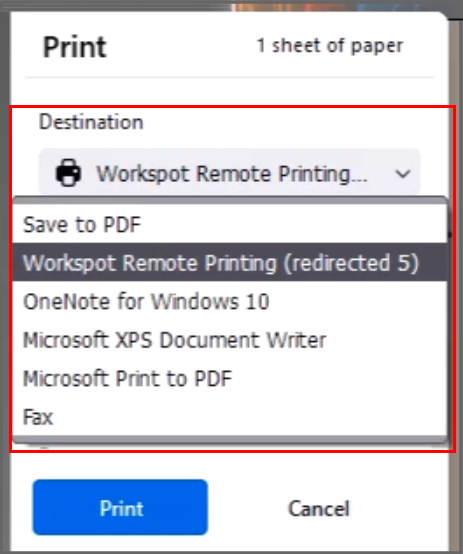
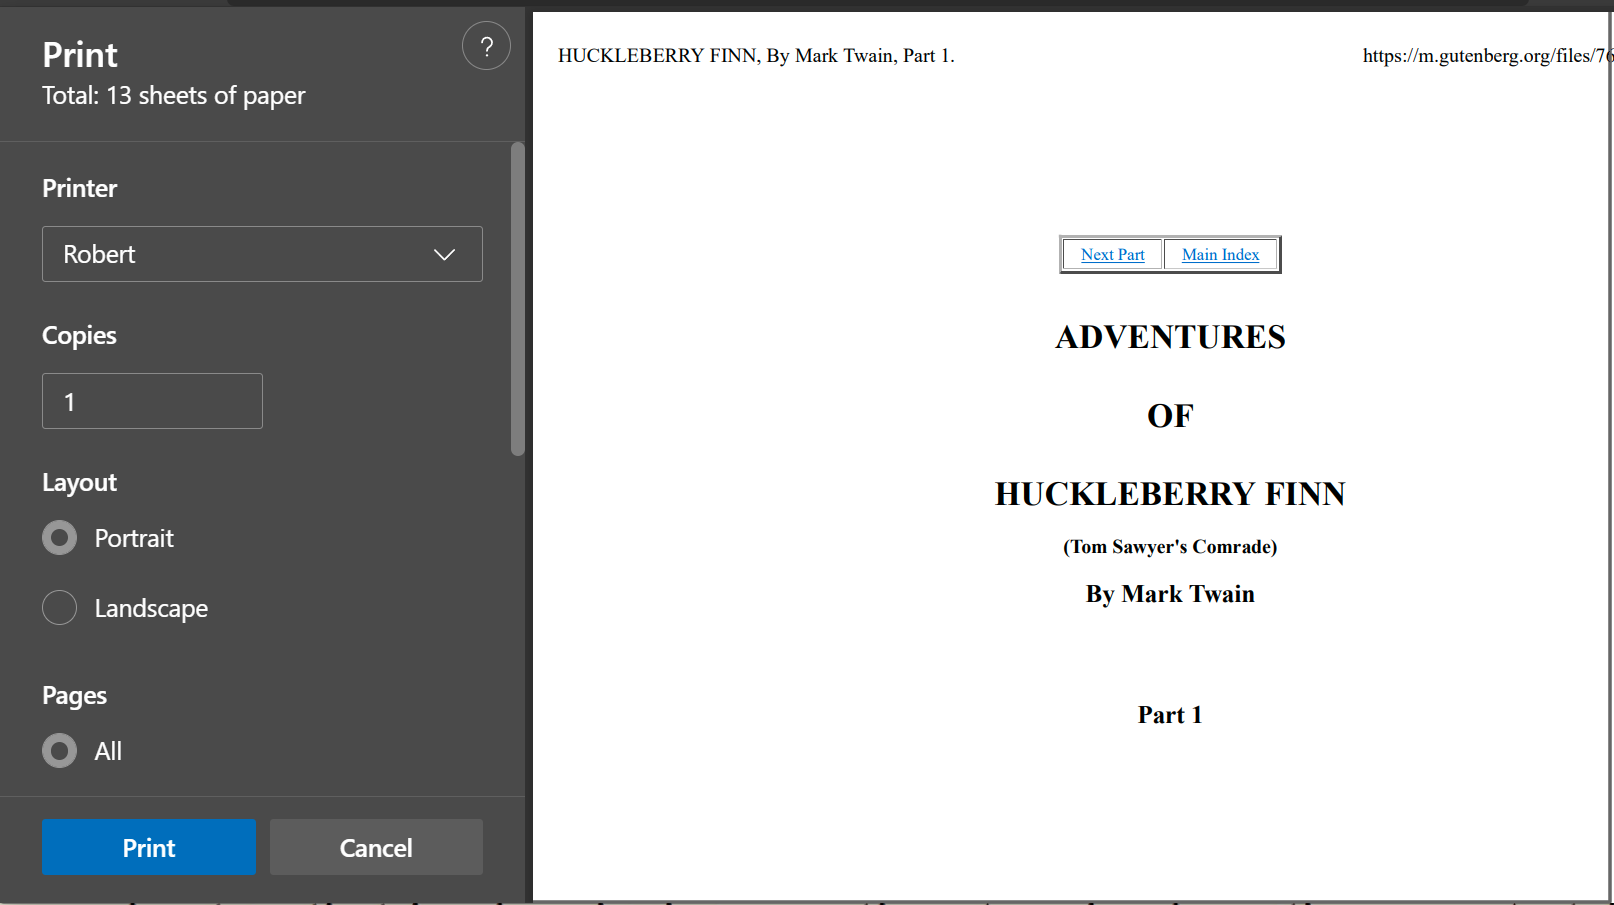
During the transfer, you will see a "Preparing file to print" popup. Once the transfer is complete, your browser displays a local print dialog. Select the desired printer (or save to PDF), select the desired local print options, and press "Print."
Note: If the Client is in full-screen mode, printing to Workspot Remote Printing returns you to windowed mode. Once you exit the local Print dialog, you can return to full-screen mode if desired.
Note: The file is converted to PDF before being transferred to the Client device. This is usually trouble-free but may not be appropriate for high-end tasks like prepress work.
General USB Redirection
Many USB devices on the local device can be used by the Workspot desktop or app through redirection (specifically, RDP device redirection). This occurs automatically for keyboards, mice, and audio devices but must be configured explicitly for other devices, such as scanners.
Note: General USB redirection is currently only supported on Chromebooks.
Limitations
- Many devices cannot be redirected, especially those that are redirected automatically.
- A driver for the local device must be present on the remote system before it can be used.
Procedure
To redirect a USB peripheral on your local device:
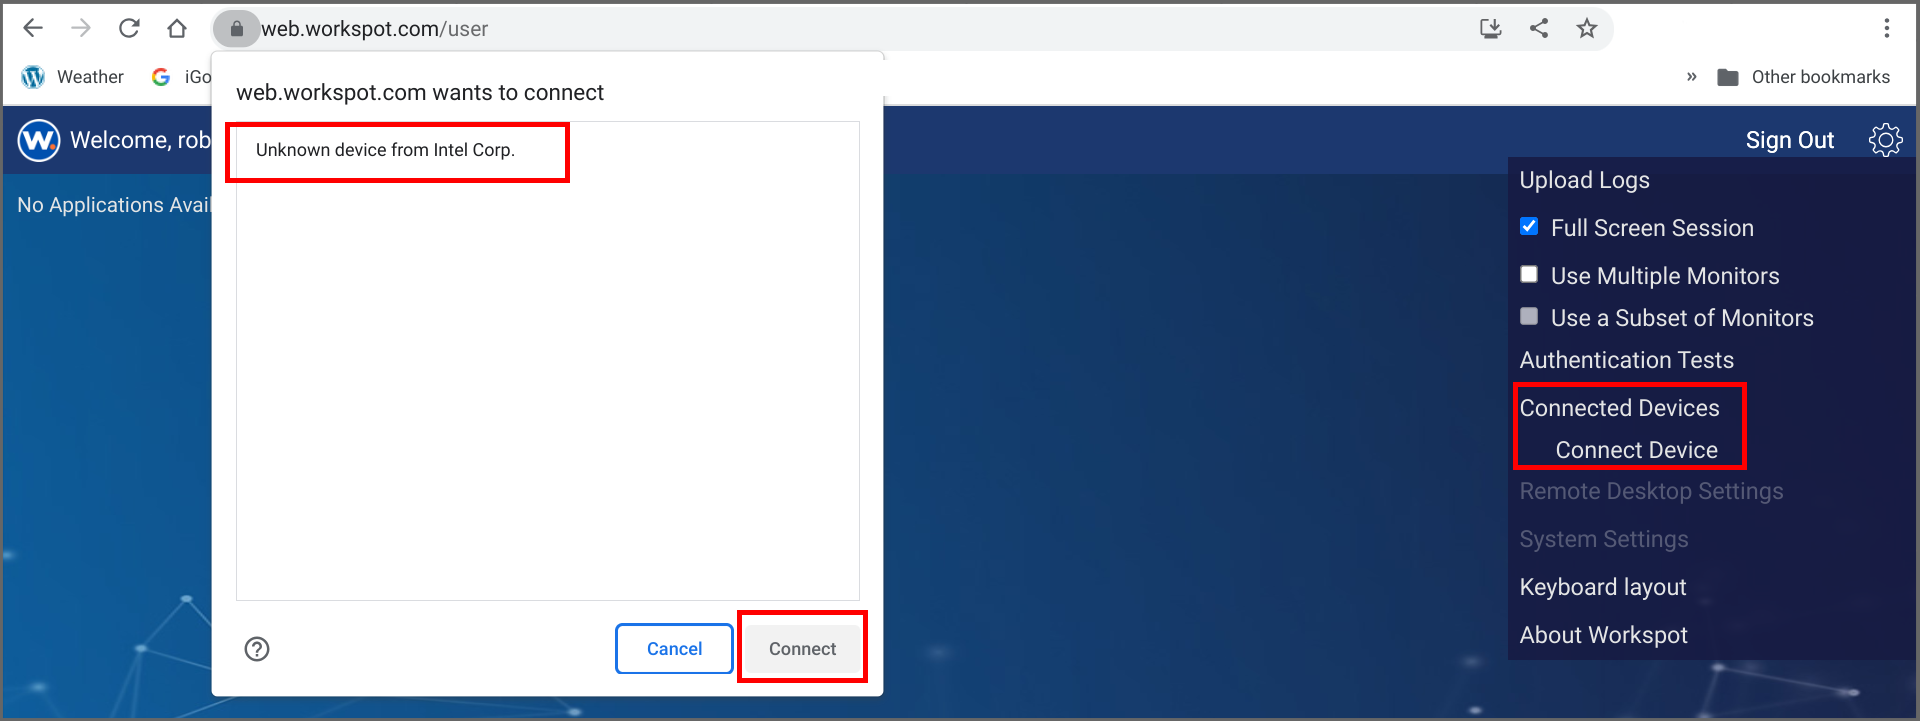
- Go to the “Setup” (gear) icon in the Workspot Web Client.
- Select “Setup > Connected Devices > Connect Device.”
- A popup will appear in the URL bar of the browser, saying “web.workspot.com wants to connect,” followed by a list of available devices.
- Select a device.
- Click “Connect.”
- Sign into your Workspot desktop or app and configure and use the device as usual.
Other Features
From the Settings (gear) menu, you can also:
- Upload Logs. This sends diagnostic logs to Workspot.
- View the "About Workspot" page. This displays the current version and build numbers and links to the list of patents involved in the product.
Limitations
- Not supported with Cloud Applications.
- Only supported for connections through a Workspot Managed Gateway.
- Local webcam and microphone redirection are not yet supported, preventing the user from participating in applications like Zoom or Teams running on their Workspot desktops.
- User self-registration is not currently supported. That is, a user who has never signed into Workspot before cannot have their Workspot desktops/apps enabled via the Web Client. Workaround: Sign in once from the Workspot Windows, Mac, Android, or iOS Client or have an IT Administrator create the Workspot account manually.
- Copy/paste into and out of the Workspot desktop supports only plain-text mode.
Known Issues
- Multimonitor setups that use three or more monitors in a vertical stack do not work when the Web Client is run via Google Chrome on a Mac.
- In windowed mode, mouse accuracy is poor when the browser's zoom is set to anything other than 100%
- Multi-monitor operation is not supported by the Chromium browser used in the iGEL OS version11.07.110.01.
- The selected menu item on the Workspot Windows desktop is not highlighted when the Web Client is run on Google Chrome on Windows or Chromebooks. This problem is not seen when the Workspot Windows desktop is set to Dark Mode. Workarounds: Use Dark Mode on the Workspot desktops or use a different browser on the Client device.
- For non-persistent desktop pools, the Web Client is supposed to verify which desktop to use with Control when opening a new connection. Currently, the Client is caching information from the previous session and will attempt to connect to the previous desktop even if Control has marked it as "Failed."
- The minimum supported resolution for the remote desktop is 640x480 pixels, but when run in a browser window, the Client's viewport can be sized smaller than this. Scroll bars are applied whenever the viewport falls below 550x550 pixels.
- When run on a non-Windows platform, auto-reconnect doesn't work. Workaround: Click the desktop icon to reconnect.
- The Web Client becomes unresponsive after being left idle for 15-20 minutes. Workaround: Refresh the browser window.
Troubleshooting
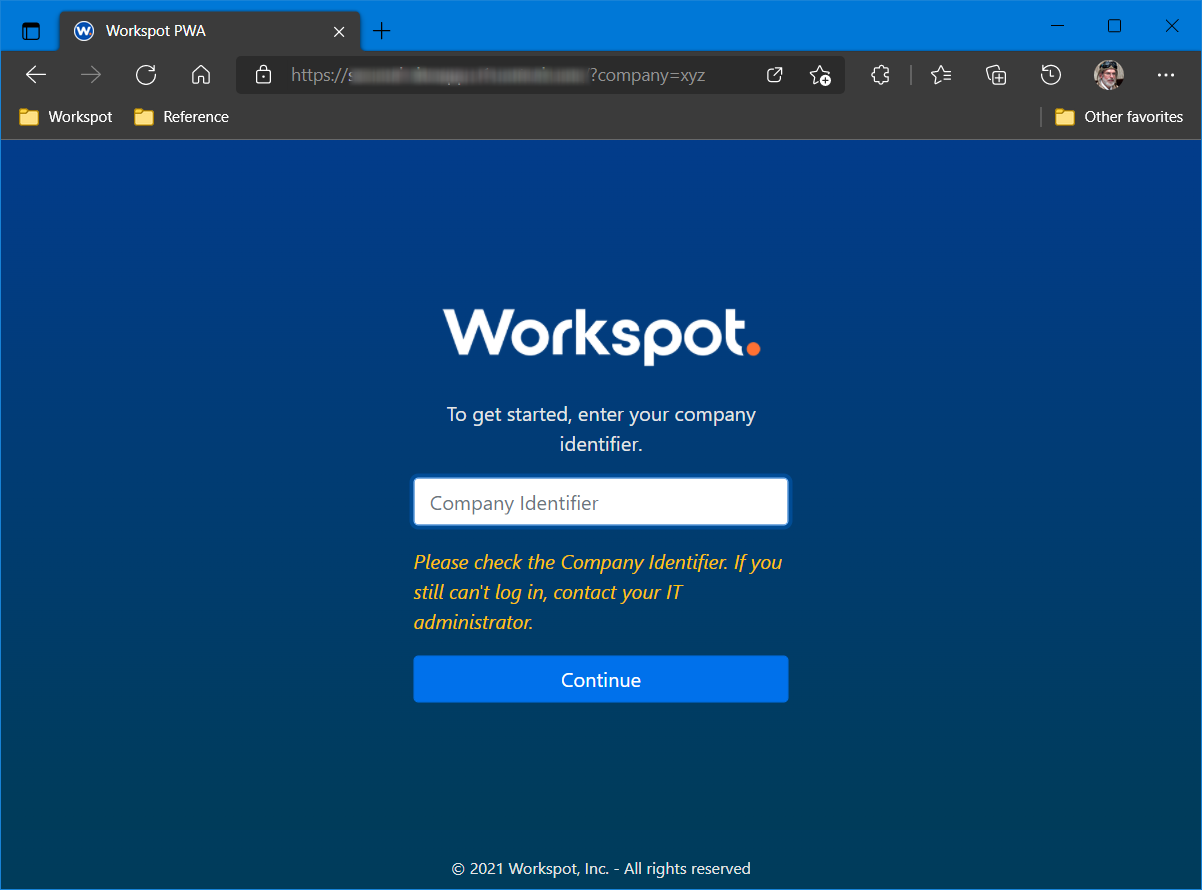
Company Identifier Prompt
If you omit or mistype the subdomain value in the URL, you will see the screen below. Type the correct subdomain value in the "company identifier" field and log in as normal.
Incognito Mode
When the user is not able to access their Workspot resources from the Web Client, try Incognito/Private Window mode in the browser. If they are able to connect when in Incognito Mode, they should user their browser’s semi-nondestructive “Reset” option and try again in a normal browser session. (We don not recommend Incognito Mode with the Client in general, just for this one troubleshooting test.)
- Reset Edge settings to default: Click the menu icon (three horizontal dots) > Settings > Reset Settings > Restore settings to their default values > Reset
- Reset Chrome settings to default: Click here for directions.
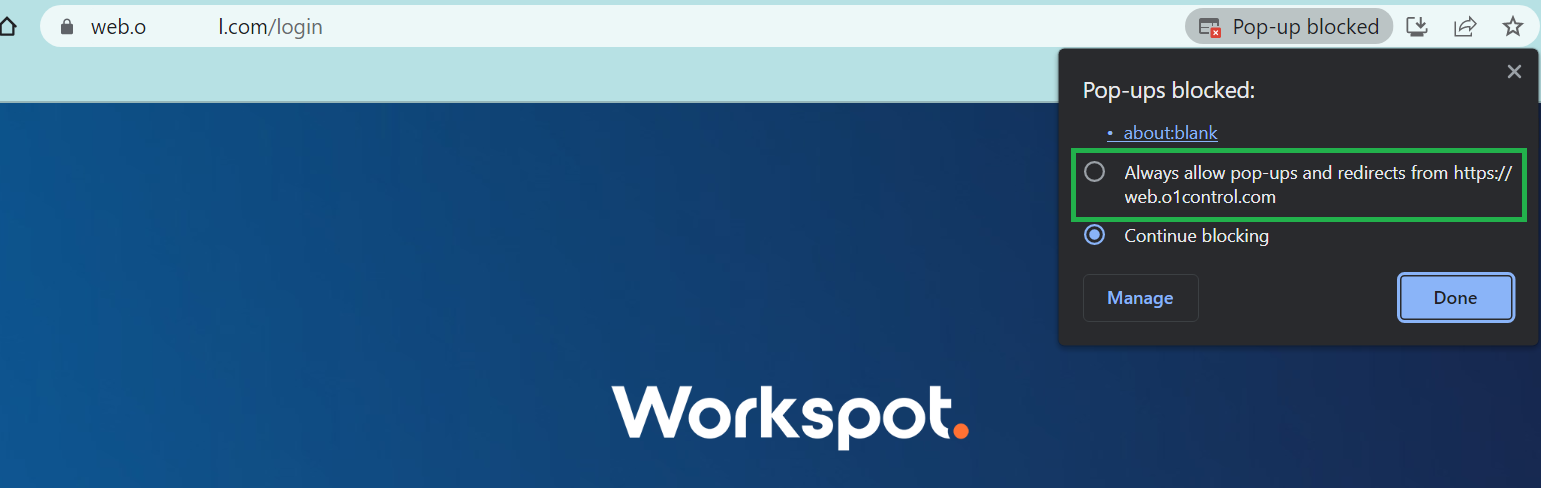
Disable Pop-up Blocker
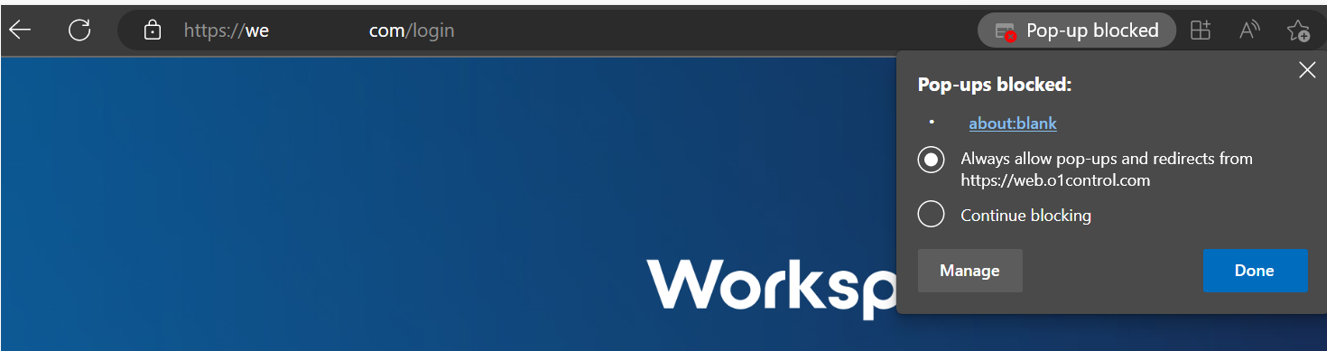
If a popup blocker is active on the the Web Client URL (https://web.workspot.com and https://betaweb.workspot.com), the user will not be able to sign in or launch their Workspot desktops/apps. The browser will give some indication that a popup has been blocked in the URL bar:

Popup and redirect blocking must be disabled for the Web Client site.
For Chrome:
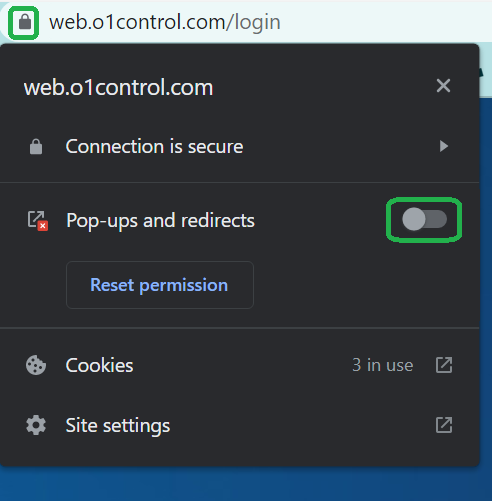
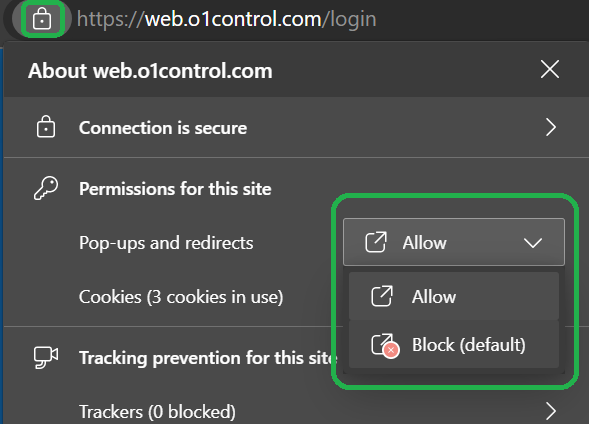
Or click on the site information lock key and enable for the site:
For Edge:
Or click on the site information lock key and Allow pop-ups and redirects for the site.
This can also be done from the page that lists all sites allowed to use popups and redirects:
- For Chrome: “Chrome > Settings > Privacy and Security > Site Settings > Pop-ups and redirects > Add site to Allowed to send pop-ups and use redirects."
- For Edge: Edge > Settings > Cookies and Site permissions > Pop-ups and redirects > Add > site to the Allow list.”
Blue Screen When Attempting to Open a Web App
Occasionally it has been noted that users may see ‘blue screens’ when attempting to log into an app in the Web Client. The resolution to this issue is to log into your RD App Server and enable Prioritize H.264/AVC 444 graphics mode for Remote Desktop Connections group policy setting.
End-users will be able to use the app after closing and reopening the Web Client.
Remember to update the corresponding template for this to become a permanent solution.
Blue Screen When Attempting to Open a Workspot Desktop
Occasionally it has been noted that users may see ‘blue screens’ when attempting to log into a Workspot Desktop from the Web Client. To fix this, sign into the desktop from another Client type (Windows or Mac Client) and make the following change to the RemoteFX Adaptive Graphics group policy setting: Set the Configure image quality for RemoteFX Adaptive Graphics to “Not configured.“
Reboot the Workspot desktop and the end-user should be able to log in from the Web Client and not receive the blue screen again.
Remember to update the corresponding template for this to become a permanent solution.
© 2024 Workspot