

Workspot Desktop Agent Installation and Configuration
Setup, Best Practices, and Use
Last updated February 12, 2024 by Robert Plamondon
Overview
The Workspot Desktop Agent is a software service that runs on Workspot template images, Workspot desktops and servers running Workspot RD Pools.
The Workspot Desktop Agent:
- Registers the virtual machine (such as Workspot desktops) with Workspot Control if it is not registered already. This registration includes the virtual machine’s IP and Ethernet addresses and everything else needed for Control and admins to identify and track every virtual machine.
- Sends status, session information, device capabilities, and performance data to Control, including who is signed in, diagnostic messages, and performance information.
- Receives information from Control, such as notifications that a new version of Agent is available or that the VM needs to shut down cleanly.
- Auto-updates itself if running on a VM in a persistent VDI Pools and RD Pools. (For VMs in non-persistent Pools, Workspot recommends upgrading to the latest Agent using the process described in this article: Control: Applying Updated Templates to Desktop Pools.)
- Optionally runs a custom startup script after each system boot.
During VM provisioning (that is, when a new desktop or RD Pool VM is cloned from a Workspot template), Agent:
- Optionally joins the VM to your AD domain, using your domain server and the credentials that you provide.
- Performs other setup tasks that you (optionally) specify. See the XML Template Configuration section.
If the Agent does not run successfully, Workspot Control is aware of the existence of the VM but lacks important information about it, and it is not available as a Workspot Desktop. Control knows its IP address, so you may be able to sign in and install, restart, or authenticate the Agent as needed.
Creating a New Workspot Template
A new Workspot Template is typically cloned from an existing Workspot template that already contains the Agent. If that isn't practical, the Agent can be installed manually.
Workspot Control offers Marketplace templates for Azure that already contain the Agent.
Note: Templates for use in the Azure cloud are Region-specific. Attempting to use a template in the wrong region results in a "virtual machine not found" error. Contact Workspot if you need to modify a template to work in a region other than the one it was created for.
See Using Workspot Templates for non-Agent-related template information and procedures.
Installing the Agent Automatically Through Inheritance
Existing templates already contain the Agent. You can simply clone the template and inherit its Agent.
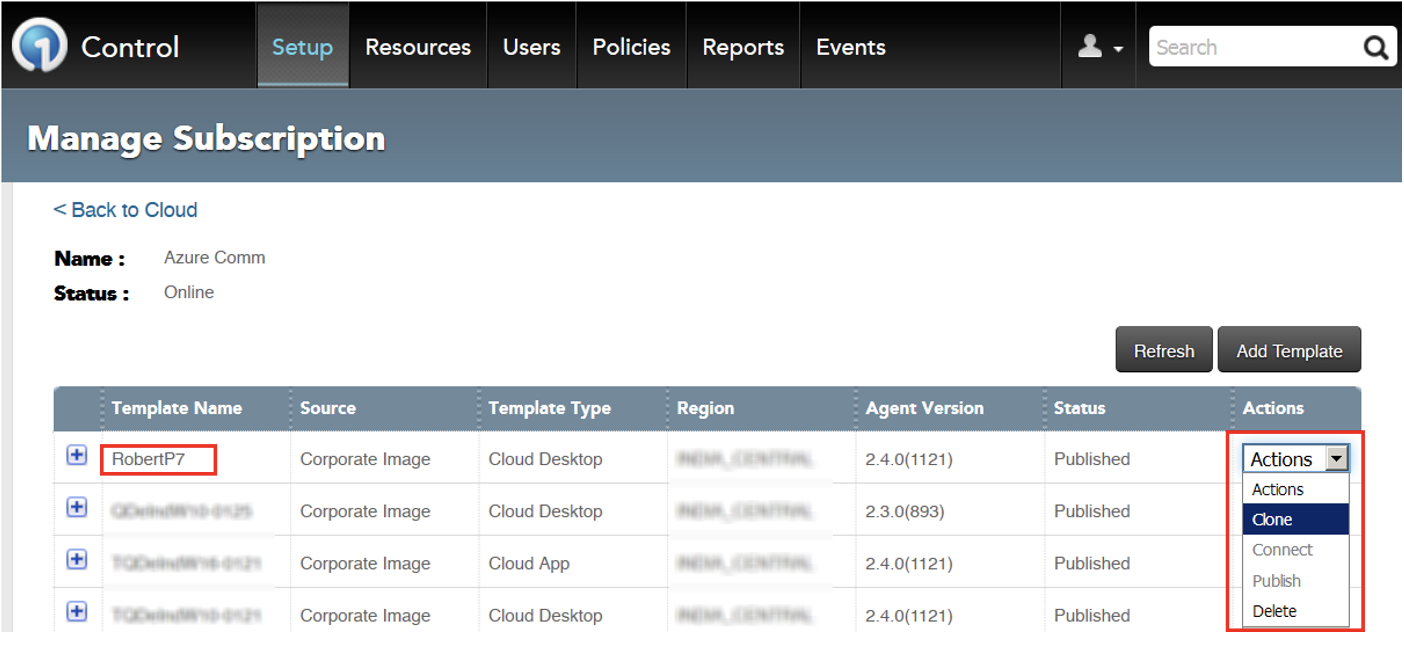
- In Workspot Control, run the clone functionality in “Setup > Subscriptions > subscription_name > old_template_name > Actions > Clone” on the old template.
- The new template will boot into Draft Mode. The Agent will auto-update itself to the latest version after it boots.
- The rest of these steps are performed on the new template.
- Remote (RDP) into the new template VM and sign in as a local administrator, using the administrator account you specified in your base template, following the instructions in section “Sign into the Template” in Using Workspot Templates.
- Customize the Agent configuration as shown in later sections.
Installing the Agent Manually
Install the Agent manually if:
- No Agent is currently installed, or
- The Agent on the parent template is earlier than version 2.4.5. These earlier versions are unable to update themselves to the latest version and will show a VM status of "Offline."
Prerequisites
-
The ability to sign into the draft-mode template VM as a Windows Administrator.
-
Windows Control Administrator account credentials (normal installation), or a Template Token from Workspot Control.
To Install the Agent Manually, follow the steps below:
1. Sign Into the Draft-Mode Template VM
Sign into the draft-mode template VM as a Windows Administrator. This is generally done via Remote Desktop Connection and (except for on-premises installations) a jump server. See the “Sign into the Template” in Using Workspot Templates.
2. Download the Agent Installer
The Agent Installer is on the Workspot download site.
- On the new template VM, open a browser and navigate to https://download.workspot.com.
- Download the Workspot Agent installer WorkspotAgentSetup.msi.
3. Choose a Registration Method
The Agent should be registered with Workspot Control as part of the installation process. This can happen in three ways:
- If the Agent has been previously installed on the VM, it is already registered.
- You can register the Agent during installation by providing the login/password of a Workspot Control administrative user.
- You can also register the Agent with a template registration token obtained from Control.
4. Run the Agent Installer
If the Agent has been previously installed on the VM, you will not need to provide Workspot credentials.
- Otherwise, the Agent needs credentials that allow it to be registered with Control. This can be done in two ways:
- Normal installation: you provide Control Administrator credentials during installation. Follow the Normal Installation procedure below.
- Token-based installation: You use a template registration token from Control. Follow the Token-Based Installation procedure below.
5. Finishing Up
In a typical installation, your template is now ready to be published and assigned to pools unless you need to customize the Agent's settings, run scripts when provisioning new VMs imaged from the template, or run a custom script on VMs after each startup.
- If you need to make any of the changes listed above, see XML Template Configuration.
- Go to "Cloud > cloudname > Actions > Publish" and publish the template.
- On the desired pools, go to "Resources > VDI Pools > poolname > Actions > Update Image." Select the updated image and when you want the update to happen.
- When at least one desktop has been updated, verify that it is running the new version of the Workspot Agent.
Normal Installation
- On the template VM, open a CMD window with Administrator privileges.
- Navigate to the folder with the Agent installer.
- Run the Agent Installer with the command:
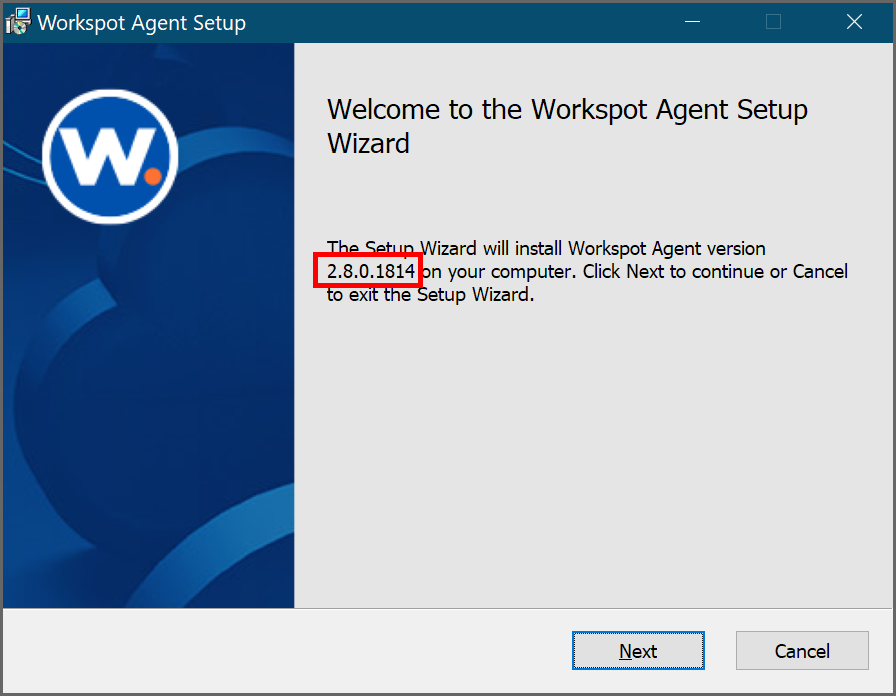
- On the "Welcome" screen, verify that the release version of the Workspot Agent is what you expected.
- Follow the prompts.
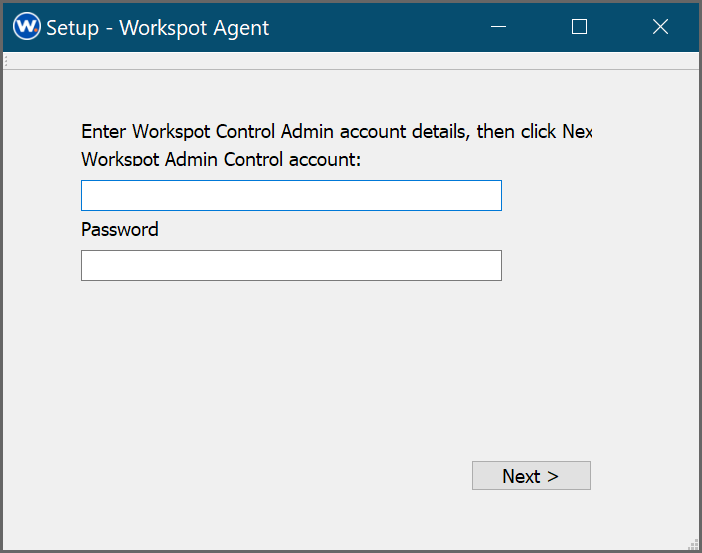
- On the credentials screen, enter your Workspot Control Administrator login credentials to register the Agent with Workspot Control.
Token-Based Installation
- On the template VM, open a CMD window with Administrator privileges.
- Navigate to the folder with the Agent installer.
- Run the Agent Installer in quiet mode. This will suppress all prompts, including the prompt for Control credentials. Use the command:
- Sign into Workspot Control as a user with Administrator privileges.
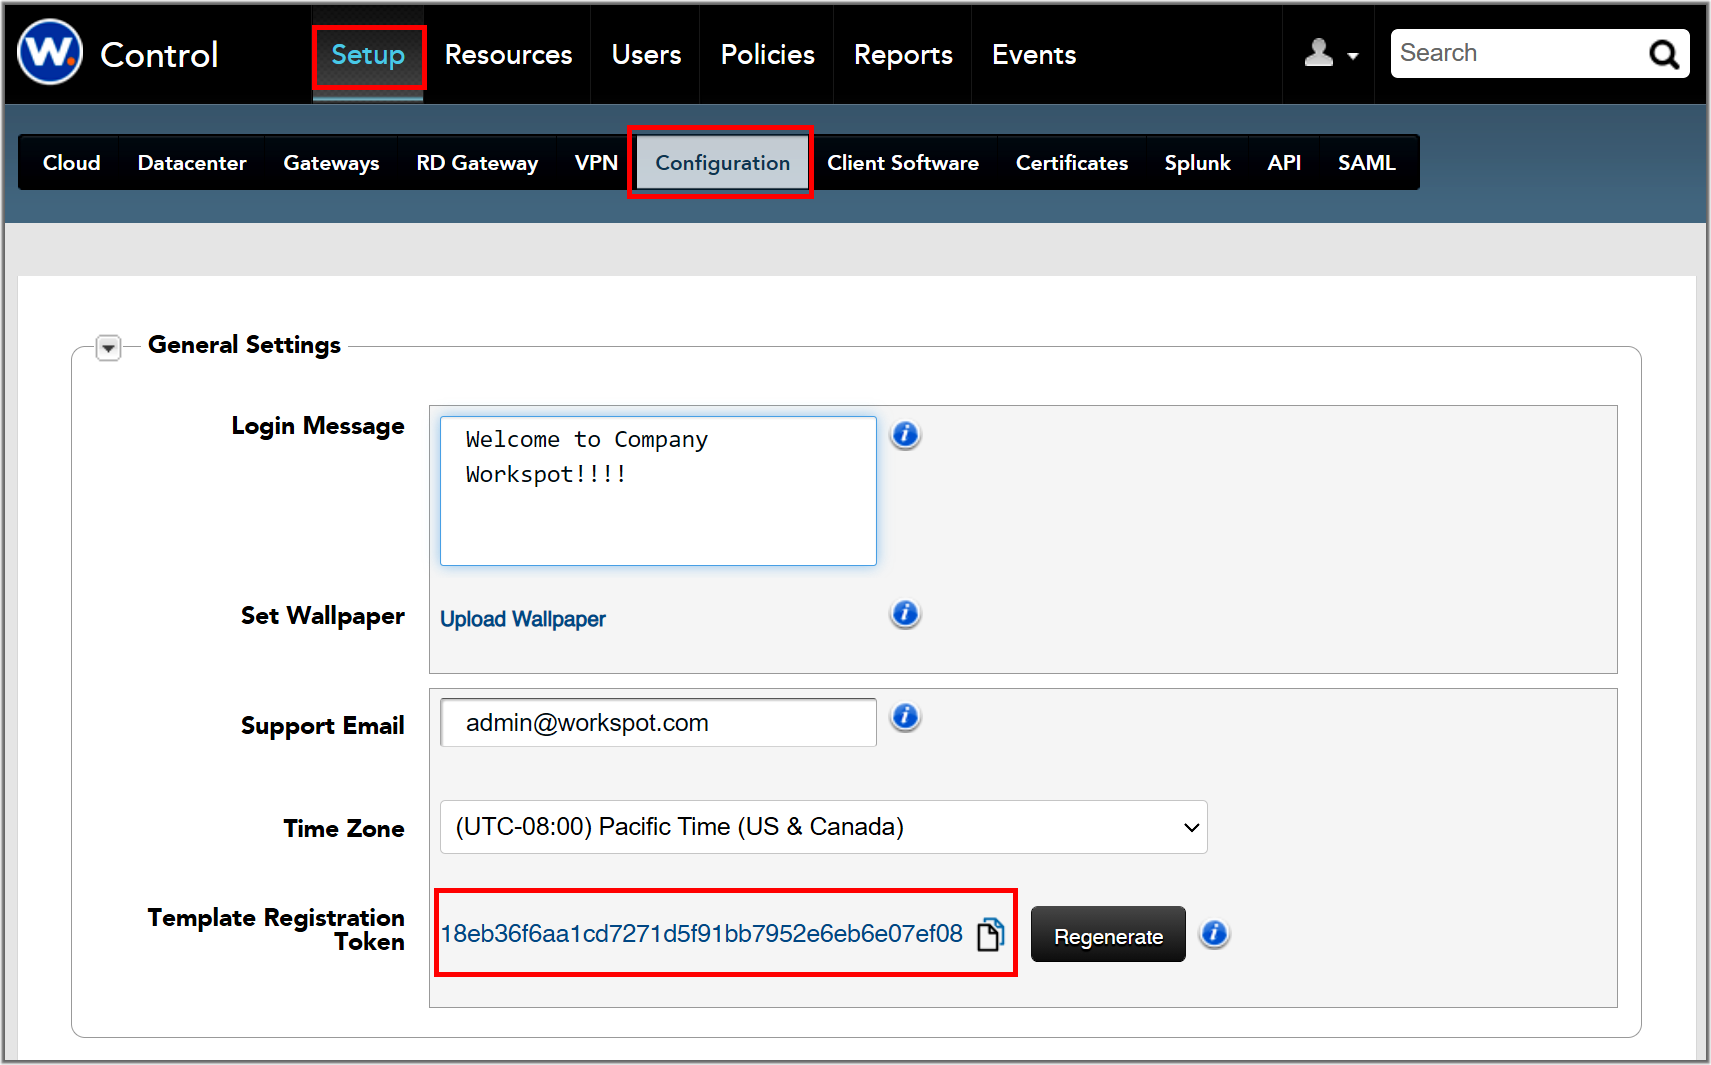
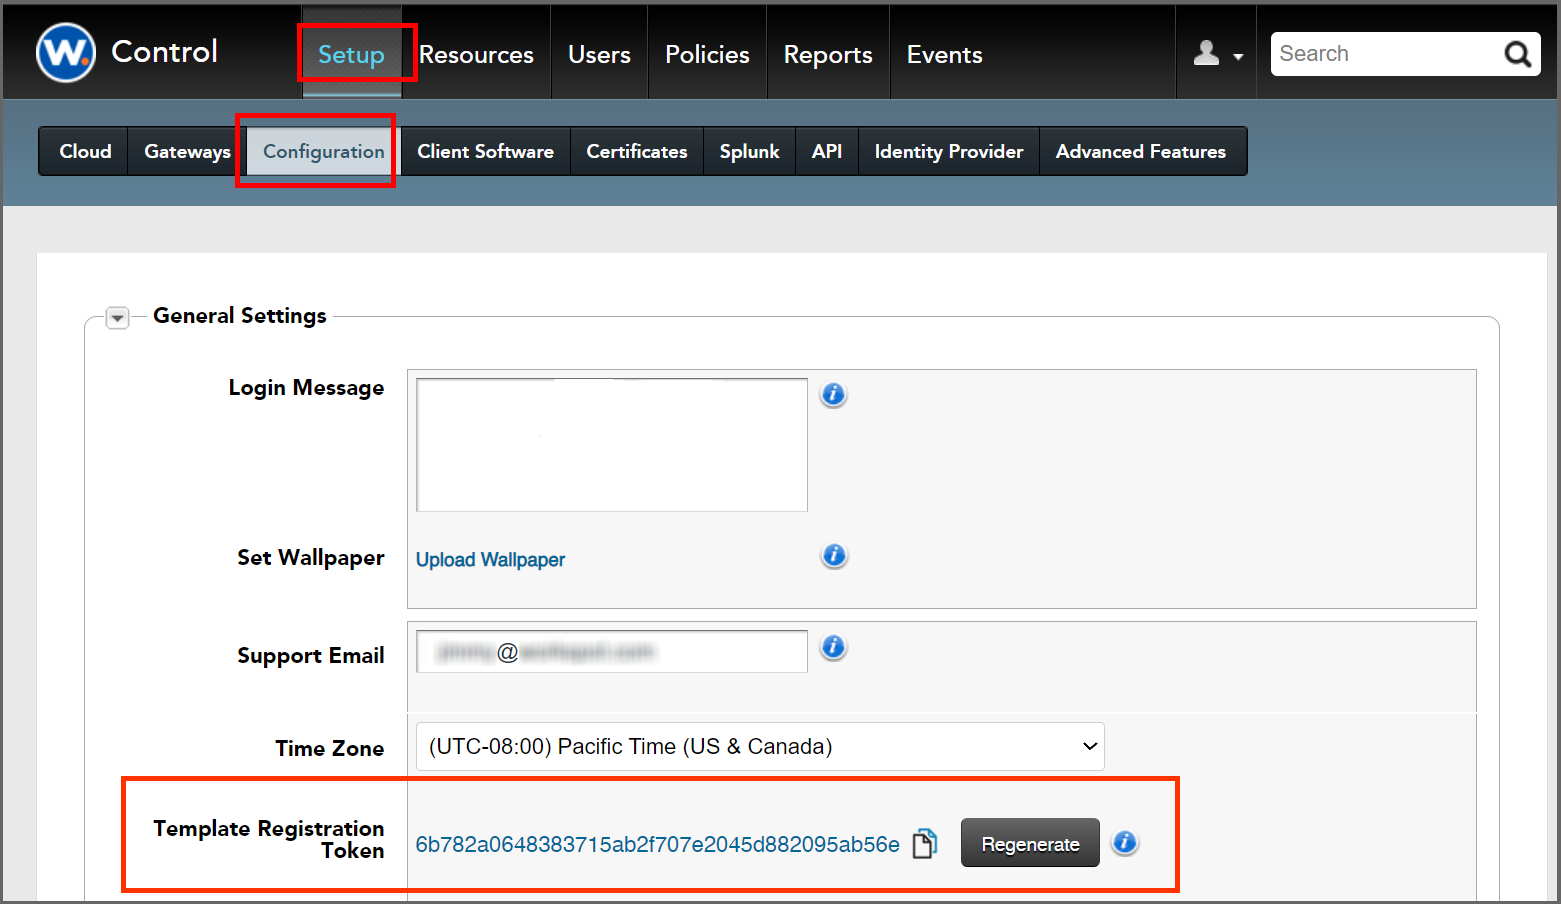
- Go to "Setup > Configuration."
- Find the Template Registration Token as shown in the screen capture below.
- Note: The Template Registration Token does not expire, but you can create a new one with the “Regenerate” button if you choose. Regenerating the token has no effect on existing templates.
- Copy the Template Registration Token. This token that allows you to register the Agent.
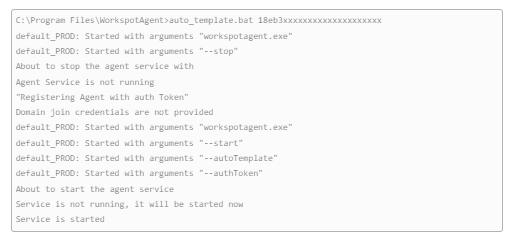
- In the CMD window on the template VM, go to the Workspot Agent directory

You will see output like this:
Updating the Agent
The Agent has an auto-update feature where it checks for updates shortly after boot and once every 24 hours. Power-managed desktops will also check for updates shortly after returning from sleep or hibernation if they are likely to fall behind otherwise.
In general:
- Persistent desktops: auto-update is enabled.
- RD Pool servers: auto-update is enabled.
- Non-persistent desktops: auto-update is disabled (non-persistent desktops are too short-lived to justify updating).
- Draft-mode templates: auto-update is enabled.
- Published and Preview templates: not applicable, since these templates are not running.
When a template becomes out of date, such as when its Agent is no longer supported by Workspot, it should be updated and applied to your pools. See Control: Applying Updated Templates to Desktop Pools.
XML Template Configuration
When you create a new desktop from the template, the Workspot Agent performs a number of tasks that are controlled by the WorkspotConfig.xml configuration file.
Joining the Domain and Runing the wsRunOnce Script
- It joins the domain you specify (unless you tell it not to).
- It optionally reboots the desktop after joining the domain.
- Provided you join the domain, it executes the wsRunOnce.cmd or wsRunOnce.ps1 script (but not both) after joining the domain and registering the new VM with Workspot Control. You can use this to:
- Install GPU drivers,
- Activate Windows via a MAK key,
- Activate application licenses,
- Install additional software,
- Modify registry keys,
- And so on.
- If you specified that the VM is not to be domain-joined, the wsRunOnce script is not executed.
- And, of course, the Workspot Agent contacts Workspot Control to announce its successful deployment. After that, it sends status information, auto-updates itself, and so on.
Creating a Domain Service Admin Account
Before you can join desktops to your domain, you need to create a service account in Active Directory with permission to join machines to the domain.
Not Joining a Domain
The domain-joining step is optional, controlled by the DoNotJoinDomain XML option. You can create templates that either do or don’t join the desktops to your domain. Preventing the Agent from joining the domain is useful when third-party tools perform the domain-joining task rather than the Workspot Agent.
If you do not join a domain, the wsRunOnce script is not executed.
Customizing the WorkspotConfig.xml File
The Workspot Agent directory in “C:\Program Files\WorkspotAgent” contains the files you will use to customize your template.
The master configuration file is WorkspotConfig.xml.
- Make a backup copy of the Workspot XML config file provided after the install of the Workspot Agent.
C:\Program Files\WorkspotAgent\WorkspotConfig.xml - (Optional) Modify the XML config with domain and user information.
Note: If password or any other parameters contains special characters, it must be escaped (i.e., “OU=Workspot&Co is OU=Workspot&Co”).
| Original Character | Replacement |
| " | " |
| ' | ' |
| < | < |
| > | > |
| & | & |
- Modify the XML config with additional information, as required.
- Copy WorkspotConfig.xml to C:\ProgramData\WorkspotAgent\Config.
Note: Make sure to choose groups which are not touched by GPO, otherwise changes made by WorkspotConfig.xml could be overwritten by GPO.
Note: The Workspot XML config file will be deleted during provisioning.
Listing of WorkspotConfig.xml
<?xml version="1.0" encoding="utf-8"?>
<!-- Check this zendesk link for details : https://workspot.zendesk.com/hc/en-us/articles/115002951363-Workspot-Agent-v2-1-Installation-for-Templates -->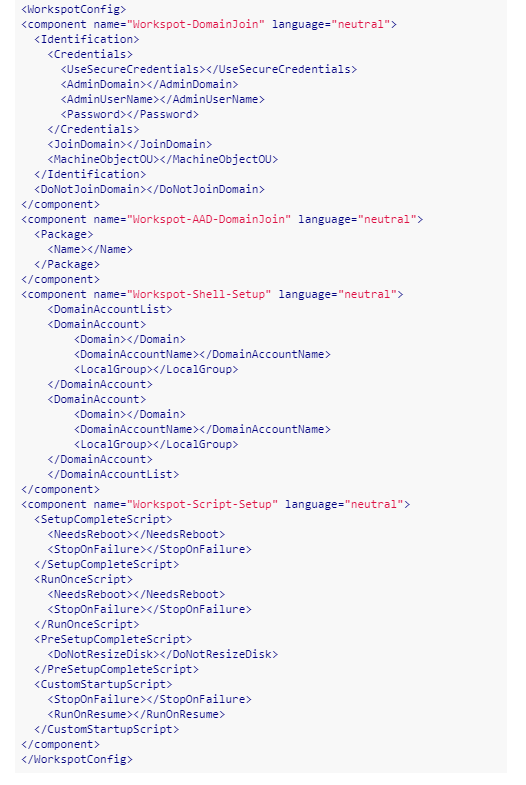
Details About Selected CommandsCommon Tasks
Disk Expansion
Agent expands the C: partition to fill the boot drive when it first provisions desktop. This allows desktops to use larger disks than the templates they are imaged from.
To disable disk expansion, set DoNotResizeDisk to 1 in the PreSetupCompleteScript section of WorkspotConfig.xml:

Rebooting the VM after provisioning
If you use a configuration script that requires that the VM be restarted after provisioning, you can specify by setting the NeedsReboot option to 1 in WorkspotConfig.xml. By default, no reboots are performed.
Do not reboot the VM from inside a script.
To reboot after running the wsSetupComplete.cmd/wsSetupComplete.ps1 script:

To reboot after running the wsRunOnce.cmd/wsRunOnce.ps1 script:

Joining the Domain With UseSecureCredentials
The domain-join credentials can be specified in WorkspotConfig.xml or manually on the command line of the secure_credentials.bat script.
Workspot recommends using secure_credentials.bat instead of the XML Password option. Thus, the details of the Password option are not given here.
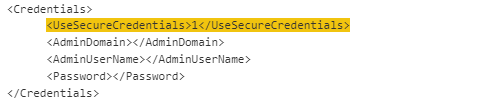
To use secure_credentials.bat, set UseSecureCredentials to 1 in the Credentials section:
To set these secure credentials:
- Go to the Agent Install Location.
- Find the file secure_credentials.bat.
- Run "secure_credentials.bat --set domain\admin password"

- Make sure special characters are escaped. See the table in this article or the more comprehensive list at http://www.robvanderwoude.com/escapechars.php.
- The credentials are stored directly in Windows Credentials Manager instead of being stored in Workspot secured Vault. These credentials are used by the cloned VMs to join the domain.
- If run multiple times, the batch file overwrites previous credentials.
- You can verify the credentials are properly set by using this test.

- The saved credentials are used to connect to the specified file share. The log file will show the status of the connection. If the connection fails because of faulty credentials, this will be shown in C:\ProgramData\WorkspotAgent\Log.
- If you forget to set the Secured Credentials, VMs will enter an Error State, shown in Workspot Control as a Domain-Join Read Credentials failure.
Adding Users and Groups Locally
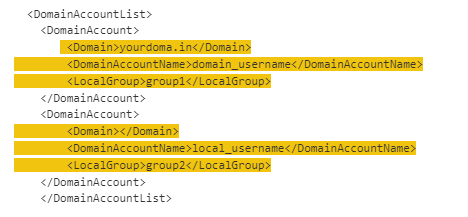
To add users or groups to the VM, set the Domain, DomainAccountName, and LocalGroup parameters. You can add multiple accounts with multiple <DomainAccount> records.
To add local (non-domain) users or groups, leave the Domain record blank.
Workspot Agent Scripts
The Workspot Agent supports these custom scripts:
- WsSetupComplete (WsSetupComplete.cmd or WsSetupComplete.ps1 but not both). This script runs immediately after cloning is complete and the VM is registered with Workspot Control, but before the domain is joined.
- WsRunOnce (WsRunOnce.cmd or WsRunOnce.ps1 but not both). This script runs after the new VM reboots after joining the domain successfully.
- WsCustomStartup.ps1. Runs after the Agent service starts every time the VM boots.
- secure_credentials.bat. Used to set domain-join credentials manually.
- auto_template.bat. Used for manual token-based Agent registration.
These scripts can be used to:
- Install GPU drivers,
- Activate Windows via a MAK key,
- Activate application licenses,
- Install additional software,
- Modify registry keys,
- And so on.
The Workspot Agent looks for these scripts in C:\ProgramData\WorkspotAgent\Config\.
Any echo commands you place in the scripts are written to .log files in C:\ProgramData\WorkspotAgent\Scriptlogs\scriptname.scriptextension.log
WsSetupComplete Script
If the WsSetupComplete.cmd or WsSetupComplete.ps1 script exists is C:\ProgramData\WorkspotAgent, the Workspot Agent executes it immediately after the VM is cloned and registered with Workspot Control, and before the domain is joined.
This script is run whether or not domain joining is enabled.
There are two parameters associated with this script:
- NeedsReboot
- StopOnFailure
If NeedsReboot is set to 1, the VM wills reboot after the script is run. If StopOnFailure is set to 1, the Agent will exit if the script fails, leaving the VM incompletely configured. Both parameters default to zero.

WsRunOnce Script
If the WsRunOnce.cmd or WsRunOnce.ps1 script exists in C:\ProgramData\WorkspotAgent, the Workspot Agent executes it after joining the domain and rebooting the VM.
If domain joining is not enabled, this script is not run.
As with WsSetupComplete, there are two parameters associated with this script:
- NeedsReboot
- StopOnFailure
If NeedsReboot is set to 1, the VM reboots after the script is run. If StopOnFailure is set to 1, the Agent exits if the script fails, leaving the VM incompletely configured. Both parameters default to zero.

WsCustomStartup.ps1 Script
Unlike the startup scripts above, which run only once, during provisioning, the C:\ProgramData\WorkspotAgent\Config\WSCustomStartup.ps1 script runs every time the desktop boots, after the Agent starts.
The script is typically used to check for driver updates and other startup tasks.
To use the WsCustomerStartup.ps1 script, create the script in C:\ProgramData\WorkspotAgent\Config\WSCustomStartup.ps1 and set RunOnResume to 1:

Script Programming Guidelines
- Full paths must be specified for any .exe or .msi files invoked by the script.
- UNC paths (\\hostname\sharename\...) are not allowed.
- Everything executed by WsSetupComplete.cmd must be silent, unattended, or automated. That is, it must not require user input. If something waits for user input, the script will fail and the VM will not be ready for use.
- For security, each script should delete itself and any one-time-use scripts it calls.
- Reminders:
- The wsSetupComplete script is called before the VM is joined to the domain, so no domain resources are available.
- The User context is SYSTEM, so the “current user” (HKCU) is not viable for modification.
- If something needs to be run under specific local user/admin account, use the PowerShell credential store.
- Do not shut down or restart a VM during the execution of any of these scripts, except with the <NeedsReboot> option. Any other method will interfere with the normal Agent setup/registration process.
Exit Codes and Error Handling
Workspot Agent assumes that if a script exits with an exit code of zero, it was successful. Any other exit code is technically a failure, but the Agent ignores exit codes by default, treating any exit as a success.
Non-zero values can be treated as fatal errors with <StopOnFailure>, as shown below:
<StopOnFailure>1</StopOnFailure>StopOnFailure is set independently for <SetupCompleteScript> and <RunOnceScript>.
When a fatal error (non-zero exit code) is detected, Workspot Control will mark the VM as failed and log a VM error status, preventing it from being assigned to a user:

This fatal error is non-recoverable. The VM needs to be reimaged after the script error is corrected.
Sysprep vs. Quickprep
Workspot desktop and RD Pools can be either Sysprep or Quickprep.
| Task | Sysprep | Quickprep |
| Computer name change | YES | YES |
| Join domain | YES | YES |
| Generate new SID | YES | NO |
| Customization outside template | YES | NO |
For Quickprep: Shutdown the template VM. Template is now ready for Workspot Control provisioning
For Sysprep:
1. Create a sysprep unattend.xml answer file for Windows customization and save it in a location like C:\temp.
The following Windows 10 Sample file:
- Skips welcome screens.
- Creates a local administrator account.
(*) NOTE: You can add parameters as needed (such as time zone, language, etc.).
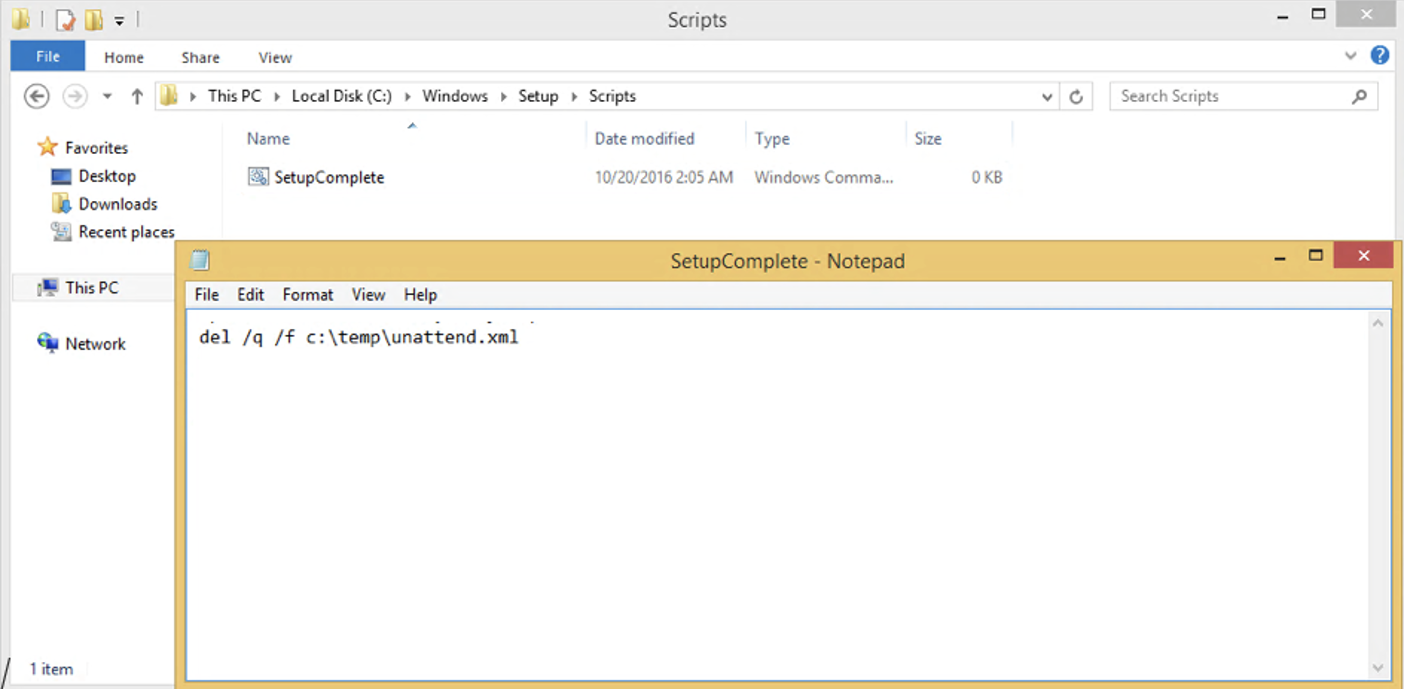
2. Create SetupComplete.cmd to delete unattended.xml answer file after sysprep. Copy the SetupComplete.cmd to c:\windows\setup\scripts\. Unattend.xml may contain sensitive information.
3. Sysprep the VM with the following command:
C:\Windows\System32\sysprep\sysprep.exe /shutdown /oobe /generalize /unattend:c:\temp\unattend.xml
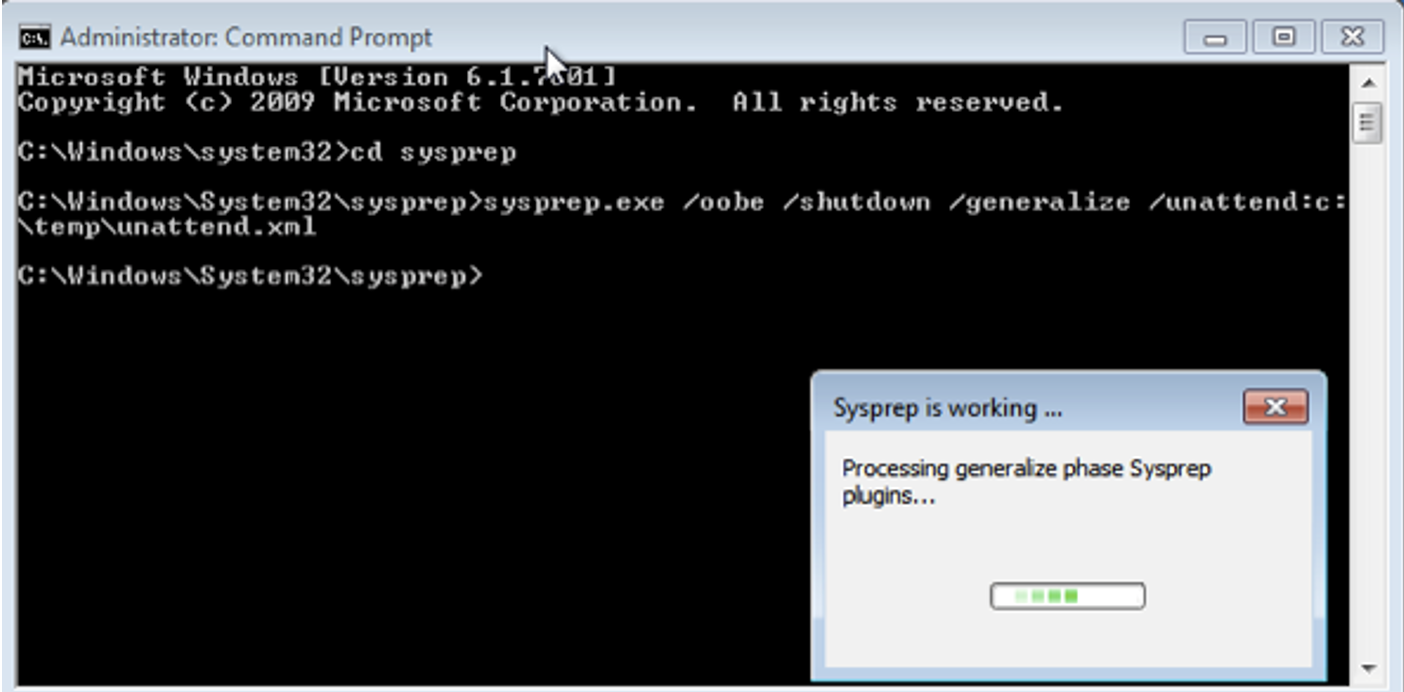
(*) NOTE: This command will sysprep the VM and then shut down the VM. After the VM is powered on, it will go through the sysprep process.
The template is now ready for Workspot Control provisioning.
Troubleshooting
Reregistering VMs and Templates Using an Agent Token
If the Agent on a VM is not properly registered with Control, Control lacks most information about it. To fix this, you need to provide a new token from Control.
Reregistering a Pool VM.
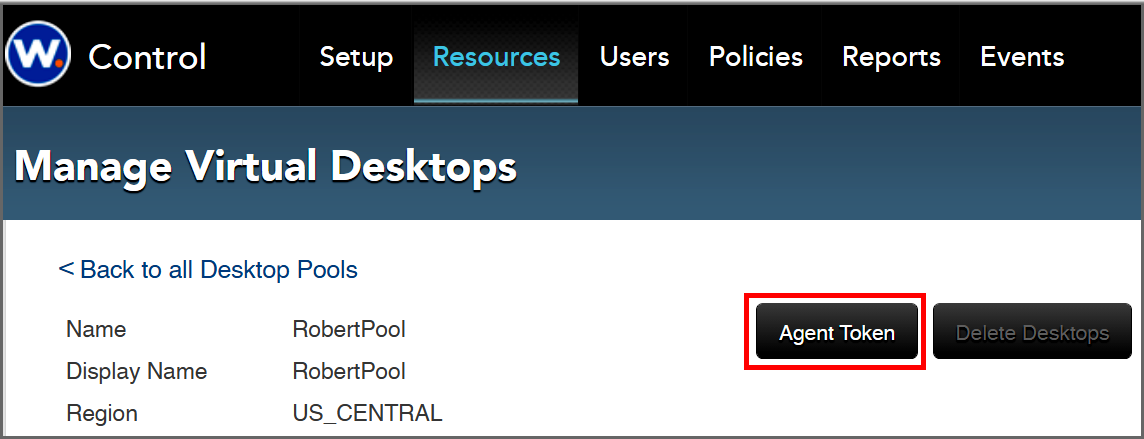
- In Control, go to the pool containing the VM: "Resources > VDI Pools > poolname."
- Click the "Agent Token" button.
- On the next screen, copy the Agent Token.
- Using a jump server, use Remote Desktop Client to sign into the VM that needs to be re-registered.
- Jump server usage is described in the "Sign Into the Template" section in Using Workspot Templates.
- On the VM:
- Open a CMD window as an administrator.
- Navigate to C:\Program Files\WorkspotAgent.
- Run "C:\Program Files\WorkspotAgent\reregister_poolvm.bat tokenvalue," where tokenvalue is the Agent Token you copied from Control.
- The Agent will contact Control with the token, which will authenticate it as belonging to your organization and the desired pool.
Tokens expire after 24 hours.
Reregistering a Template.
This is similar to reregistering a Pool VM.
- In Control, go to “Setup > Configuration > General Settings > Template Registration Token.”
- Press the “Regenerate” button and then press the “Copy” icon to copy the token.
- In the template VM, open a CMD window as an administrator.
- Navigate to C:\Program Files\WorkspotAgent.
- Run "C:\Program Files\WorkspotAgent\auto_template.bat tokenvalue," where tokenvalue is the Template Token you copied from Control.
Log File Locations
- For installation and template registration issues, see the logs file in: C:\ProgramData\WorkspotAgent\InstallLog.
- For runtime issues, see the log file in: C:\ProgramData\WorkspotAgent\Log.
DNS Collisions
If a VM is deleted uncleanly (that is, it was deleted when it was not running), it does not release its DNS address. This will eventually time out in the DNS controller, but in the meantime, if Workspot Control assigns the name to a new VM, the collision will cause trouble.