

Creating Workspot Cloud Desktop Pool
This article is a quick guide for creating a Workspot desktop pool. It is part of the Getting Started with Workspot article series. A more comprehensive treatment is given in Control: Desktop Pools.
- Log into Workspot Control.
- Click “Resources > Cloud Desktop Pools > Add Pool.” The “Create Your Cloud Desktop Pool” page appears. Fill in the form as described below.
Note: Fields marked with an asterisk (*) are required.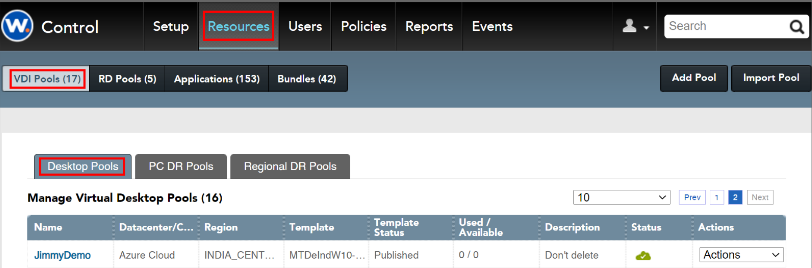
Add pools with the "Resources > Desktop Pools > Add Pool" button.
Desktop pools can be created by Control users with full Administrator access. - *Select Datacenter/Cloud. Select the Workspot Cloud Config configured for Public or Private Cloud platform.
Microsoft Azure
Google Cloud Platform
AWS Workspaces Core
AWS EC2
VMWare
Nutanix
-
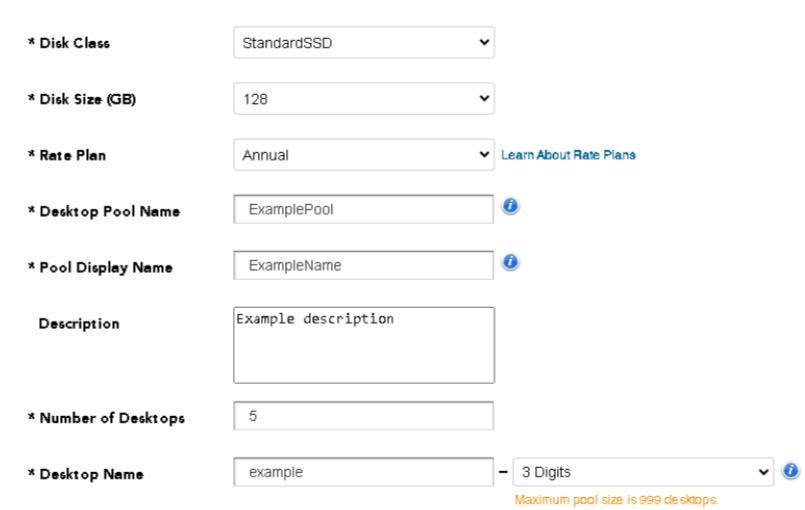
*Disk Class. OS Disk types selection
-
*Disk Size (GB). OS disk size in GBs
-
*Rate Plan. Defaults to Annual Rate Plan for Workspot licensing.
-
*Desktop Pool Name. The name displayed by Control for this pool.
-
Only alphanumeric characters are allowed.
-
This name must be unique across your entire Workspot deployment.
-
-
*Pool Display Name. This name will be displayed by the Workspot Client. This name can contain spaces and punctuation.
-
Description. An optional text field for information about the pool.
-
*Number of Desktops. A numeric field specifying how many desktops to create initially.
-
The number of desktops can be increased or decreased later.
-
If you specify more desktops than you have entitlements for, you will see an error when you click the “Create” button.
-
-
*Desktop Name. The hostname of the desktops in the pool. Each desktop will have a hostname consisting of this string, a hyphen, and a 1-4 digit number. For example, mydesktop-123.
-
Use alphanumeric characters for this field.
-
GCP does not allow upper-case characters here.
-
The total length of the string must be 15 characters or less, including the hyphen and the number, or you will see an error message when you click the “Create” button.
-
The number field is specified in the pull-down “digits” menu as 1-4 digits.
-
Note that while a four-digit number field is allowed, it is never necessary, since the maximum number of desktops currently allowed is 999. (Thus, if you specify a four-digit number, it will always have a leading zero.)
-
If you specify a too-small number of digits for the number of desktops, you will see an error message when you click “Create.”
-
-
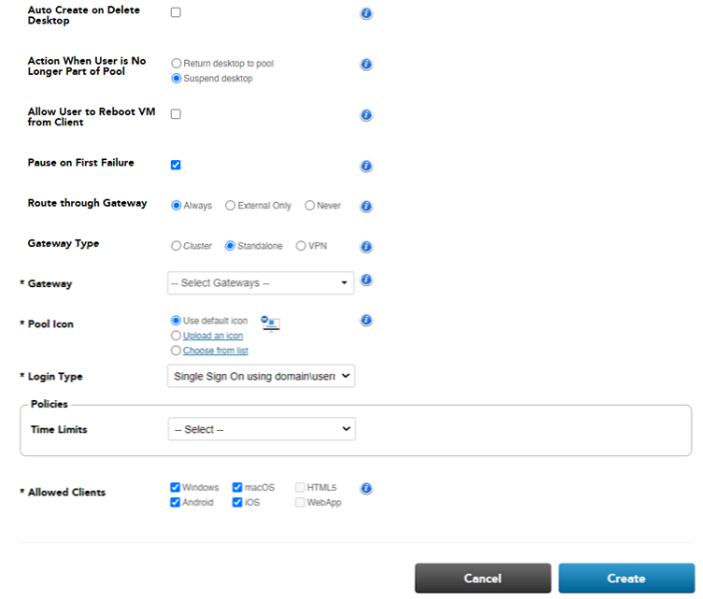
Auto Create on Delete Desktop. If selected, a new desktop will be created whenever an old one is deleted, maintaining the size of the pool. (Default is “no.”)
-
Action When User is No Longer Part of the Pool. Shown only for persistent desktop pools. When a user is no longer entitled to a desktop in this pool, the desktop is either returned to the pool or suspended. (Default is “Suspend desktop.”)
-
In both cases, the former user can no longer sign into the desktop.
-
A suspended desktop is no longer allocated to anyone until reallocated by the Control Administrator. This makes it available for inspection by the Administrator before it is returned to the pool.
-
-
Allow User to Reboot VM from Client. Shown only for persistent desktop pools. If selected, end-users can reboot their desktop from the Workspot Client. (Default is “no.”)
-
Pause on First Failure. The provisioning process will halt if an error is detected. This prevents all desktops from failing with the same error if there is a problem. (Default is “yes.”)
-
Multiple desktops are provisioned in parallel, and the process does not truly pause until all these complete.
-
Once paused, the Administrator is given an option to resume the provisioning.
-
-
Route Through Gateway. In this context, a “Gateway” is either a VPN or an RD Gateway known to Control. The options are “Always,” “External Only,” or “Never.” (Default is “Always.”)
-
“Always” means that either a VPN or an RD Gateway is used for all Workspot Client connections to the desktops in the pool. This option is recommended when the pool is in the Cloud.
-
“External Only” means that the VPN or RD Gateway are used only when the Client believes it is not connected to the organization’s network, as determined by the Location Detector mechanism. This option is typically used for on-premises deployments.
-
“Never” means that the Client will always attempt a direct connection to the desktop. This option is typically used for on-premises deployments.
-
-
Gateway Type. This is one of “Cluster” (a Managed Gateway Cluster), “Standalone” (a legacy RD gateway), or “VPN.” New installations will typically use gateway clusters.
-
Gateway. VPN option is not shown unless a VPN is declared in “Setup > VPN.” Selects whether a VPN or one or more RD Gateways are used to connect to the pool.
-
“VPN” is the default if a VPN is declared in “Settings > VPN.”
-
Managed RD gateway clusters are recommended for Public Cloud pools.
-
To use an RD Gateway (either managed or legacy), select at least one RD Gateway from the “Select Gateways” pull-down menu.
-
Selecting more than one gives greater scalability and redundancy. If more than one RD Gateway is selected, the Workspot Client will choose one from the list at random when connecting or reconnecting.
-
Choose the gateways in the same region as the pool. Distant gateways add unnecessary latency.
-
-
*Pool Icon. Selects which icon to display on the Workspot Client for this pool. Choices are “Use default icon,” “Upload an icon,” and “Choose from list.”
-
Uploaded icons should be in .PNG format.
-
“Choose from list” displays a list of over 40 standard icons.
-
-
*Login Type. Choose between “Single Sign On using username and password” and “Single Sign On using domain\username and password.”
Login Domain. Not shown if you select “Single Sign On using do- main\username and password.” Specifies the default domain name for user sign-in.
-
Policies. If desired, select existing Time policies (Default named Policy, Default Concurrent Policy) to use for this pool. (Note: The "Select" menu entry means "None.")
-
Allowed Clients. If you want to prevent some Workspot Clients from accessing this pool (for example, the Workspot Android Client), deselect them here.
-
Create. Click the “Create” button to provision the pool.
-
If the “Create Your Virtual Desktops” fields are filled in acceptably, the “Manage Virtual Desktops” page will be displayed with a banner that says “Pool Created Successfully.” Otherwise, an error message is displayed and you will remain on the “Create Your Virtual Desktops” page.
-
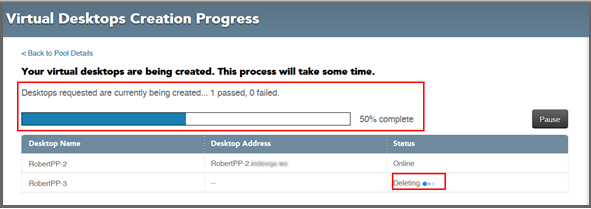
Provisioning takes some time. Click the “Check Progress” link to monitor provisioning progress on an auto-updated page.
-
When the desktops go from “Online” to “Ready,” they are available to users.
-