

Workspot Enterprise Connector
Last modified on April 2, 2024 by Robert Plamondon
This article covers adding Workspot Enterprise Connector to your datcenter and is part of the Getting Started with Workspot article series. See Workspot Enterprise Connector for a more extensive treatment of this topic.
The Workspot Enterprise Connector (also called Connector or EC) integrates Workspot Control with your Active Directory (AD) domain controller. Connector is a Windows service that you install on a server in your data center.
Contents
Recent and Upcoming Releases
Release 5.3.0
- Support for multiple Workspot Control instances, initially in the US and the EU.
How Workspot Enterprise Connector Works
AD Requests
Connector opens a secure connection to Workspot Control and listens for requests about user account status and group membership. Workspot Control needs to know the users' status and group membership to assign the correct resources to them. Connector services these requests by making read-only queries to your AD server.
Connector opens an outbound HTTPS connection with Workspot Control on port 443 in addition to communicating with your domain controller.
In addition, for on-premises deployments such as VMware ESXi or Nutanix, Enterprise Connector acts as a portal between Control and your on-site hypervisors such as VMware vSphere or Nutanix AHV to allow Control to manage your Workstation desktop and App Server VMs.
End-User Self-Registration
Typically, when an end-user connects to Workspot for the first time (via the Workspot Client), they use self-registration, which works as follows:
- The user enters an email address or UPN and is authenticated using the method configured in Workspot Control (for example, using AD or Azure AD authentication).
- As part of the authentication, Workspot Control asks Workspot Enterprise Connector for the status of their account and a list of their AD group memberships. If the account has been suspended, the user is rejected and cannot use Workspot.
- The user is assigned to a Workspot Group, which determines which desktop pools and apps they can use, and which access policies apply to them.
- If the user belongs to an AD group that is associated with a Workspot Group, the user is assigned to that group. For example, if you define an AD Group called "WorkspotPowerUsers," you can define a Workspot Group that includes members of this AD group.
- Otherwise, the user is assigned to the Default User Group. If that isn't the appropriate group, the user must be reassigned manually in Workspot Control or added to an appropriate AD group by your domain administrator.
Tip: Assign new users to the desired AD group and create the corresponding group in Workspot Control before users sign into the Workspot Client for the first time.
See also User Self-Registration and Resource Entitlements.
Ongoing AD Operation
Workspot Control uses Connector to poll AD accounts to see if they have been suspended or deleted. Control removes Workspot access to suspended and deleted accounts. This poll can also be initiated manually in Control with the "Sync Now" button under "Setup > Datacenter > datacentername."
Group membership is also checked, using a more complicated mechanism. In summary:
- Group membership is only checked once the user signs in via the Workspot Client, and then only if it has been 24 hours since the last check.
- In addition, if the "Users > Groups > Refresh Entitlements" button has been pushed on Control, a new check will be made when the user signs in, or within five minutes if they are already signed in.
- If the user selects "Refresh Entitlements" on the Client, they will be updated immediately.
See the document How Workspot Control Handles AD Account Status and Group Membership Changes for more information.
Tip: If users aren't seeing the expected resources as the result of an AD group membership change, it is likely the result of the polling delay described above, the users having been assigned to the default Workspot group instead of the expected group because they aren’t members of the expected AD group.
Prerequisites
General
- Installing and configuring Connector requires administrative access and domain administrator access. You will create an AD service account for Connector that has limited domain access.
- Run the Connector service on at least one supported, maintained, lightly loaded Windows server on the same private network as your domain controller.
- Use Connector only on secure LANs or VPNs.
- The servers running Connector need to be kept up-to-date with security patches, etc.
- Connector should have a reliable, low-latency path to the domain controller. This is best done by placing it in the same datacenter and on the same subnet as the domain controller.
- Workspot recommends having two instances of Connector on different hosts for high availability. Control automatically load-balances queries to multiple Connectors and queries the surviving instance if one fails.
- If you use replicated domain controllers, having different instances of Connector that connect to different replicated controllers is recommended for greater reliability.
Hardware/OS requirements:
- See Workspot OS and Hardware Requirements for supported Windows Server versions for Windows Enterprise Connector.
- The server running Connector must be a member of the Windows domain used by Connector.
- Connector is a fairly lightweight service but should not be run on the domain controller device.
- Minimum of 4 GB of memory (Connector will use ¼ of the available free memory or 1GB, whichever is less).
- 250 MB of free disk space for installation and runtime usage.
Outbound Connections
Connector must be able to open outbound connections over HTTPS on port 443 to:
If you require the use of a proxy, see Setting a Proxy Server for the Workspot Agent and Workspot Enterprise Connector.
Required Software Packages
Java. Connector requires the Java Runtime Environment.
- Workspot recommends Azul Zulu OpenJDK 8.
- We recommend installing the most recent version certified by Workspot and updating only to versions certified by Workspot.
- As of October, 2023, the most recent certified version was 8.58. Download it here from Azul.
Powershell. Installation requires Windows PowerShell 2.0 or above (installed by default with Windows Server 2016 and higher).
The Service Account
- You must have access to a domain account with admin privileges to install and run Connector. This domain account will also be used to create the service account necessary to run Connector.
- You must create a service account in Active Directory and add the user account to the local administrator group of the Connector server before installing Connector.
- The password for this account must not contain spaces or non-printing characters.
- If the password contains a double-quote character ("), expect to have to escape it as (\") later, when you install Connector.
- For permissions, see "Setting Permission for the Service Account," below.
- For production installations, grant the Connector service account "Log on as a Service" rights via Group Policy. This will ensure that the account does not lose this privilege in the future and the Connector service will be able to start.
Setting Permissions for the Service Account
Permissions for the Workspot Enterprise Connector service account should be configured as follows:
- On the domain controller, login as a domain administrator and create a new domain user for the Connector service account.
- Open Command Prompt in "Run as Administrator" mode.
- In the following example, the domain is example.com.
- The base DN for the domain is dc=example,dc=com.
- The Connector service account is WSECservice.
- Add Replicating Directory Changes to the service account:
> dsacls "dc=example,dc=com" /g "example\WSECservice:CA;Replicating Directory Changes"- Add Replication synchronization to the service account:
> dsacls "dc=example,dc=com" /g "example\WSECservice:CA;Replication synchronization"- Add the List Contents and Return Property Deleted Object permissions
> dsacls "cn=deleted objects,dc=example,dc=com" /takeownership- Then grant permissions for the EC service account as follows:
> dsacls "cn=deleted objects,dc=example,dc=com" /g example \WSECservice:LCRPFor more information on Dsacls see https://technet.microsoft.com/en-us/library/cc771151.aspx
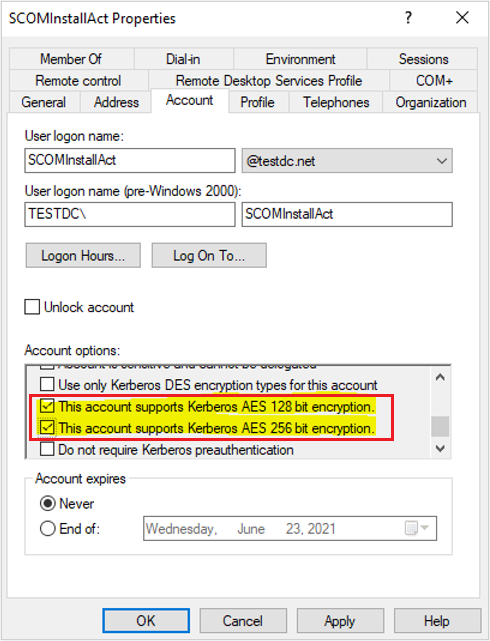
Enable AES Encryption
Depending on your organization’s security policies, you may also have to declare that the account supports AES encryption in its AD Account Options before it contacts the domain controller with an accepted encryption:
Configuring and Installing the Workspot Enterprise Connector
Define a Private Cloud in Workspot Control
1. Log in as a Windows Administrator to the domain-joined Windows server where the Connector will be installed.
2. From this server, use a browser to sign into Workspot Control as a Control Administrator.
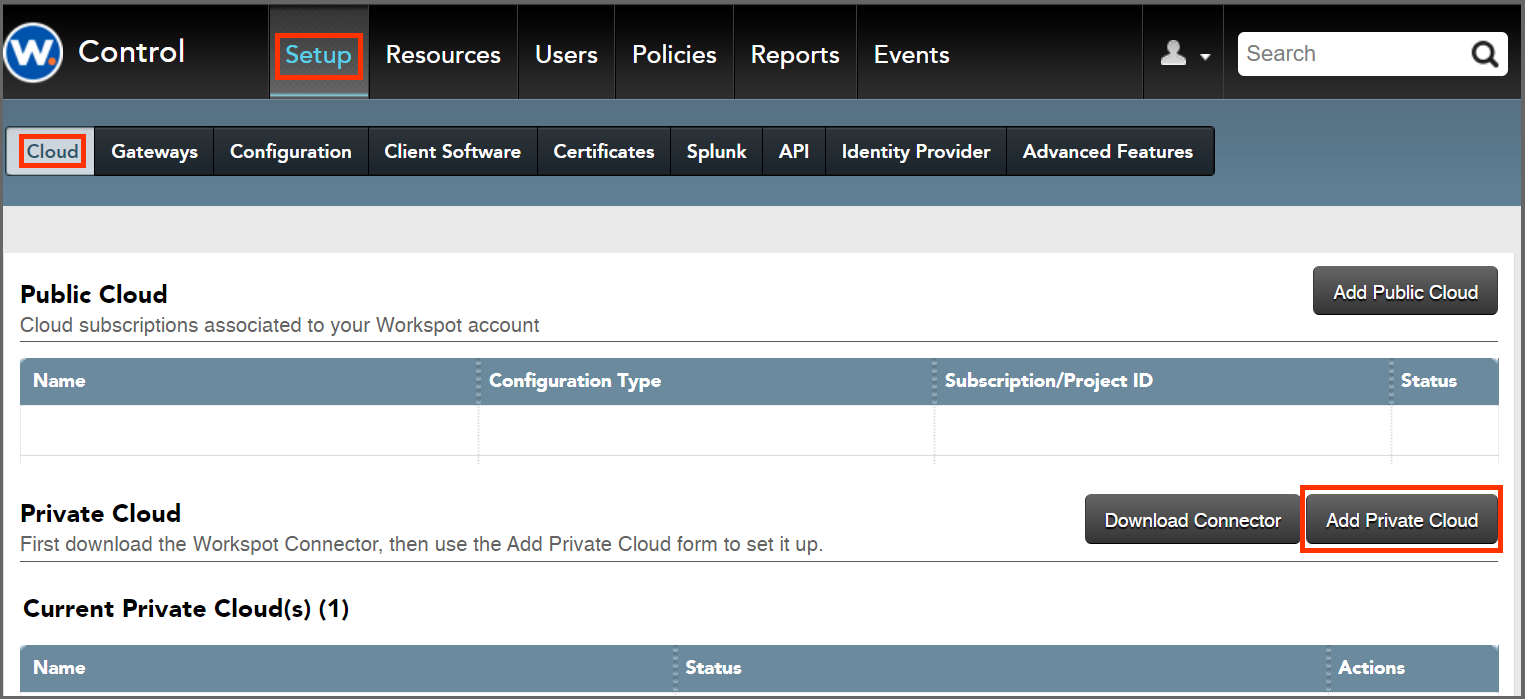
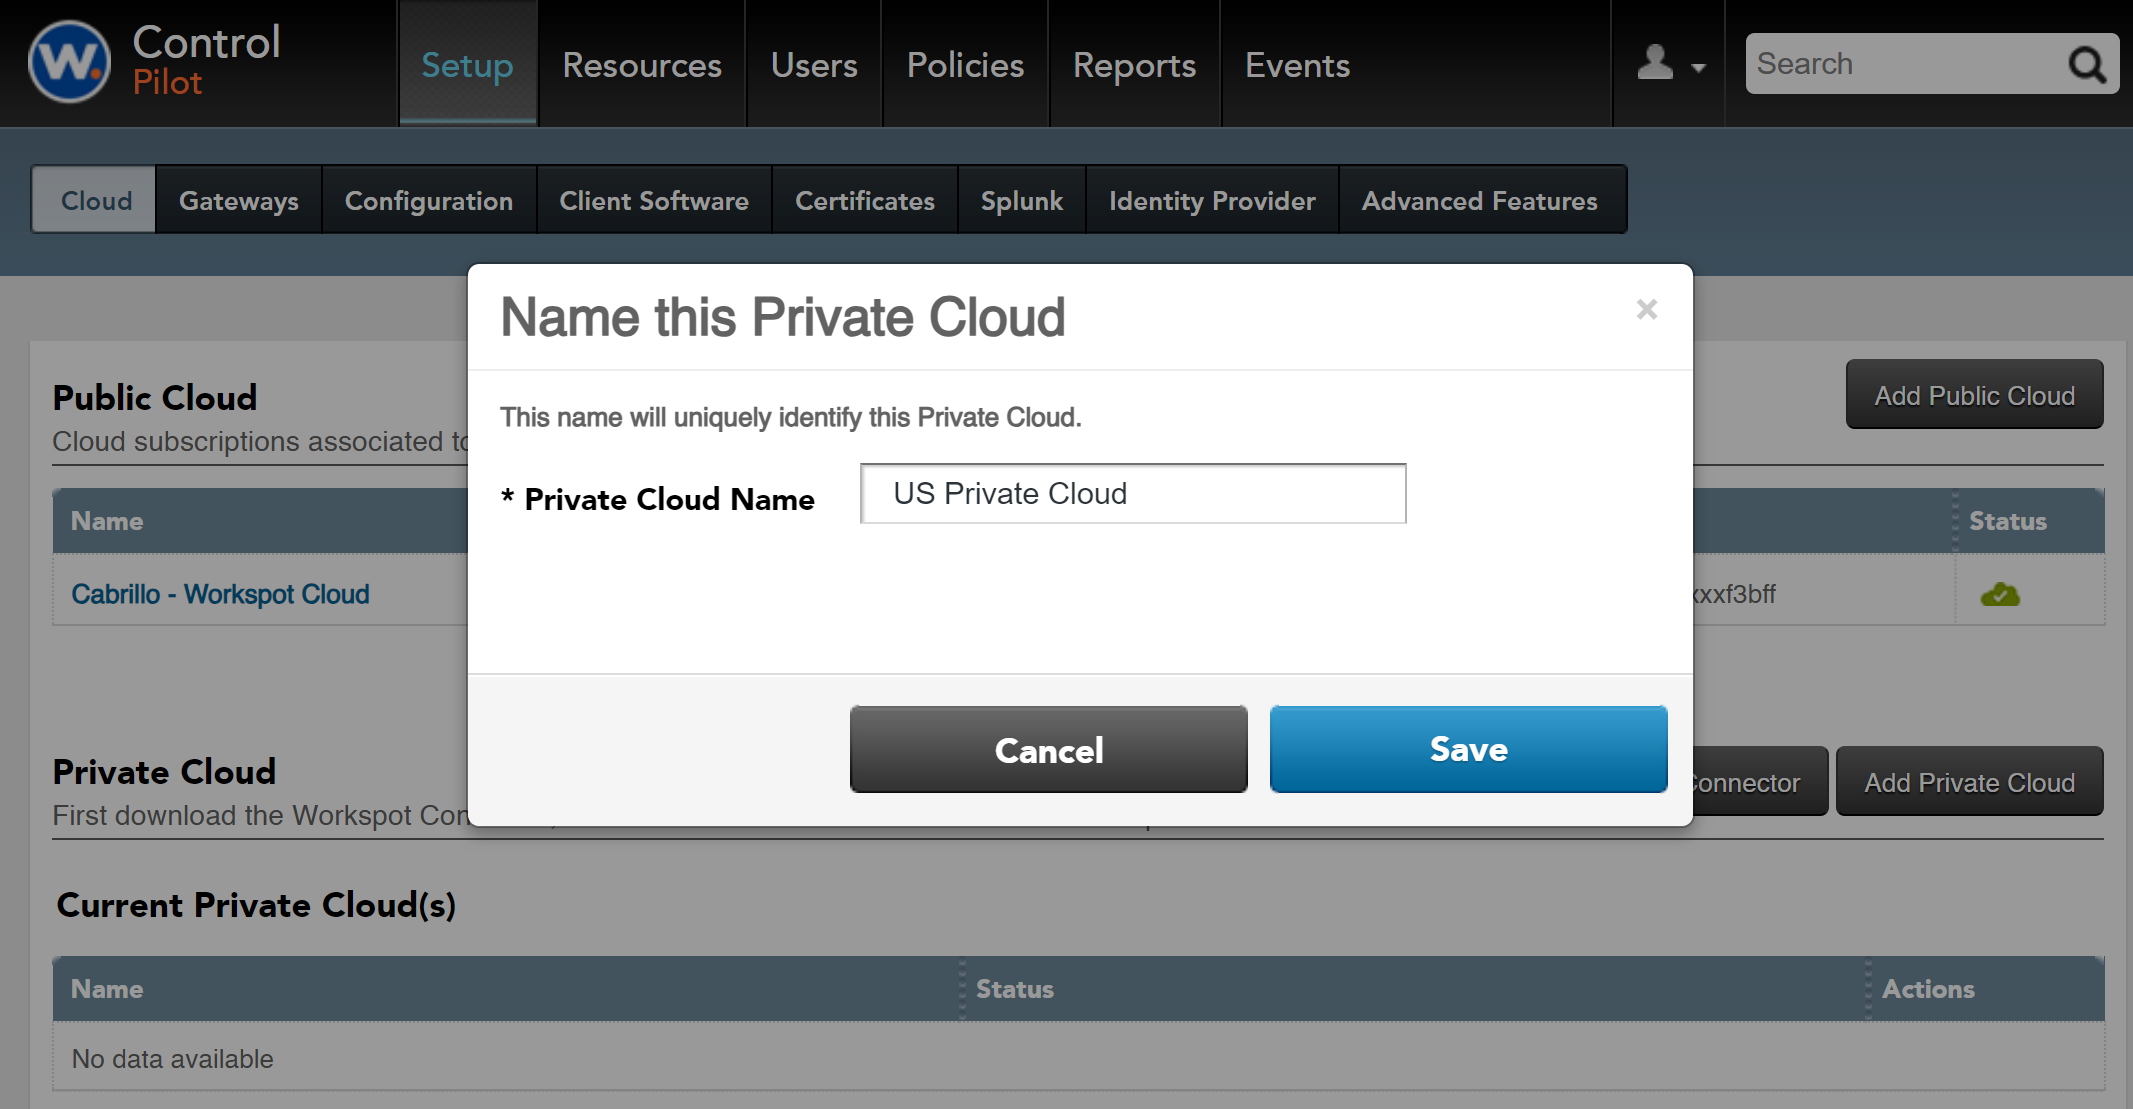
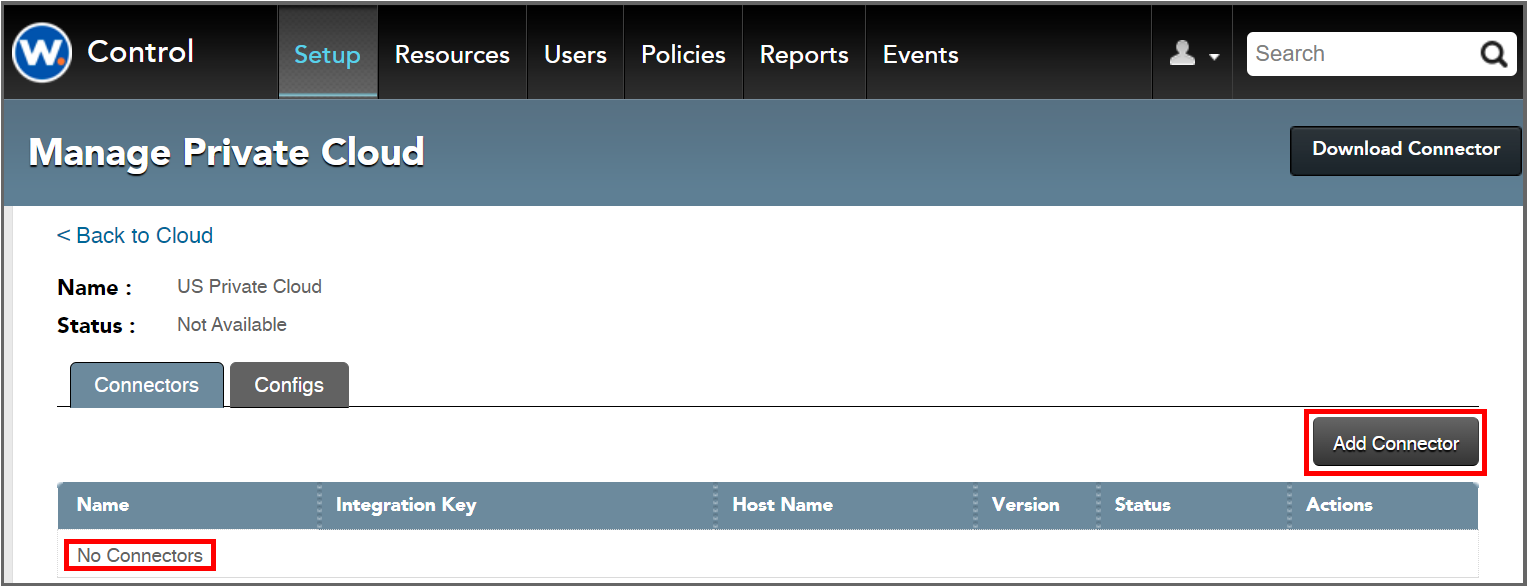
3. Create a Private Cloud: Go to Setup > Cloud > Private Cloud > Add Private Cloud.” Enter a Name for the configuration, in this example, "US Private Cloud".
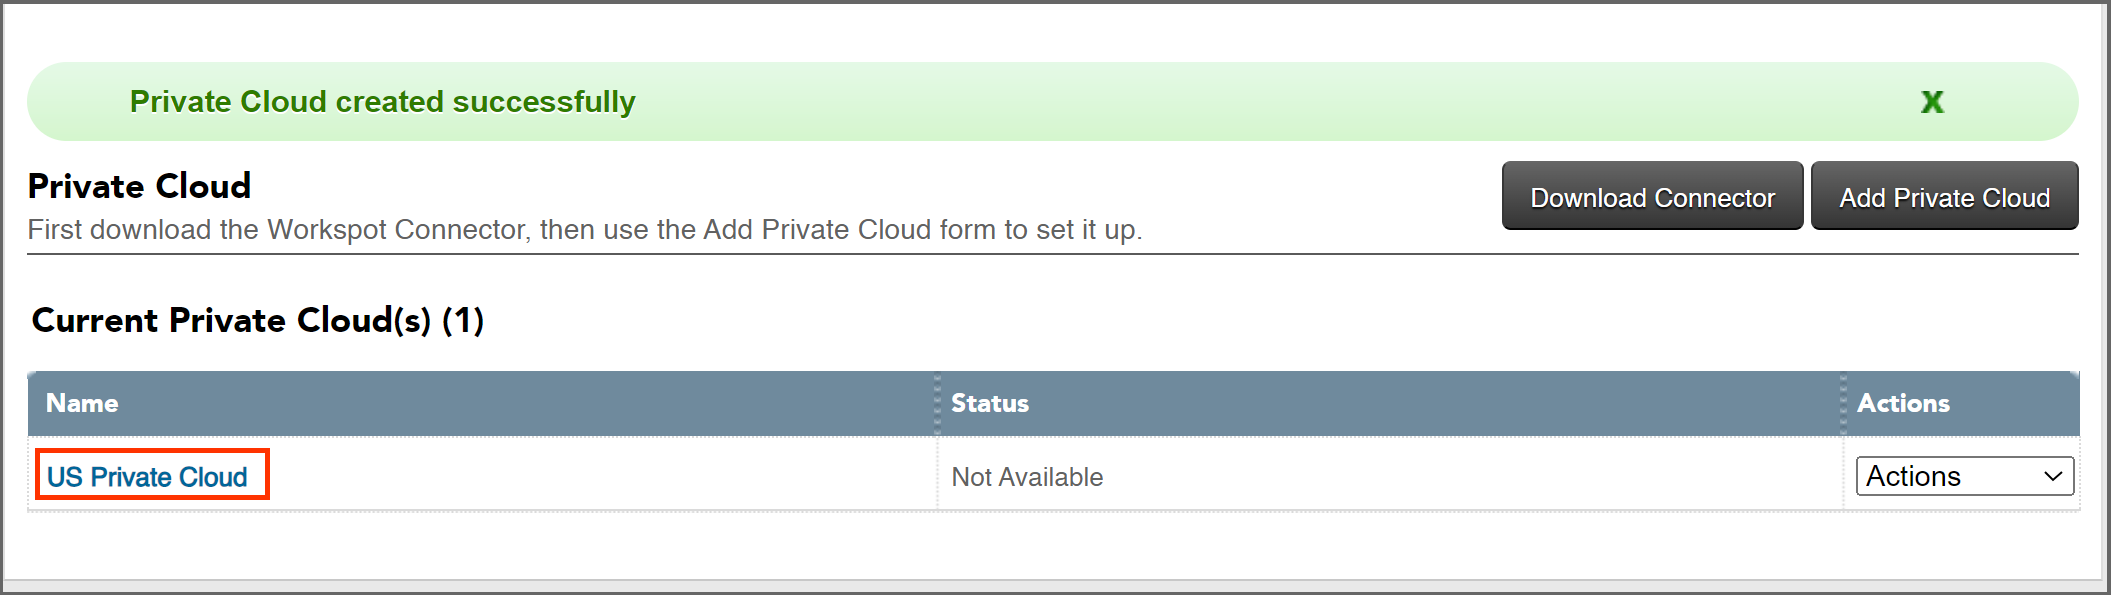
4. Back on the “Setup > Cloud” page, click on the name, "US Private Cloud", to manage its configuration. This will show the “Manage Private Cloud” page, which will show “No connectors.”
Declare a new Enterprise Connector
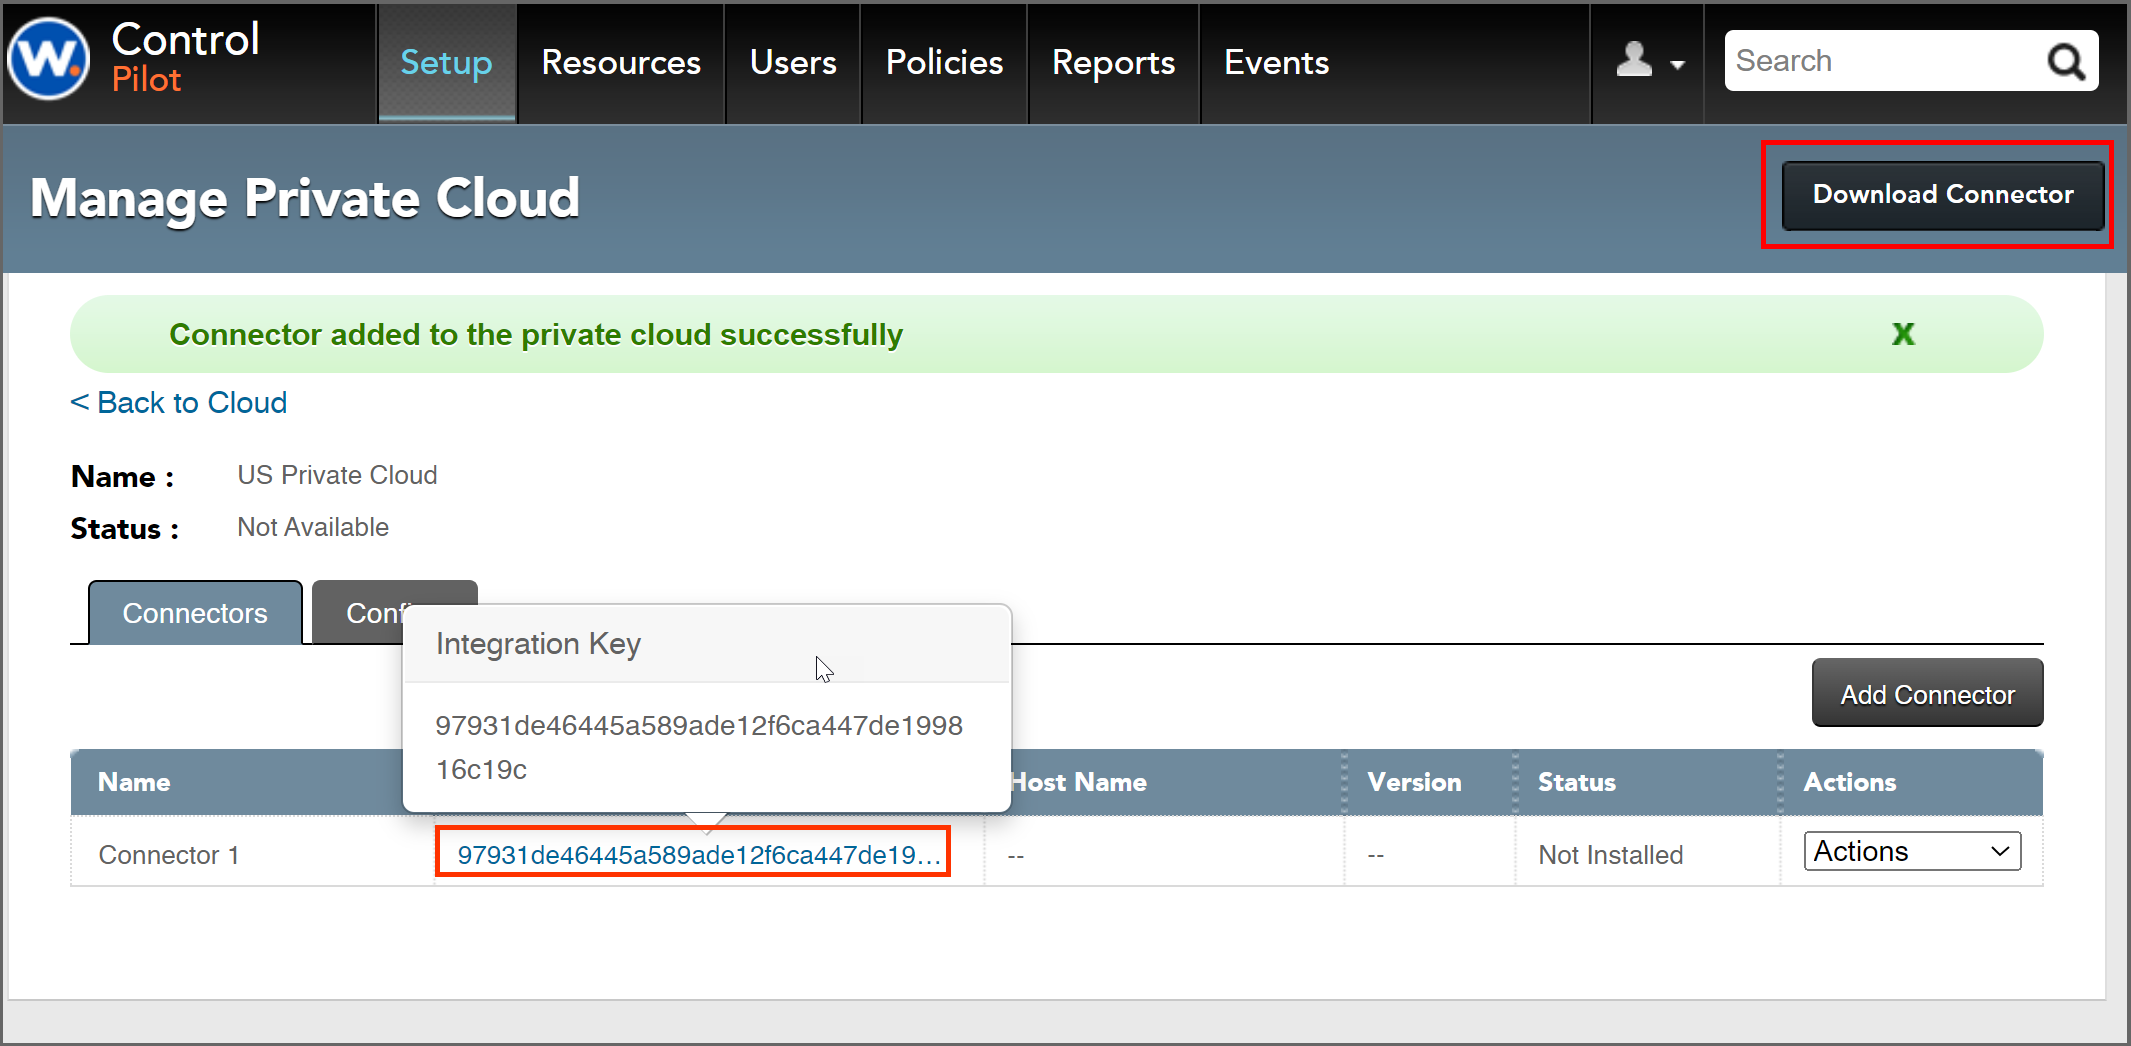
5. Click “Add Connector” and a Connector definition will be declared, along with an integration key that we will copy to Workspot Connector server.
- Click the integration key field and it will pop up a window with the full string. Select this and paste it somewhere, such as in Notepad, since we will need it later.
Download and Install Workspot Connector
6. Sign in as a Windows Administrator on the server on which you are installing Workspot Connector, do that now.
- From the server, use a browser to sign into Workspot Control.
- On the “Setup > Cloud > your_private_cloud_name” page, click the Download Connector button to download the Enterprise Connector installer.
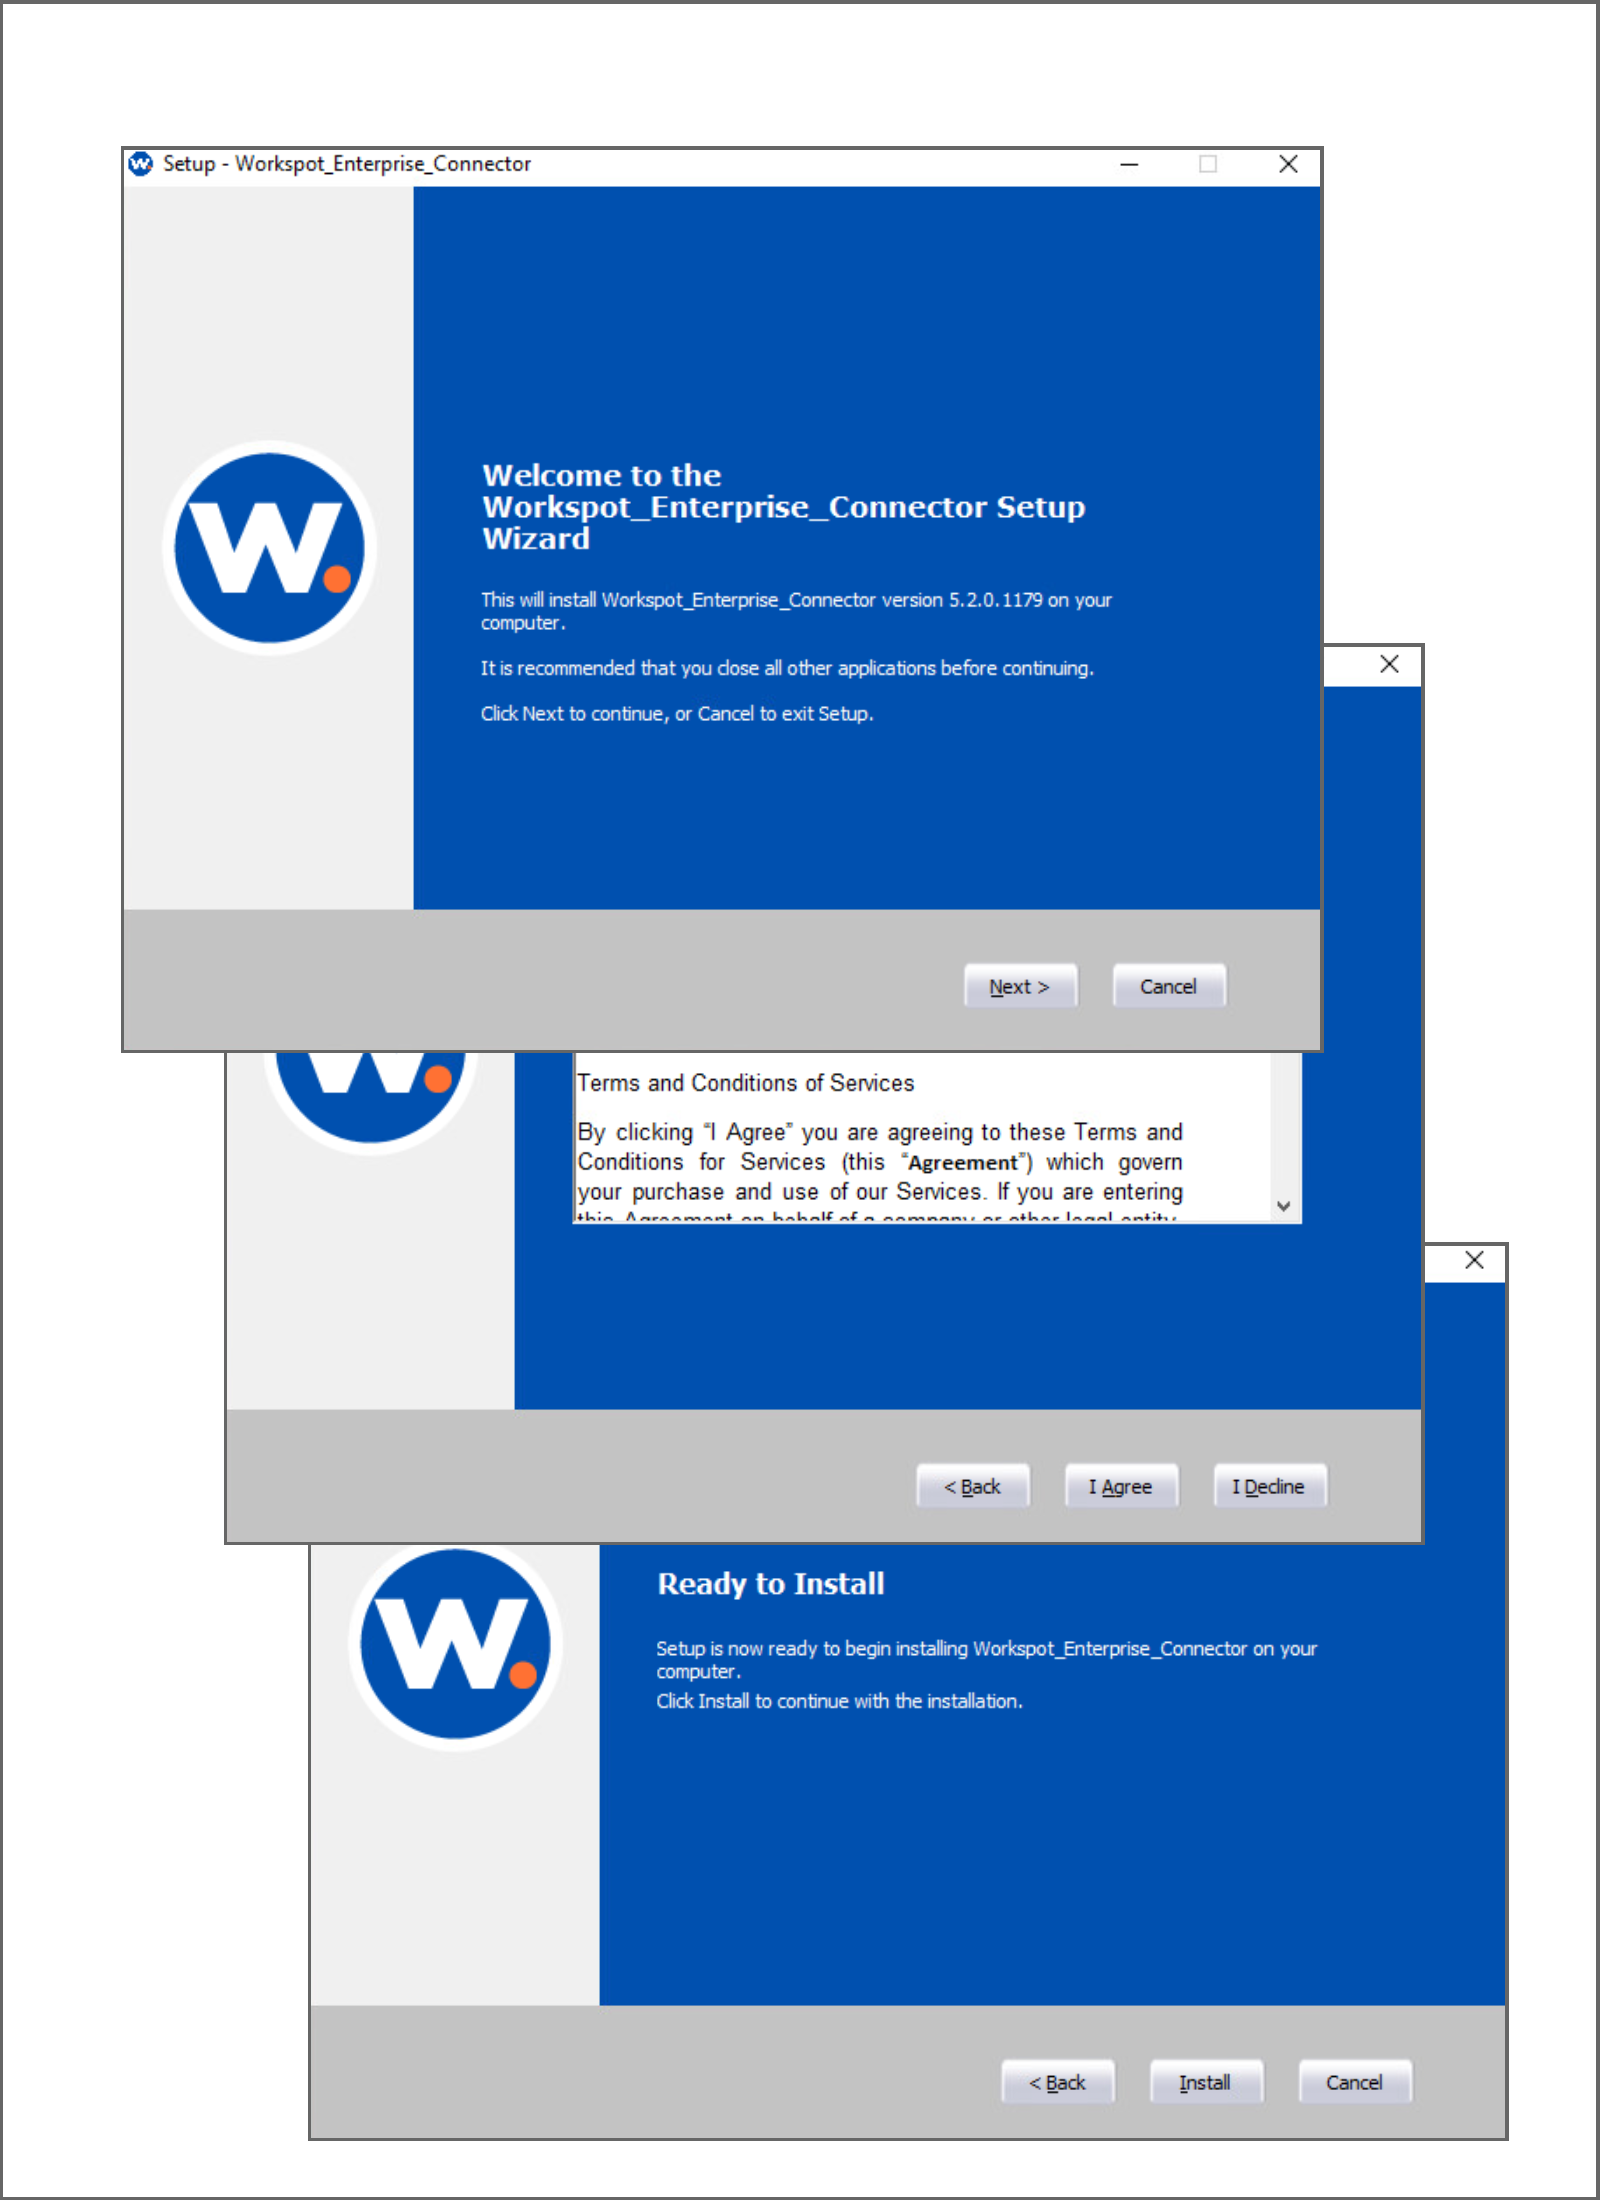
- Launch the Workspot Enterprise Connector Installer and navigate through the initial screens.
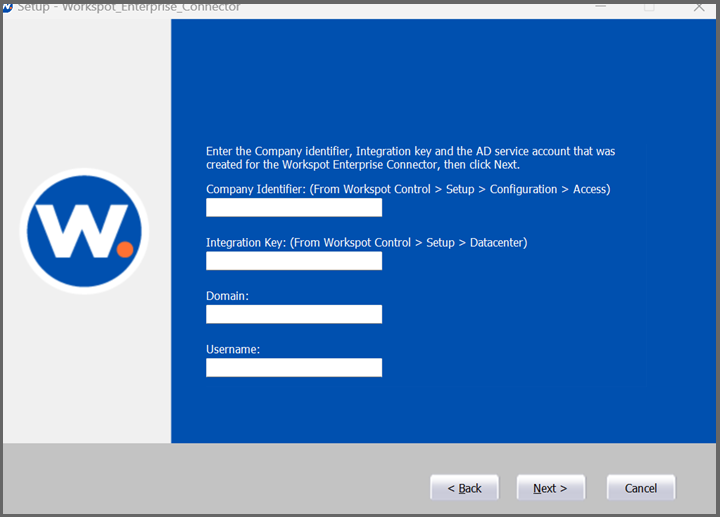
- In the Integration Key screen, paste in:
- Your Company Identifier
- The Integration Key
- The AD domain name Connector is handling requests for
- The username of the service account created previously in Active Directory (and added to this machine's local administrators group)
- The service account's password. Note: If the password contains a double- quote character ("), escape it as (\").
- Click on Next.
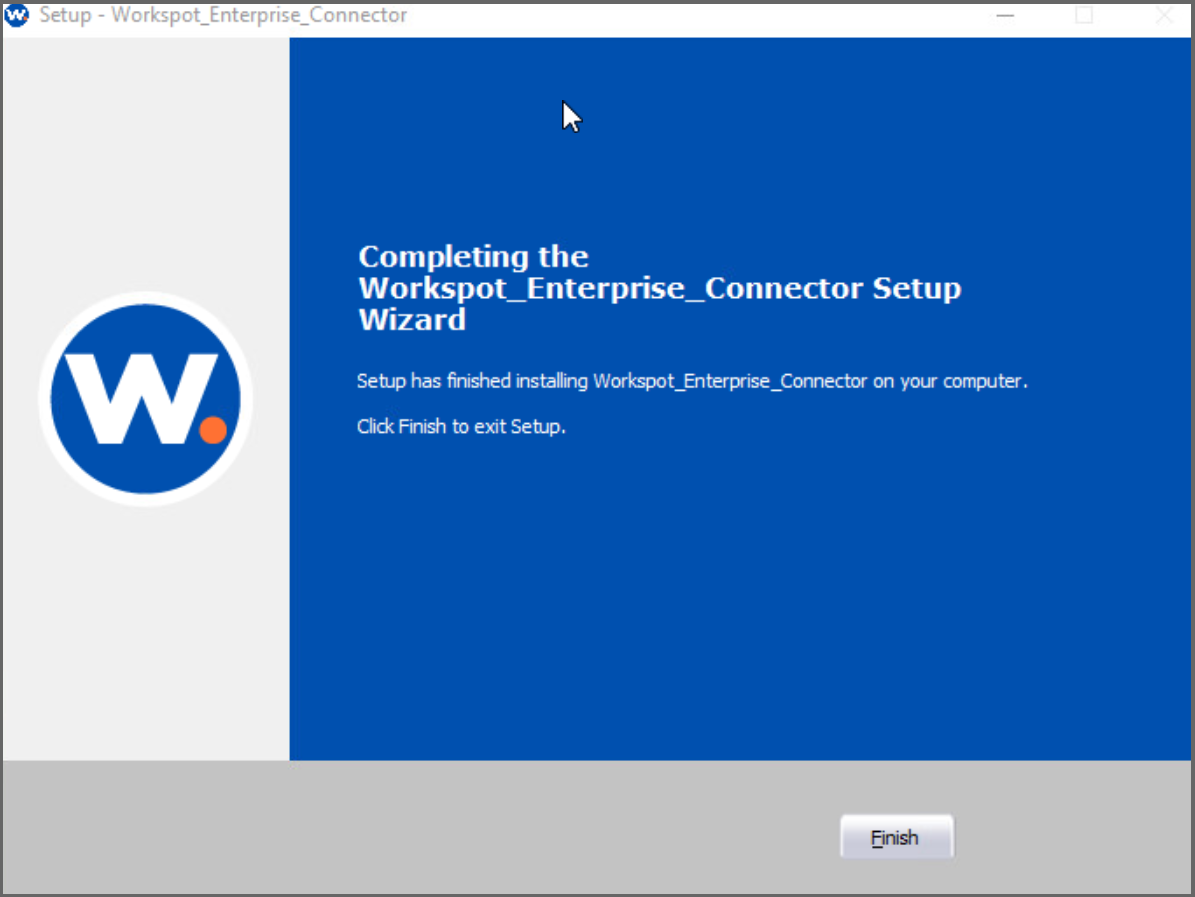
7. Click on Finish.
8. In Windows Services, verify that the Workspot Enterprise Connector service is running
Finish Configuration on Workspot Control
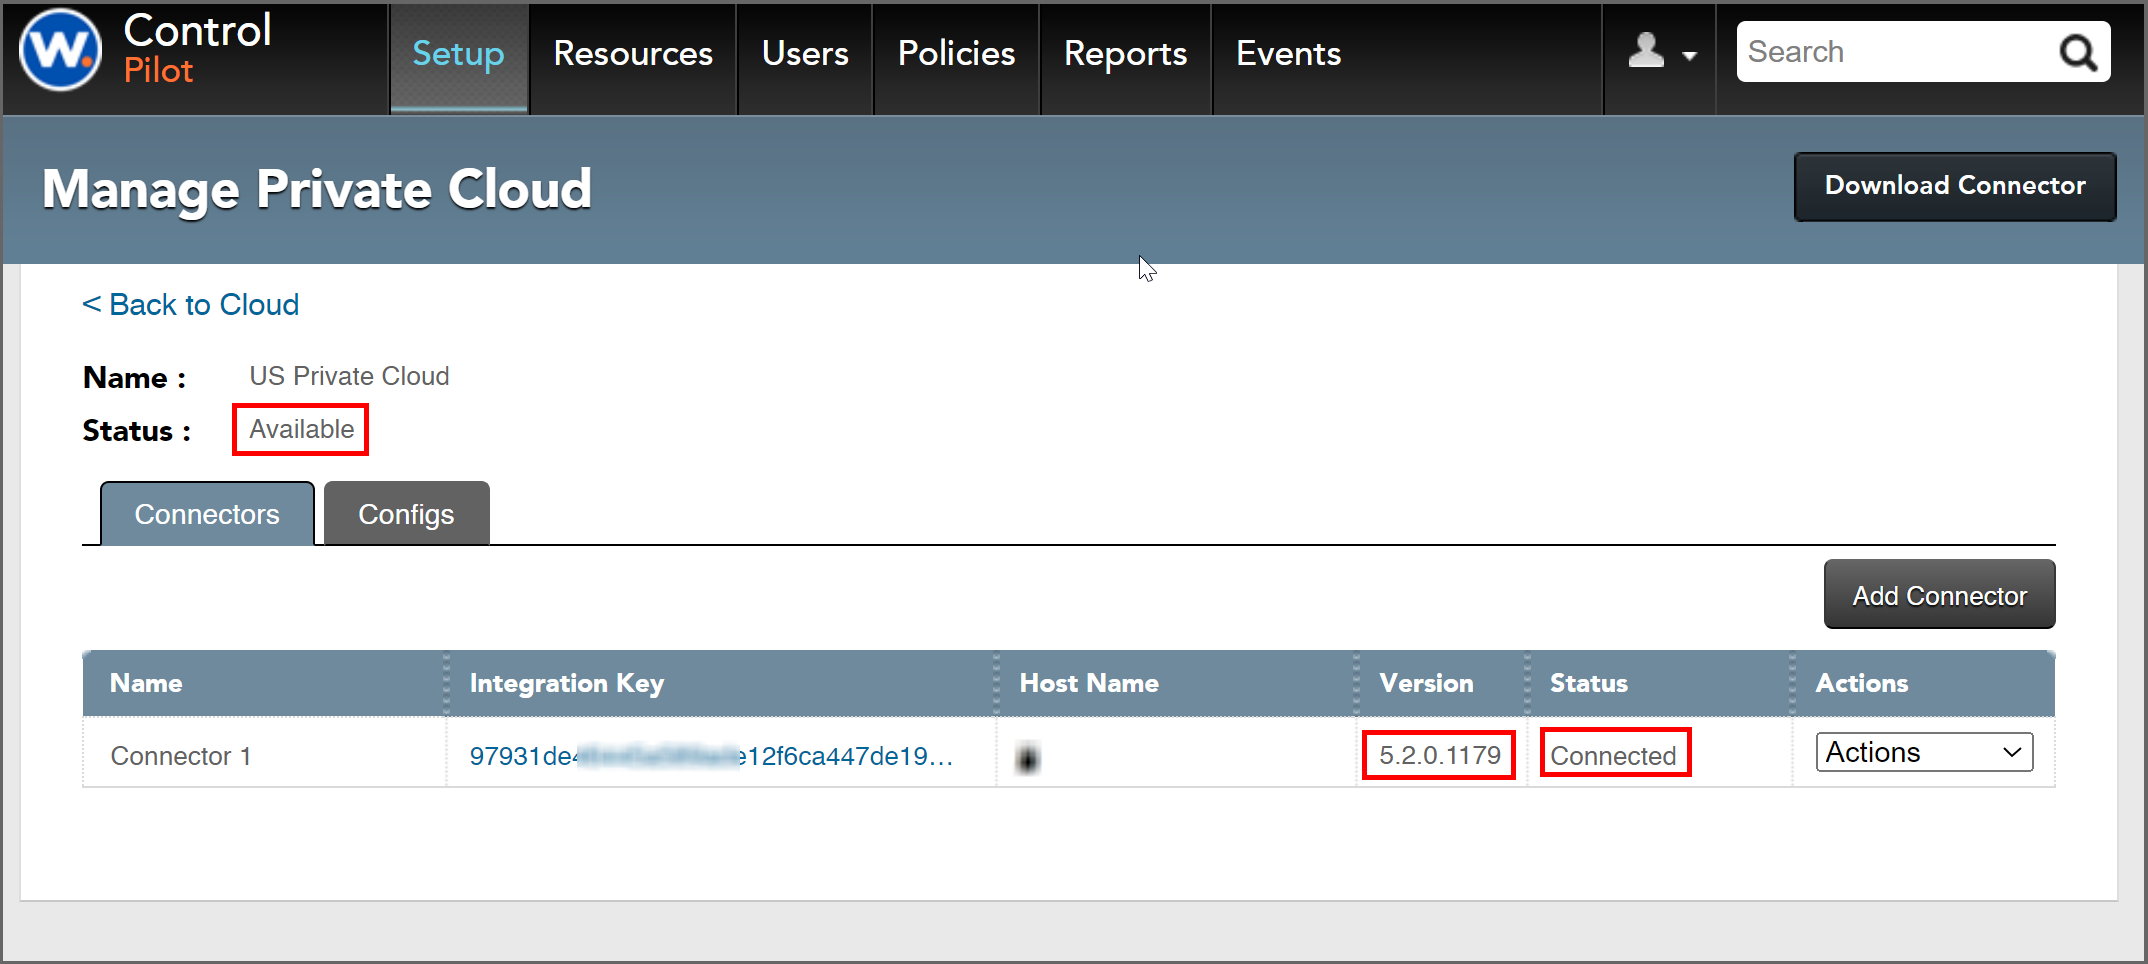
9. Returning to Workspot Control, Go to “Setup > Cloud” to check the Connector status. If installed and configured correctly, the status will show “Available” on the “Cloud” page and “Connected” on the “Private Cloud” page.

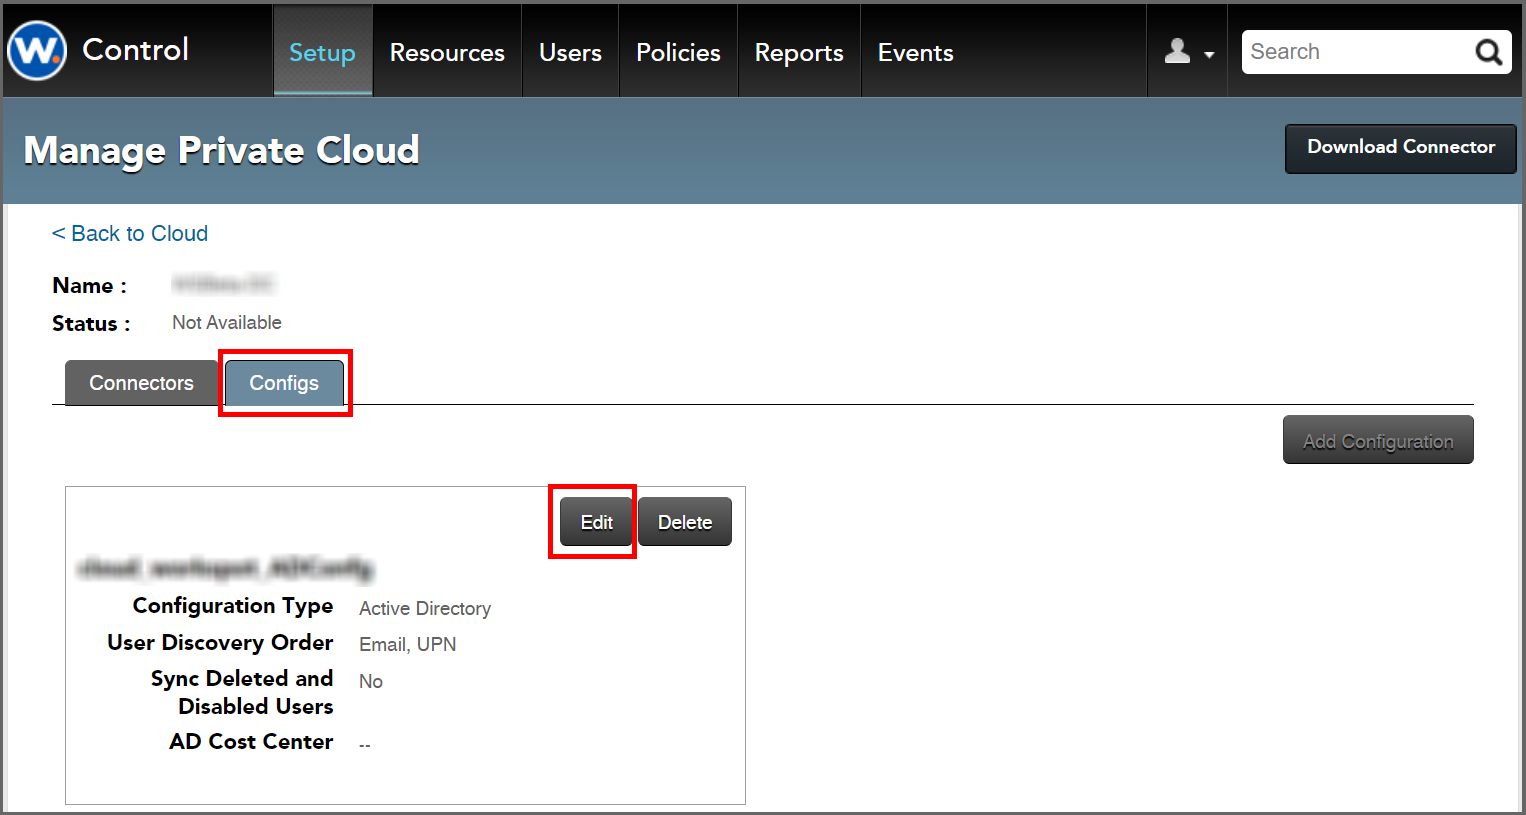
10. The “Configs” tab of the “Manage Private Cloud” page is now active and you can finish your configuration.
Troubleshooting
-
If errors occur during installation and setup, see c:\ProgramData\workspot\setup.txt.
- If Connector doesn't seem to be running, start it in Services.
- If errors occur while Connector is running, see the log file in C:\Program
Files\Workspot_Enterprise_Connector\log.
Related Documents
-
For more information on dsacls. see https://technet.microsoft.com/en-us/library/cc771151.aspx.
© 2024 Workspot