

Using Workspot Templates
Last updated on October 26, 2023 by Robert Plamondon
You can create new Workspot desktop templates from a prepopulated list of Azure Marketplace or GCP images. These images can be turned into templates that you can modify and use in your Workspot desktop pools.
This document describes the process for creating and managing such templates.
Template Concepts
A Workspot template is a desktop image file that includes the Workspot Agent. In this document, we are concerned only with Azure- and GCP-compatible templates.
- Templates are configured for a specific virtual network and, in the case of Azure, region. GCP templates can be deployed worldwide.
- A template must have a local administrator account that you use to sign in to the template to manage and customize it.
- Templates can join an AD domain.
- All the characteristics of the template are inherited by new desktops created from the template (existing desktops are not affected), and by new templates cloned from the parent template (existing templates are not affected).
Template Workflow
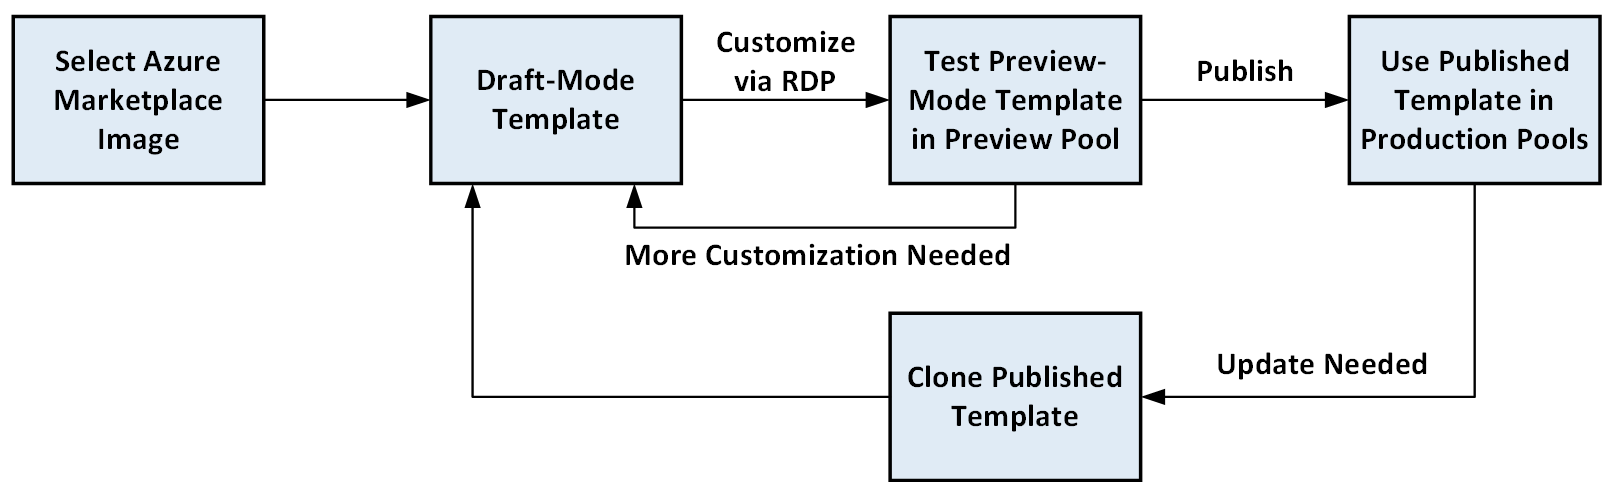
Create the template. First, you clone one of your existing Workspot templates. In Azure, you can also create an Azure Marketplace Template as a simple way of starting fresh. Either way, this creates a new template in Draft mode, which launches the template VM, where it is ready for customization.
Customize the Draft-mode template. Next, you sign into the template using its local administrator account. Then you install your software and change system parameters until the template seems ready for your users.
Preview the template. From Draft mode, you can optionally put the template into Preview mode, which powers it down and makes it available for selected Preview users. When you create a desktop pool from a Preview-mode template, the members of the Preview group receive desktop entitlements in that pool. A template in Preview mode can be returned to Draft mode if you need to make more changes.
Note: Only a single pool can use a given Preview-mode template.
Publish the template. Finally, you put the template into the Published mode, which makes it available for use by ordinary users once you build or edit a pool to use the template.
Clone the template. Published templates can no longer be customized, but they can be cloned, creating a new template from the existing one. The clone is powered up and placed into a Draft mode, ready for customization.
A clone starts out identical to its parent except for a new name, a different Notes field, and the option of selecting a different virtual network in the same region if any.
Since cloning retains all the customizations of the parent template, this is the preferred way of creating a new template when changes aren’t too sweeping. For example, you would start with a clone if the only changes you wanted to make were to install updates.
Commands Allowed with Different Template Status
Different template states allow different commands. The Clone command is only available for published templates, for instance. The complete matrix is shown below:
|
| Draft Mode | Preview Mode | Published Mode |
| Clone |
|
| ✓ |
| Delete | ✓ | ✓ | ✓ |
| Draft |
| ✓ |
|
| Preview | ✓ |
|
|
| Publish | ✓ | ✓ |
|
Creating a Template
If you need to create or upload a template (as opposed to cloning one of your existing Workspot templates), see:
- “Creating an Azure Marketplace Template,” below, for a fresh Azure image.
- Customer Provided Windows 10 template requirements for Azure and GCP for uploaded images.
Creating a Non-Azure Template
Creating a non-Azure template from scratch is beyond the scope of this document. Contact Workspot Support.
Creating an Azure Marketplace Template
If you are on the Microsoft Azure Cloud, you can create a fresh Azure template with the Workspot Agent preinstalled.
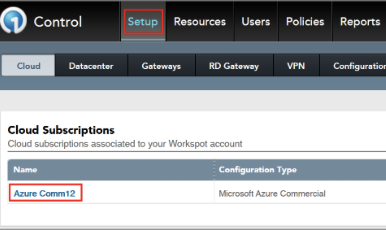
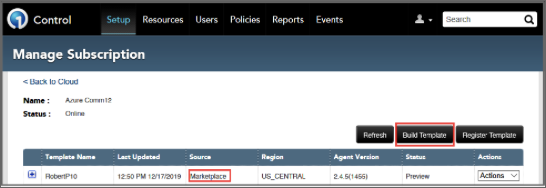
Step 1. Navigate to the "Build Template" page. Templates are created on a per-Cloud-Subscription basis, so the first step is to go to “Setup > cloudname” and click the Build Template” button. This will pop up the “Build Template” page.
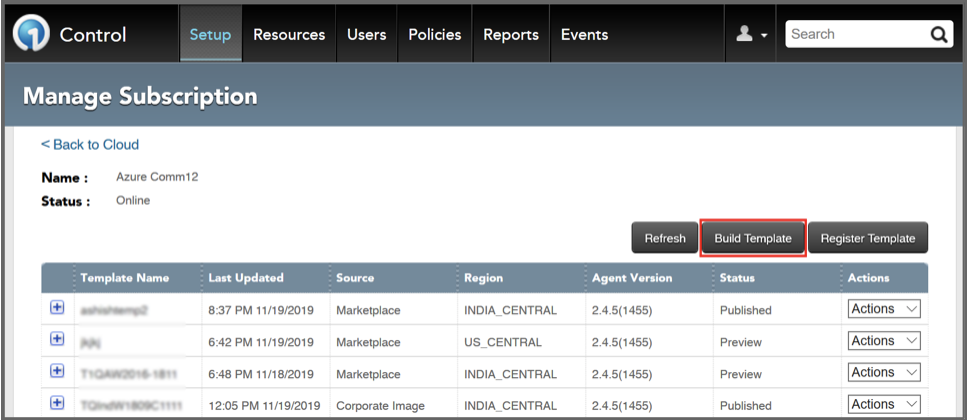
Creating a template via “Setup > cloudname > Build Template.”
Step 2. Fill in the “Build Template” form, as described below:
The Build Template page, shown filled in with typical parameters.
- Region. Click the “Browse” button. This pops up a window that lets you select from the virtual networks defined for your Workspot network. Each virtual network is associated with an Azure region. Select one of these.
- Note: The search box is non-functional. Just click the “Browse” button.
- For Azure, the template can be used only in the specified region. For GCP, the draft-mode template will boot in the selected region, but when published, will work in any region that offers the same VM type.
- OS Type. Select whether the “Image” pull-down menu will show Windows Desktop or Windows Server images.
- Image. A pull-down menu that lists the images. Select one of these.
- Template Name. Enter a name for your template. Use printable ASCII characters.
- Template VM. Click the “Select” button and choose the most appropriate VM from the list. This does not select a VM size for the desktops that will use the template. Instead, it selects the VM size for the template VM itself. It can be smaller than the eventual desktop VM, but it needs to be big enough to allow the software to install successfully on the template.
- Note. A text field that lets you include notes about the template for your own reference.
- Setup Domain Join. If checked, you will be prompted (after clicking “Create Template”) for domain administrator credentials that will be saved in a secure wallet to allow the template (and desktops built from the template) to join your domain.
- Create Template. Click “Create Template.” Control will prompt for domain administrator credentials, if selected, and credentials for a local administrative account. Afterwards it builds the template.
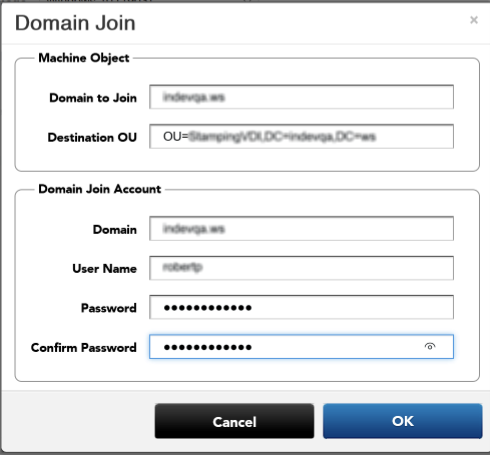
Step 3. Join the domain. If you have checked the “Setup Domain Join” box, you will be asked to join the domain via the “Domain Join” popup. Both the template and any desktops built from it will use these parameters to join the domain. Domain administrator credentials are stored in the VM’s secure wallet. Enter the appropriate domain name, OU string, and the credentials of a domain administrator’s account.
Step 4. Create a Local Admin Account. The “Create Local Admin Account” popup appears next. You will use this account to sign into and administer the template VM. Enter login and password for an administrative account that will be created on your template VM (and all desktops built from the template).
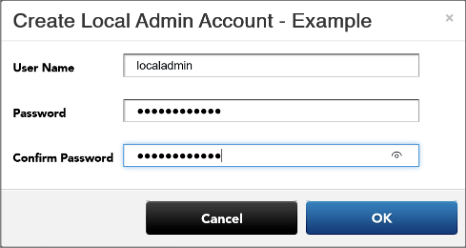
The local admin account allows administrative access
to the template VM for customization.
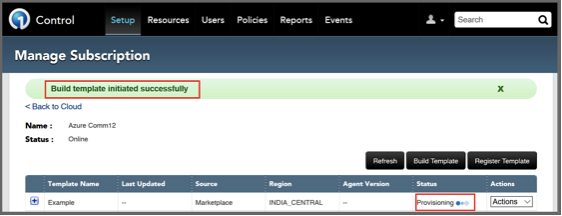
Step 5. Wait for provisioning. Once the credentials are entered, the template begins provisioning. When provisioning is complete, its status will change to Draft.
Signing into the Template via a Jump Server
To sign into your template VM, use a jump server on your Workspot virtual network. This can be done in different ways. Your Cloud provider’s jump-server capabilities let you access templates before you have built your first desktop pool.
The method below requires that you have access to a Workspot desktop on the same network as your template. For example, the jump server can be your exiting Workspot desktop. This method is convenient for administrators who do not have access to the Cloud provider portal.
Step 6. Sign in to the Workspot Client and launch your existing Workspot desktop.
Use an existing Workspot desktop as a jump server.
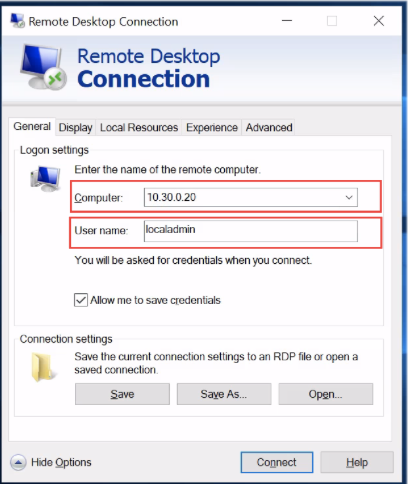
Step 7. Sign in to the template VM. From your Workspot desktop, Use Remote Desktop Connection to sign into the template VM.
- You can find the template VM’s IP address by expanding its entry on the “Manage Subscription” page.

Discovering the IP address of your template VM.
- On the Workspot desktop, launch Remote Desktop Connection and sign into the template VM using the local administrator credentials you set earlier.
Connect to the template VM using Remote Desktop Connection.
- You will see a Remote Desktop security warning, since the template VM uses a self-signed certificate. Accept the certificate to continue.
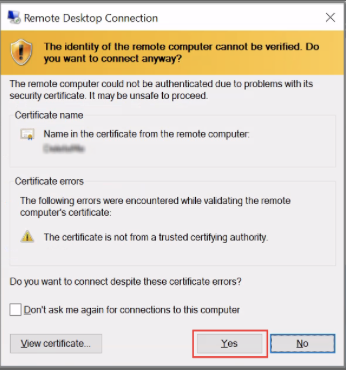
This certificate warning is expected.
- You are now signed into your template VM as the local administrator.
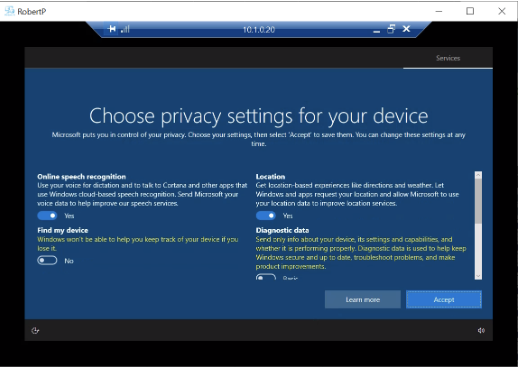
Remote Desktop window after signing into template VM (will vary with choice of template).
Customize the Template
Once you have signed into the template, you can install software and adjust system settings to match the needs of your users.
In the example screen capture below, the system default wallpaper has been changed and Firefox has been installed, plus other changes that aren’t visible in the screen capture.
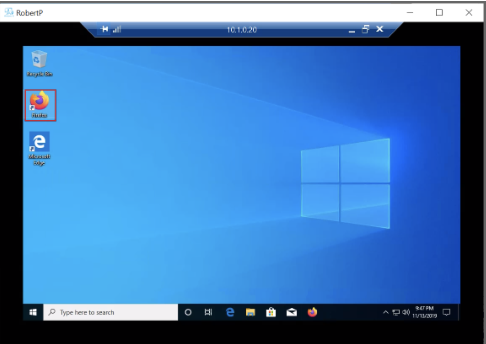
A template after installing Firefox and changing the default wallpaper system-wide.
Adjusting System Settings
See Workspot Desktop Templates: Recommended Optimizations for a list of recommended settings, most of which use the Group Policy Editor.
For example, with non-persistent desktop pools, setting appropriate session idle timeouts is essential to ensure that the desktops are returned to the pool after the user has finished with them.
Once the template VM is set up to your satisfaction, it can be shared with a pool of selected users by putting it into Preview mode.
Automatic Shutdown
Draft-mode templates are shut down automatically after seven days by being put into Preview Mode, described below.
Preview Mode
The next step is to put the template into Preview mode via “Setup > cloudname > templatename > Actions > Preview.” A template in Preview mode can be used to create a Preview pool, which will be shared with Preview users.
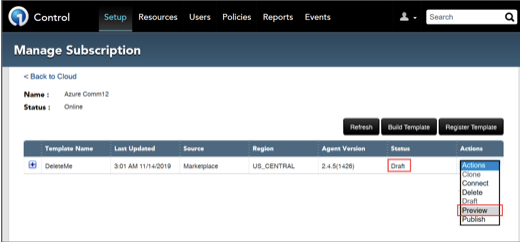
Placing a template into Preview mode.
Creating a Desktop Pool Using a Preview-Mode Template
This is the same as creating any other desktop pool, except that when selecting a template, check the “Preview” box and click the Search button to show the templates in Preview mode. Select the desired template.
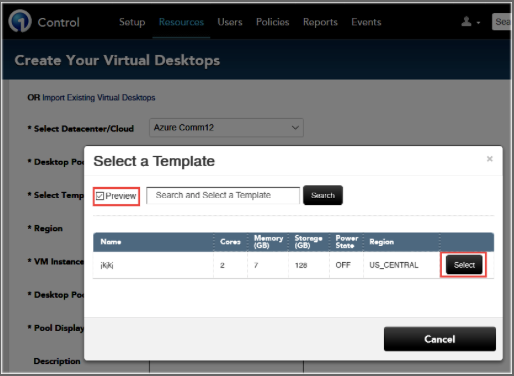
Creating a desktop pool using Preview template.
See Control: Desktop Pools for general instructions for creating desktop pools and Workspot Desktop Templates: Recommended Optimizations for recommended settings.
Note: Only a single pool can be created from a given Preview-mode template.
Preview Pool Group and Preview Users
On the “Users > Groups” page, the Preview Pool group defines which security policy, network policy, app policy, and VPN are used with Preview-mode desktops.
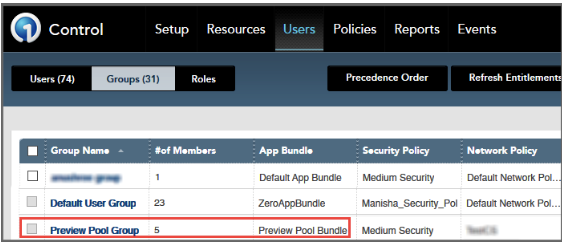
The Preview Pool Group determines who has access to Preview desktops.
The purpose of the Preview Pool Group is to allow selected users to test the new templates. To add users to the Preview Pool Group, change the group membership for the selected users via “Users > username > User Profile > Actions > Change Group > Preview Pool Group.”
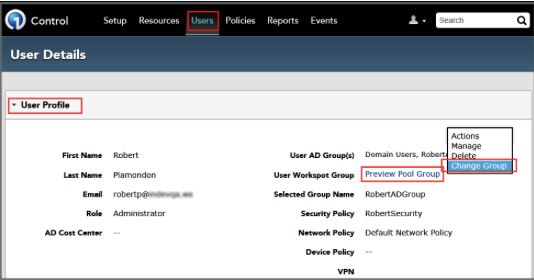
Adding a user to the Preview Pool Group.
Members of the Preview Pool Group will see desktops on each of the Preview pools in the Workspot Client.
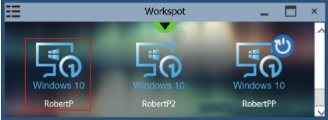
Preview pool desktops are shown in the Client for each user in the Preview Pool group.
Updating the Preview Template
To make changes to the Preview template, set its state back to Draft, make your changes, and return it to Preview.
This does not change existing Preview users' desktops. To propagate your changes, delete and recreate the desktops.
Publishing the Preview Template
If changes need to be made to the Preview template, put it back into Draft mode via Setup > cloudname > templatename > Actions > Draft” and customize it as before.
When it’s ready for ordinary users, put it into Published mode via Setup > cloudname > templatename > Actions > Publish.” After publication, you can assign the template to new desktop pools or to existing desktop pools using the “Resources > VDI Pools > poolname > Actions > Update Image”
Publishing a template.
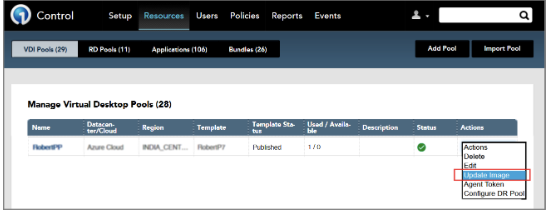
Assigning a template to an existing pool via Update Image.
Updating Published Templates
A published template cannot be put into the Draft mode. Instead, clone it via Setup > cloudname > templatename > Actions > Clone.” The clone will be placed into Draft mode and you can continue as with any other Draft template.
Troubleshooting
Reregistering a Template
If Control loses track of a template VM, you can reregister it. See the instruction in Workspot Desktop Agent: Installation and Configuration.
Related Documents
© 2023 Workspot