

Control: Desktop Pools
Latest update: April 25, 2024 by Robert Plamondon
Contents
Introduction
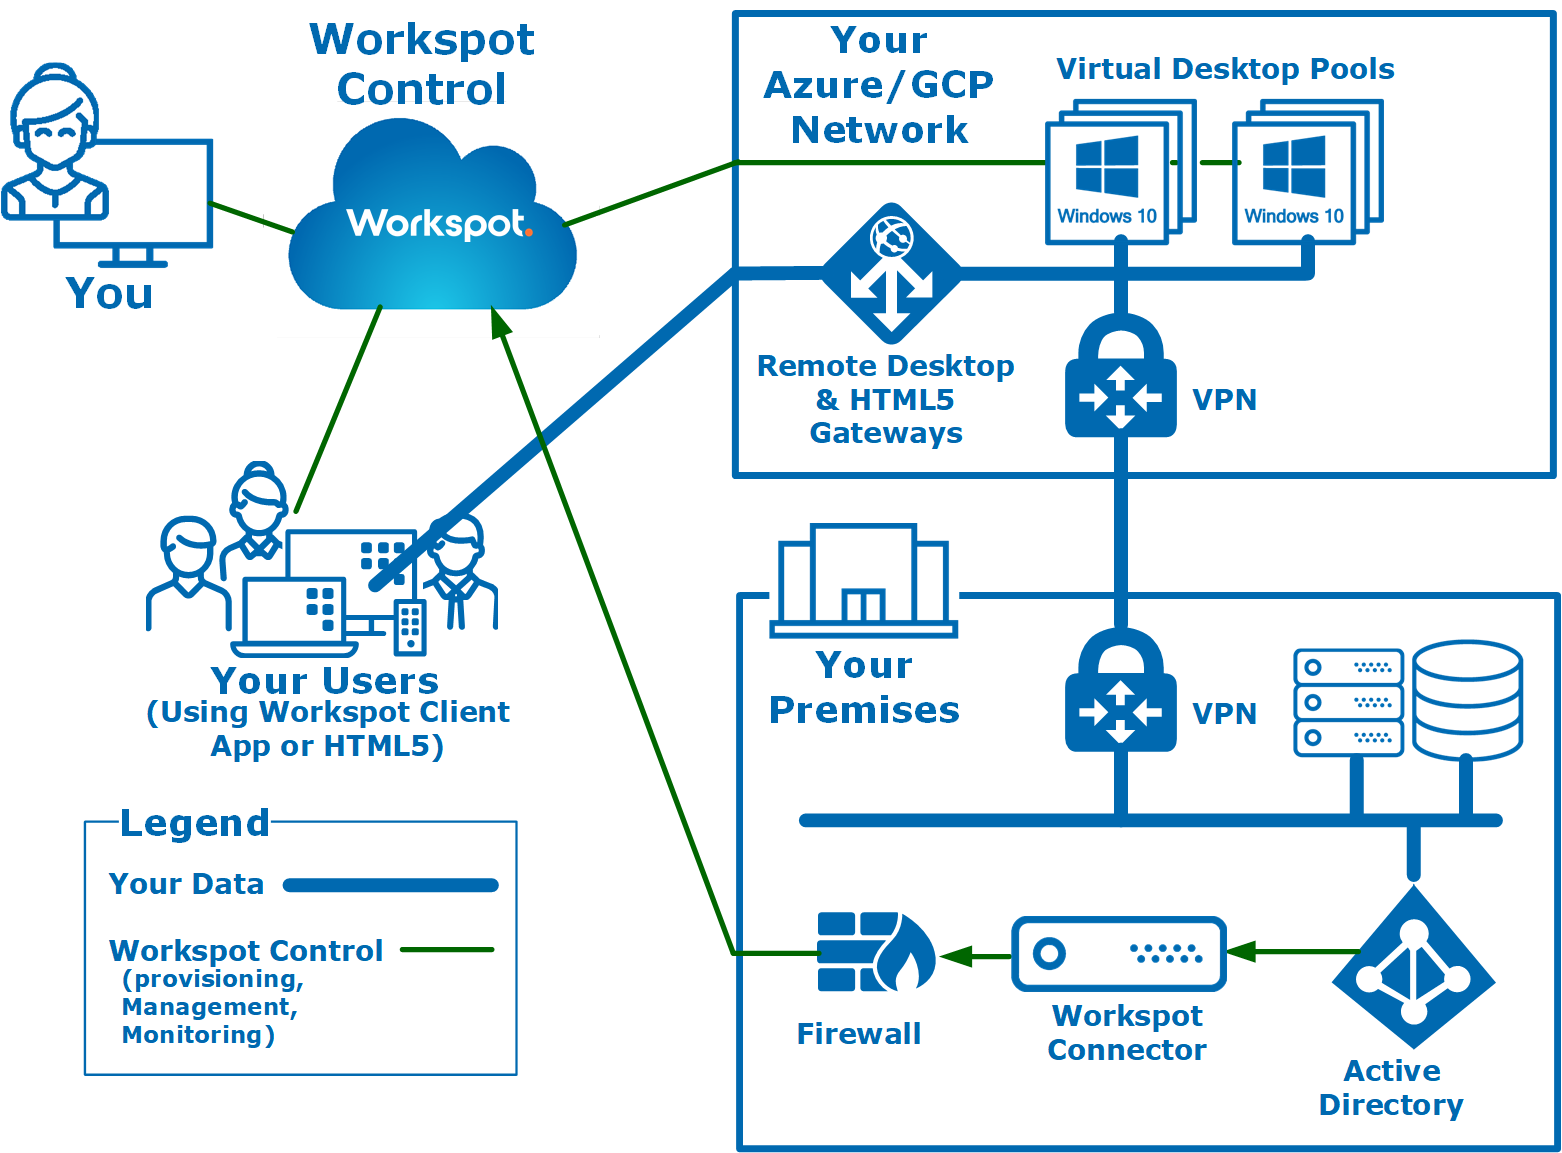
Desktop pools are at the core of your Workspot deployment. A Workspot desktop is usually a virtual Windows desktop, typically hosted in the Cloud (Microsoft Azure, Google GCP, Amazon AWS, or Amazon Workspaces Core), but sometimes in a customer’s on-premises datacenter.
A pool of desktops is a group of virtual desktops built from the same template, with identical memory, disk, and CPU resources, and managed as a unit. Some organizations use a variety of desktop types, from small Windows virtual desktops to large Windows virtual workstations with powerful Nvidia or AMD GPUs.
Upon self-registration for Workspot access, your users are automatically assigned a desktop from an appropriate pool, typically determined by their Active Directory group membership. Different groups may receive GPU workstations, second powerful desktops, or minimal desktops. This is covered in the Assigning Pools to Users and Groups section.
The Administrator creates pools (see Creating a Desktop Pool ) and can also delete pools, create the group policies that determine pool membership, assign desktops to individual users, etc. See Managing Pools.
The Administrator can also manage individual desktops (rebooting, redeploying, reassigning, etc.). See Managing Individual Desktops in a Pool.
Persistent, Non-Persistent, and GPU Pools
There are two basic types of desktop pools: persistent and non-persistent. This refers to the license type used:
- A persistent desktop pool consists of desktops using persistent desktop licenses (also called named licenses). When a user acquires a desktop in a persistent pool, the desktop and license are assigned to that user permanently (unless revoked). The user signs into the same desktop day after day, their desktop is always available, and any customization they make to their desktop is retained. Persistent desktops are equivalent to a dedicated personal computer.
- A non-persistent desktop pool consists of desktops using temporary desktop licenses (also called concurrent licenses). The desktop and its license are assigned to the user only for the duration of the current login session. When the user is signed out, their ownership of the desktop ceases and someone else can use it. This temporary assignment means that user customization is lost between sessions.
- A GPU workstation pool is a persistent or non-persistent desktop pool that has a GPU specified in its template. Creating and managing GPU workstation pools is the same as desktop pools. GPU pools do not have an identical feature set to desktop pools; for example, some power-management modes are not supported. Otherwise, everything said here about desktop pools applies to GPU pools as well.
There are also persistent and non-persistent Global Desktop Pools. See Workspot Global Desktops Overview and Non-Persistent Global Desktop Pools for more information.
Creating a Desktop Pool
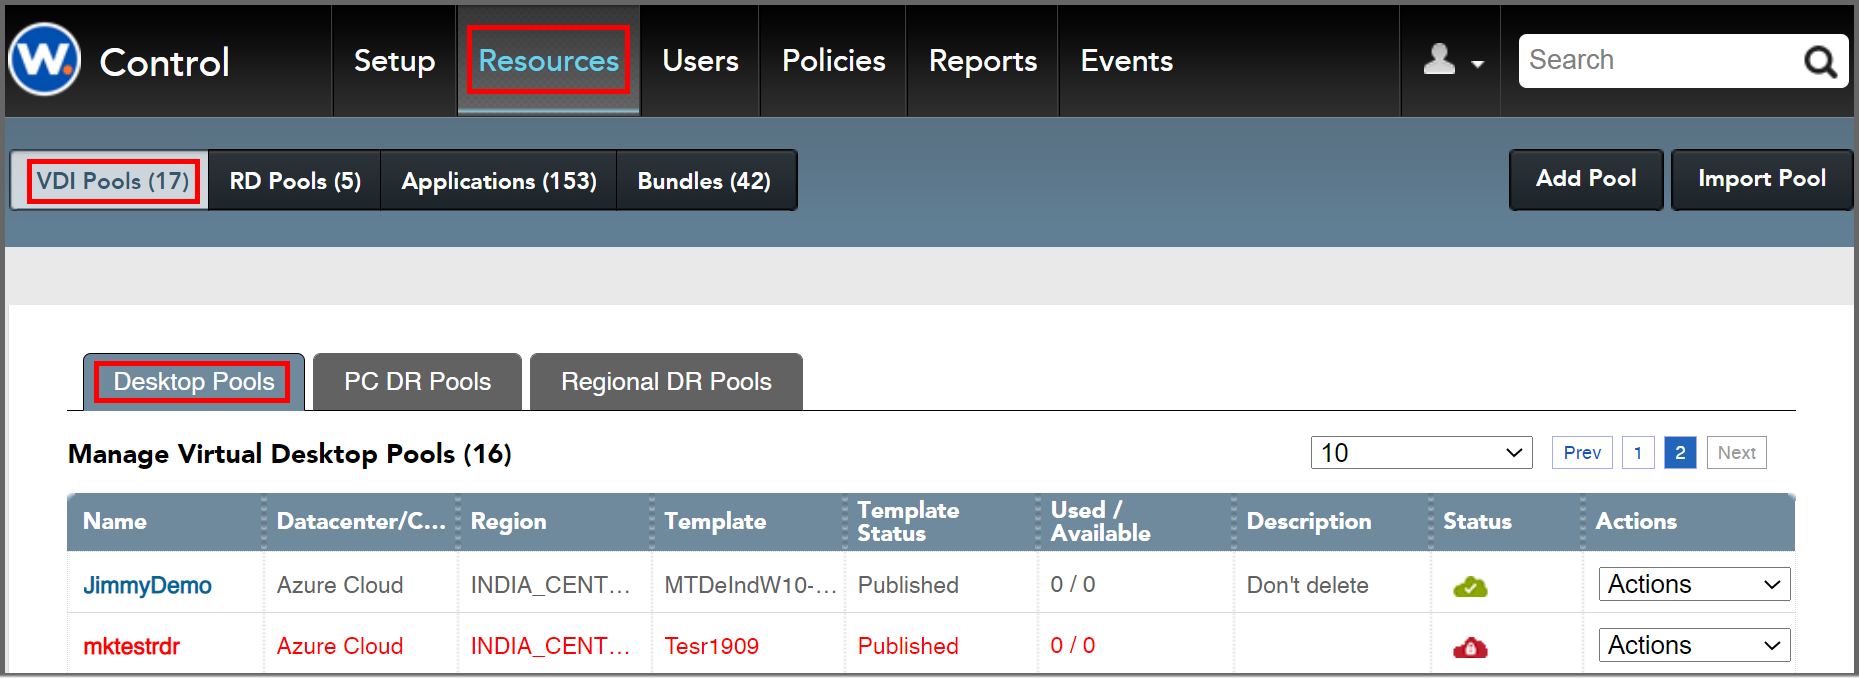
Add pools with the "Resources > Desktop Pools > Add Pool" button.
Desktop pools can be created by Control users with full Administrator access.
To create a desktop pool
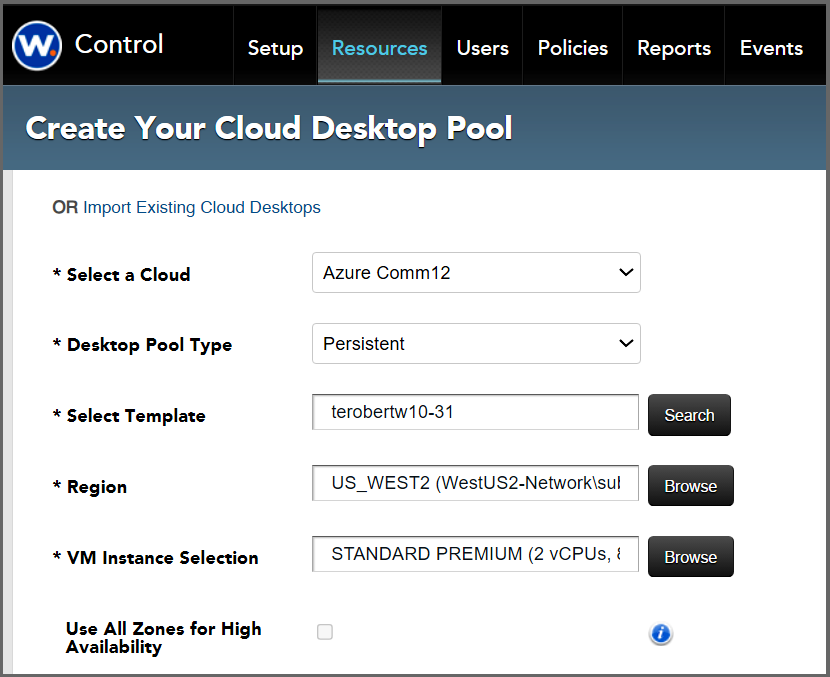
The “Create Your Virtual Desktops” form, part 1.
Step 1. Log into Workspot Control.
Step 2. Click “Resources > VDI Pools > Add Pool.” The “Create Your Virtual Desktops” page appears. Fill in the form as described below.
Note: Fields marked with an asterisk (*) are required.
Step 3. *Select Datacenter/Cloud. Specifies the location (datacenter or cloud) of the pool. Azure and GCP deployments usually specify a cloud declared on “Setup > Cloud,” while on-premises deployments specify a datacenter from “Setup > Datacenter.”
Step 4. *Select a Config. Not shown if a Cloud is specified above. Select the config as advised by Workspot.
Step 5. *Desktop Pool Type. Selects a pool of either persistent or a non-persistent desktops. Persistent desktops are allocated permanently to a single user. Non-persistent desktops are reallocated between user sessions.
Step 6. *Select Template. Selects the desktop image template to use for the desktops.
- Ignoring the search field, click the “Search” button to display the “Select a Template” popup.
- In the “Select a Template” popup, click the “Search” button to display all templates, or type a string in the search box to search for a template with a name matching the search string.
-
Click the “Select” button for the desired template.
Step 7. *Select Region. Selects the region and network (virtual address space) used by the pool.
-
Click the “Browse” button to show all the defined network spaces. The spaces that are consistent with your template and datacenter have active “Select” buttons; others are grayed out.
-
Click the “Select” button of the desired region.
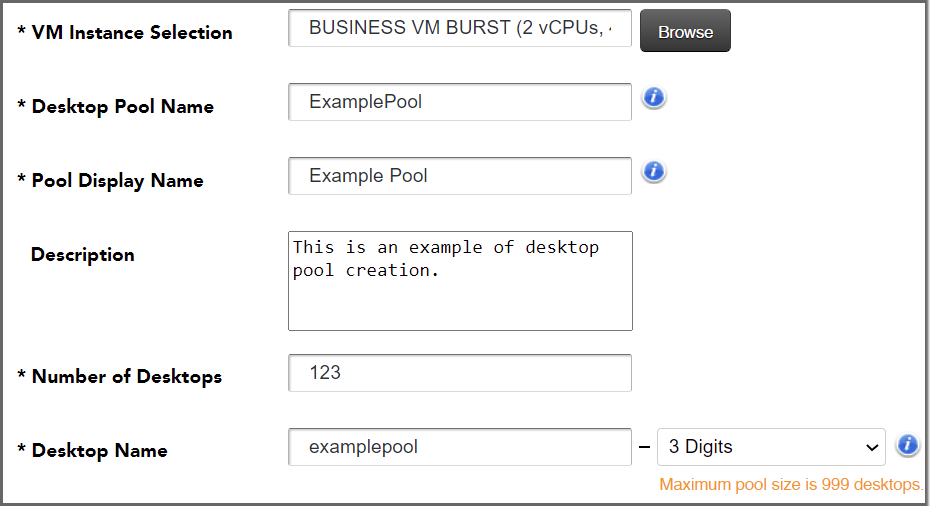
Step 8. *VM Instance Selection or VM Class (depending on Cloud). Virtual machines are available in discrete sizes in terms of virtual CPUs, memory, and disk size. VMs that use re- sources compatible with your template are shown here.
-
Click the “Browse” button to show the “Select VM Instance” popup. The parameters of your selected template are given first, then a list of compatible VMs.
-
Click the “Select” button for one of the VMs.
-
Note: If the name of one or more selections includes an OS, such as “Ubuntu 18.04 LTS,” choose one of these if it matches your template’s OS and avoid them otherwise.
The “Create Your Virtual Desktops” form, part 2.
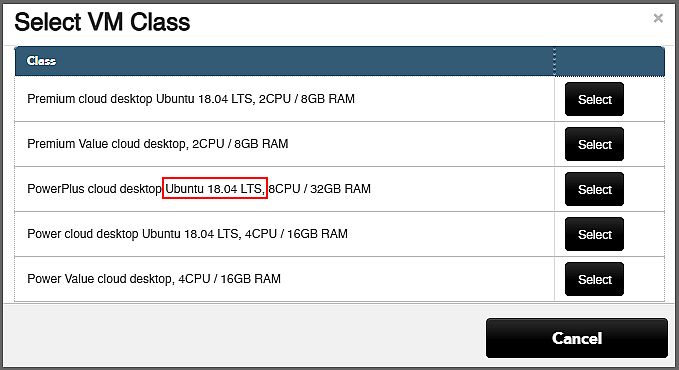
The “Select VM Class” pop-up containing several OS-specific choices.
Step 9. If your Cloud and plan require sole-tenant nodes (STN) and you have a choice of more than one STN type or size, you will see a “Sole Tenant Node Type” pull-down menu. Select one of the options.
Step 10. *Desktop Pool Name. The name displayed by Control for this pool.
- Only alphanumeric characters are allowed.
- This name must be unique across your entire Workspot deployment.
Step 11. *Pool Display Name. This name will be displayed by the Workspot Client. This name can contain spaces and punctuation.
Step 12. Description. An optional text field for information about the pool.
Step 13. *Number of Desktops. A numeric field specifying how many desktops to create initially.
- The number of desktops can be increased or decreased later.
- If you specify more desktops than you have entitlements for, you will see an error when you click the “Create” button.
Step 14. *Desktop Name. The hostname of the desktops in the pool. Each desktop will have a hostname consisting of this string, a hyphen, and a 1-4 digit number. For example, mydesktop-123.
-
Use alphanumeric characters for this field.
-
GCP does not allow upper-case characters here.
-
The total length of the string must be 15 characters or less, including the hyphen and the number, or you will see an error message when you click the “Create” button.
-
The number field is specified in the pull-down “digits” menu as 1-4 digits.
-
Note that while a four-digit number field is allowed, it is never necessary, since the maximum number of desktops currently allowed is 999. (Thus, if you specify a four-digit number, it will always have a leading zero.)
-
If you specify a too-small number of digits for the number of desktops, you will see an error message when you click “Create.”
The “Create Your Virtual Desktops” form, part 3.
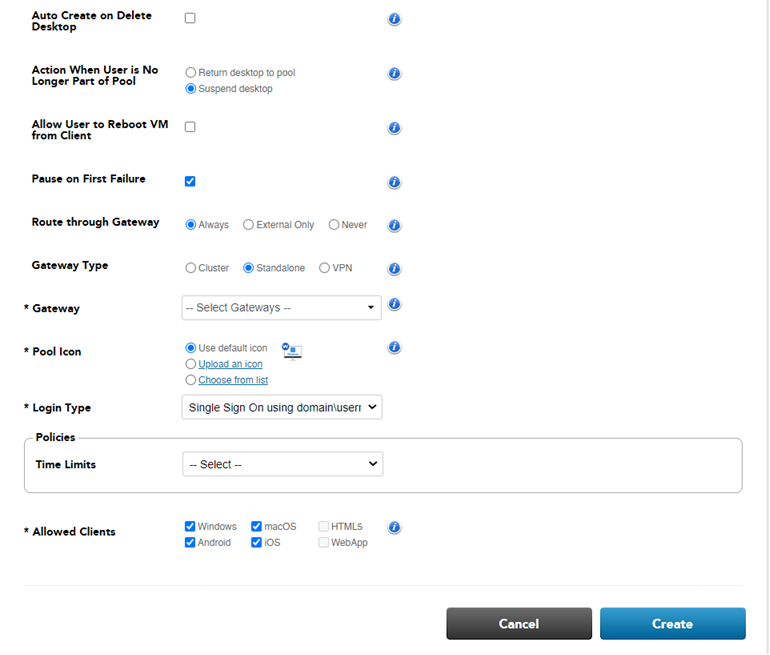
Step 15. Auto Create on Delete Desktop. If selected, a new desktop will be created whenever an old one is deleted, maintaining the size of the pool. (Default is “no.”)
Step 16. Action When User is No Longer Part of the Pool. Shown only for persistent desktop pools. When a user is no longer entitled to a desktop in this pool, the desktop is either returned to the pool or suspended. (Default is “Suspend desktop.”)
-
In both cases, the former user can no longer sign into the desktop.
-
A suspended desktop is no longer allocated to anyone until reallocated by the Control Administrator. This makes it available for inspection by the Administrator before it is returned to the pool.
Step 17. Allow User to Reboot VM from Client. Shown only for persistent desktop pools. If selected, end-users can reboot their desktop from the Workspot Client. (Default is “no.”)
Step 18. Pause on First Failure. The provisioning process will halt if an error is detected. This prevents all desktops from failing with the same error if there is a problem. (Default is “yes.”)
-
Multiple desktops are provisioned in parallel, and the process does not truly pause until all these complete.
-
Once paused, the Administrator is given an option to resume the provisioning.
Step 19. Route Through Gateway. In this context, a “Gateway” is either a VPN or an RD Gateway known to Control. The options are “Always,” “External Only,” or “Never.” (Default is “Always.”)
-
“Always” means that either a VPN or an RD Gateway is used for all Workspot Client connections to the desktops in the pool. This option is recommended when the pool is in the Cloud.
-
“External Only” means that the VPN or RD Gateway are used only when the Client believes it is not connected to the organization’s network, as determined by the Location Detector mechanism. This option is typically used for on-premises deployments.
- “Never” means that the Client will always attempt a direct connection to the desktop. This option is typically used for on-premises deployments.
Step 20. Gateway Type. This is one of “Cluster” (a Managed Gateway Cluster), “Standalone” (a legacy RD gateway), or “VPN.” New installations will typically use gateway clusters.
Step 21. Gateway. VPN option is not shown unless a VPN is declared in “Setup > VPN.” Selects whether a VPN or one or more RD Gateways are used to connect to the pool.
- “VPN” is the default if a VPN is declared in “Settings > VPN.”
-
Managed RD gateway clusters are recommended for Azure and GCP pools.
-
To use an RD Gateway (either managed or legacy), select at least one RD Gateway from the “Select Gateways” pull-down menu.
-
Selecting more than one gives greater scalability and redundancy. If more than one RD Gateway is selected, the Workspot Client will choose one from the list at random when connecting or reconnecting.
-
Choose the gateways in the same region as the pool. Distant gateways add unnecessary latency.
-
Step 22. *Pool Icon. Selects which icon to display on the Workspot Client for this pool. Choices are “Use default icon,” “Upload an icon,” and “Choose from list.”
-
Uploaded icons should be in .PNG format.
-
“Choose from list” displays a list of over 40 standard icons.
Step 23. *Login Type. Choose between “Single Sign On using username and password” and “Single Sign On using domain\username and password.”
Step 24. Login Domain. Not shown if you select “Single Sign On using do- main\username and password.” Specifies the default domain name for user sign-in.
Step 25. Policies. If desired, select existing Time policies (Default named Policy, Default Concurrent Policy) to use for this pool. (Note: The "Select" menu entry means "None.")
Step 26. Allowed Clients. If you want to prevent some Workspot Clients from accessing this pool (for example, the Workspot Android Client), deselect them here.
Step 27. Create. Click the “Create” button to provision the pool.
- If the “Create Your Virtual Desktops” fields are filled in acceptably, the “Manage Virtual Desktops” page will be displayed with a banner that says “Pool Created Successfully.” Otherwise, an error message is displayed and you will remain on the “Create Your Virtual Desktops” page.
-
Provisioning takes some time. Click the “Check Progress” link to monitor provisioning progress on an auto-updated page.
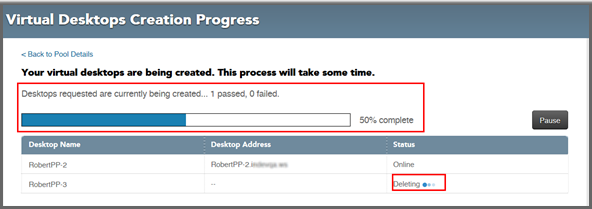
Creation progress page.
Step 28. When the desktops go from “Online” to “Ready,” they are available to users.
Note: If you are using a Cloud and a Workspot plan that involves the use of sole-tenant nodes, you will see a banner at the top of the page reminding you of this. You may also be asked to select a type/size of sole tenant node.
Desktop Provisioning Failure and Timeout
Sometimes the Cloud provider fails to provision one or more desktops. Control will return a “Failed” or “Error” status with the provider’s error message if there is one. Control will time out and consider the desktop provisioning to have failed if it hasn’t been created within thirty minutes.
Editing Pools
Editing an existing pool uses the “Edit Virtual Desktops” page, which is almost identical to the page used to create the pool. The difference is that a few fields cannot be edited:
-
Select Datacenter/Cloud,
-
Desktop Pool Type,
-
Select Template,
-
Desktop Pool Name,
- Desktop Name.
Otherwise, you can alter the pool’s parameters as desired. For example, the number of desktops can be increased and the Gateway selection can be changed.
To edit an existing pool
Step 1. Go to “Resources > VDI Pools > poolname > Action > Edit.” This will open the “Edit Virtual Desktops” page.
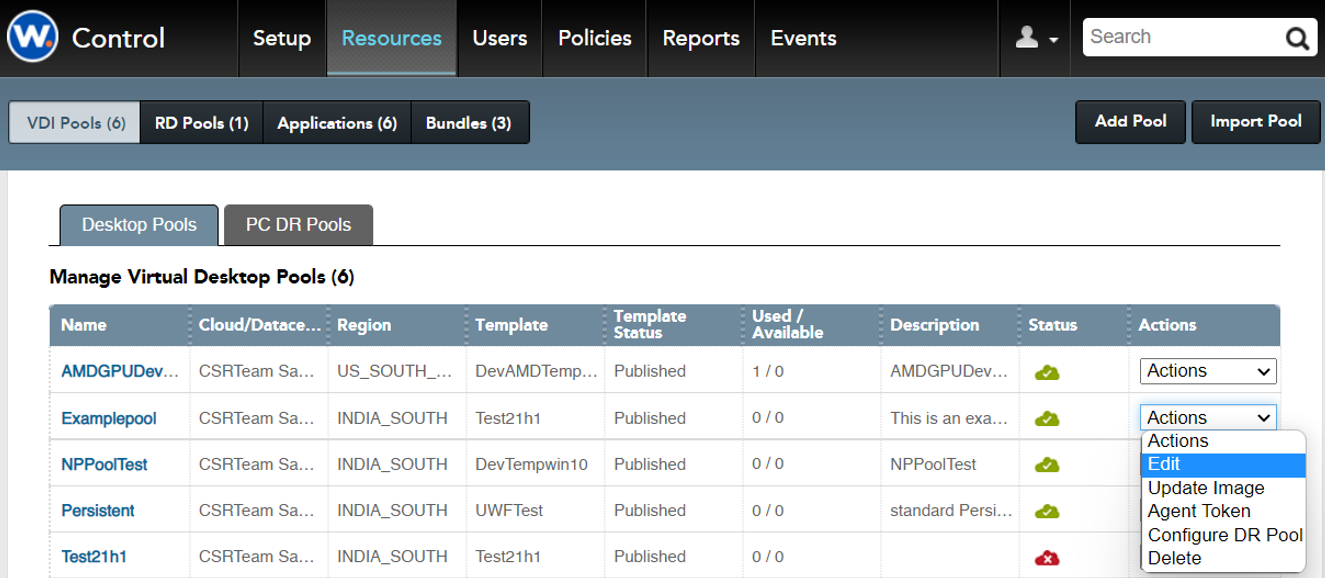
“Edit” option on the “Manage Virtual Desktop Pools” page.
Step 2. Change the parameters as desired, then click the “Save” button.
Step 3. If you have added desktops, you can monitor the provisioning process using the “Check Progress” link.
Increasing and Decreasing the Number of Desktops
Increasing the number of desktops in a pool is done by editing the pool (above) and entering a larger number of desktops than before.
Decreasing the number of desktops is done differently because you must specify the desktops to delete. Go to “Resources > VDI Pools > poolname”, select the desktops to delete, and click the “Delete Desktops” button.
Viewing Pool Parameters
To see the parameters in use by a pool, use the same procedure as editing the pool, but click the “Cancel” button instead of “Save.”
Managing Individual Desktops in a Pool
Desktop Status
Clicking on the pool’s name will list all the desktops in the pool:
Click “Resources > VDI Pools > poolname” to show the “Manage Virtual Desktops Summary” tab, which lists all the desktops in the pool.
Each desktop will show its status. See Control: Desktop Status for the full list of status values. Interesting status vaules include:
- Ready. The desktop has no user but is ready for one.
- Disconnected. The desktop has an active user session but the user’s Workspot Client is currently disconnected.
- Connected. The desktop has an active, connected user.
- Error, Failed: The desktop cannot be run. At a minimum, it ineeds to be rebooted by the user or the Control Adminstrator.
Listing the Desktops
Clicking on the pool’s name will list all the desktops in the pool:
-
Click “Resources > VDI Pools > poolname” to show the “Manage Virtual Desktops Summary” tab, which lists all the desktops in the pool.
- Click the “Detailed” tab for additional information.
Desktop Actions (Active Desktops)
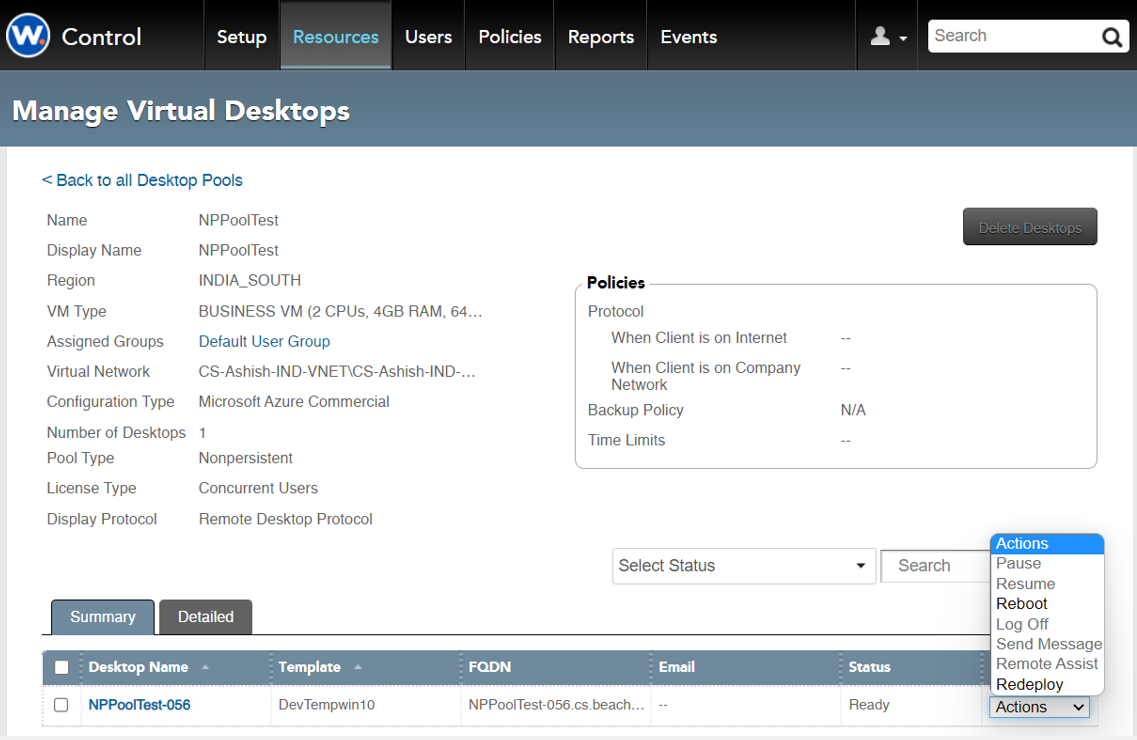
“Actions” menu for individual desktops.
The “Actions” menu is the same on both tabs. It offers the following options:
-
Reboot VM: Reboots the desktop.
-
Log Off: Ends the user’s desktop session. (Grayed out if no user is signed into the desktop.)
-
Send Message: Sends a message to the user. (Grayed out if no one is signed into the desktop.)
-
Remote Assist: Starts a Remote Assistance session on the desktop. (Grayed out if no user is signed into the desktop.)
-
Redeploy VM: Moves the desktop to a different network node. Used to resolve possible hardware or other Cloud-provider issues.
Desktop Actions (Suspended Desktops)

“Action” options for suspended desktops.
Suspended desktops display a status of “Suspended” on the pool’s “Summary” tab. Two actions are unique to suspended desktops: “Assign VM” and “Return to Pool.”
• “Assign VM” allows you to assign the desktop to a specific user and return it to the pool as an active, assigned desktop.
• “Return to Pool” returns the desktop to the pool as an unassigned desktop.
To assign a suspended desktop to a user
Step 1. Go to “Resources > VDI Pools > poolname > desktopname > Actions > Assign VM.”
Step 2. In the “Assign Desktop” popup, type part of the desired user’s name into the search box and click “Search.”
Step 3. Click the “Assign” button for the correct user.
To return a suspended desktop to the pool
Step 1. Go to “Resources > VDI Pools > poolname > desktopname > Actions > Return to Pool.” The “Confirm Return to Pool” popup appears.
Step 2. Click the “Yes, Return” button.
Assigning Pools to Users and Groups
Individual Users
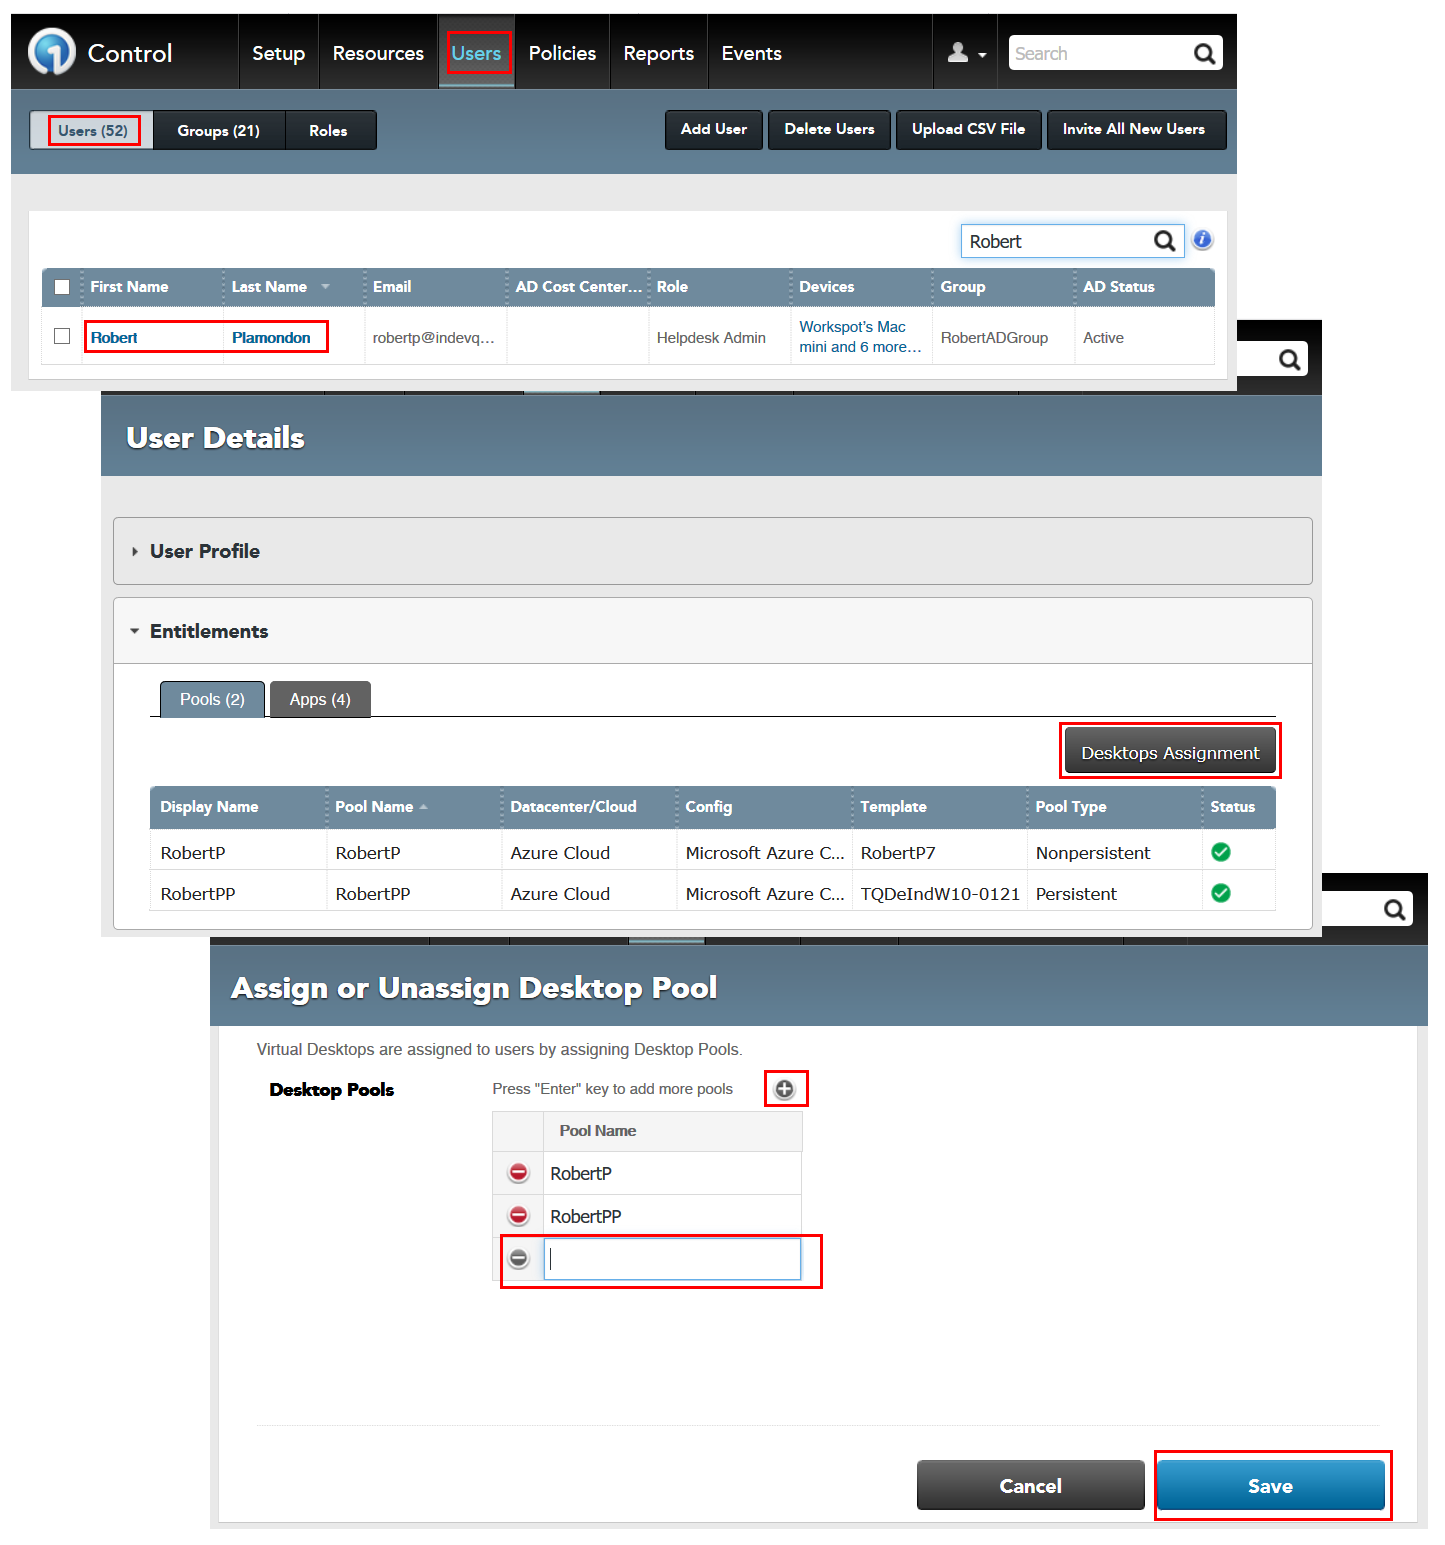
Creating user-specific desktop entitlements.
Users are assigned desktops in specific pools either user-by-user or in groups. When a user is entitled to have a desktop in a pool, this is called a desktop entitlement.
The desktop entitlement is not the same thing as a desktop assignment. The actual desktop will not be assigned to a user until they log into the Workspot Client and connect via the desktop icon.
For persistent desktops, when an entitlement is removed (unassigned), the desktop is either suspended or returned unassigned to the pool for reuse, depending on the pool settings. A suspended desktop will not be assigned until it is deleted or returned to the pool manually by the Administrator.
To assign a desktop entitlement to a user
Step 1. On the “Users > username > Desktop Assignment > Assign or Unassign Desktop Pool,” page, click the “+” button to assign a new pool to the user and fill in the blank with the name of a pool. Control uses auto- completion to help you find a valid pool.
Step 2. By clicking the “+” button multiple times, you can add entitlements for multiple pools.
Step 3. Click the “Save” button to create the entitlement.
Step 4.You will be returned to the “User Details” page and the new (longer) list of entitlements is displayed.
To revoke a desktop entitlement from a user
Step 1. On the “Users > username > Desktop Assignment > Assign or Unassign Desktop Pool,” page, click the “-“ icon for the desired pool.
Step 2. By clicking the “-“ button multiple times, you can remove entitlements for multiple pools.
Step 3. Click the “Save” button to remove the entitlement.
Step 4. You will be returned to the “User Details” page and the new (shorter) list of entitlements is displayed.
Step 5. If the entitlement is given twice (at the user level and at the group level) it will remain until it is unassigned in both places.
Groups
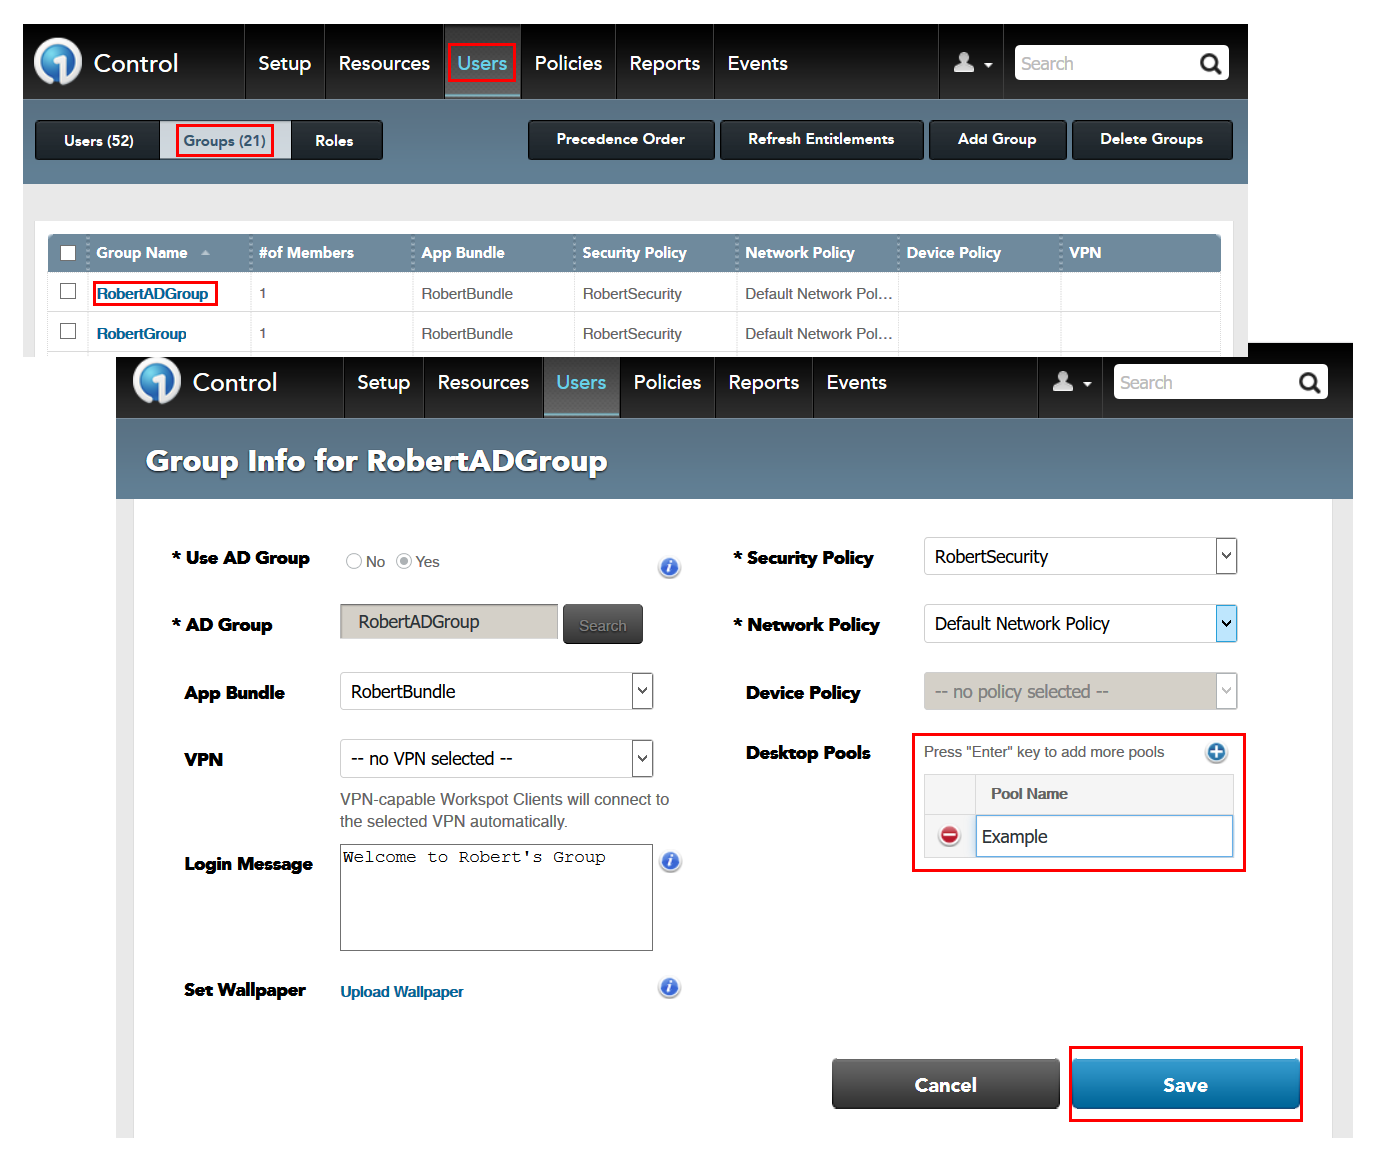
Group-based entitlements.
Group-based entitlements are similar to user-based entitlements.
To add or remove group entitlements
Step 1. Check group membership. Users can be members of more than one group, but only one group is used for a given user’s entitlements. This is displayed as “Selected Group Name” under “Users > Users > username.”
• If the wrong group is listed, rearrange the group priority order under “Users > Groups > Precedence Order.”
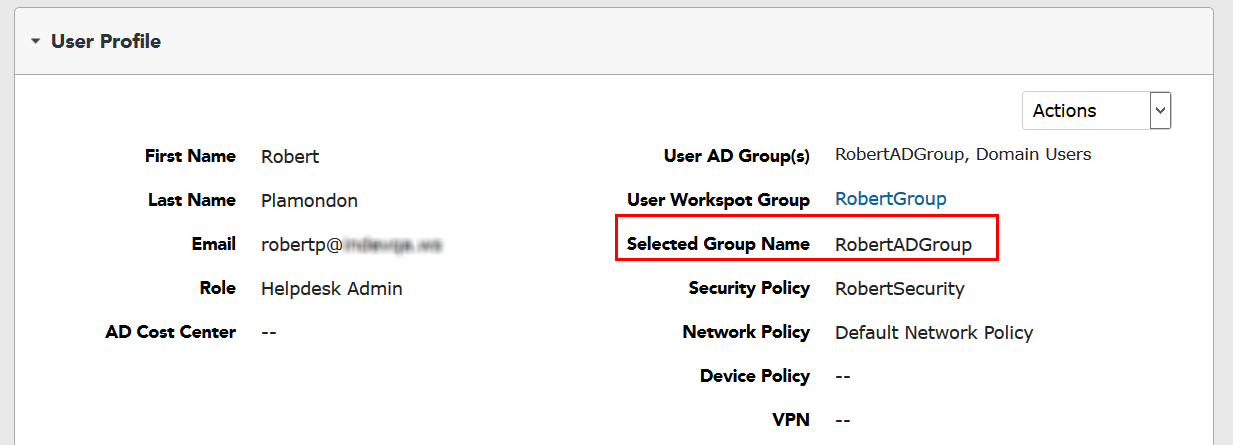
The user profile shows the group being used for group-based entitlements.
Step 2. Go to “Users > Groups > groupname” to display the “Group Info” page.
Step 3. Under “Desktop Pools,” add or remove entitlements.
-
Click the “+” button to add an entitlement, entering the pool name in the text field. Control uses auto-complete to ensure you enter a valid pool.
-
Click the “-“ to remove an existing entitlement.
-
You can add or remove multiple entitlements.
Step 4. Click “Save” to update the group’s entitlements.
Group-based entitlements.
| Control: Desktop Pools | 08/25/2022/7:14 am |
© 2023 Workspot