

Workspot Configuration for Amazon Workspaces Core
Last updated on January 12, 2024
Note: This article is no longer up to date and has been superseded by the Getting Started with Workspot Series.
A version of this article appeared in the AWS Blog in April, 2023
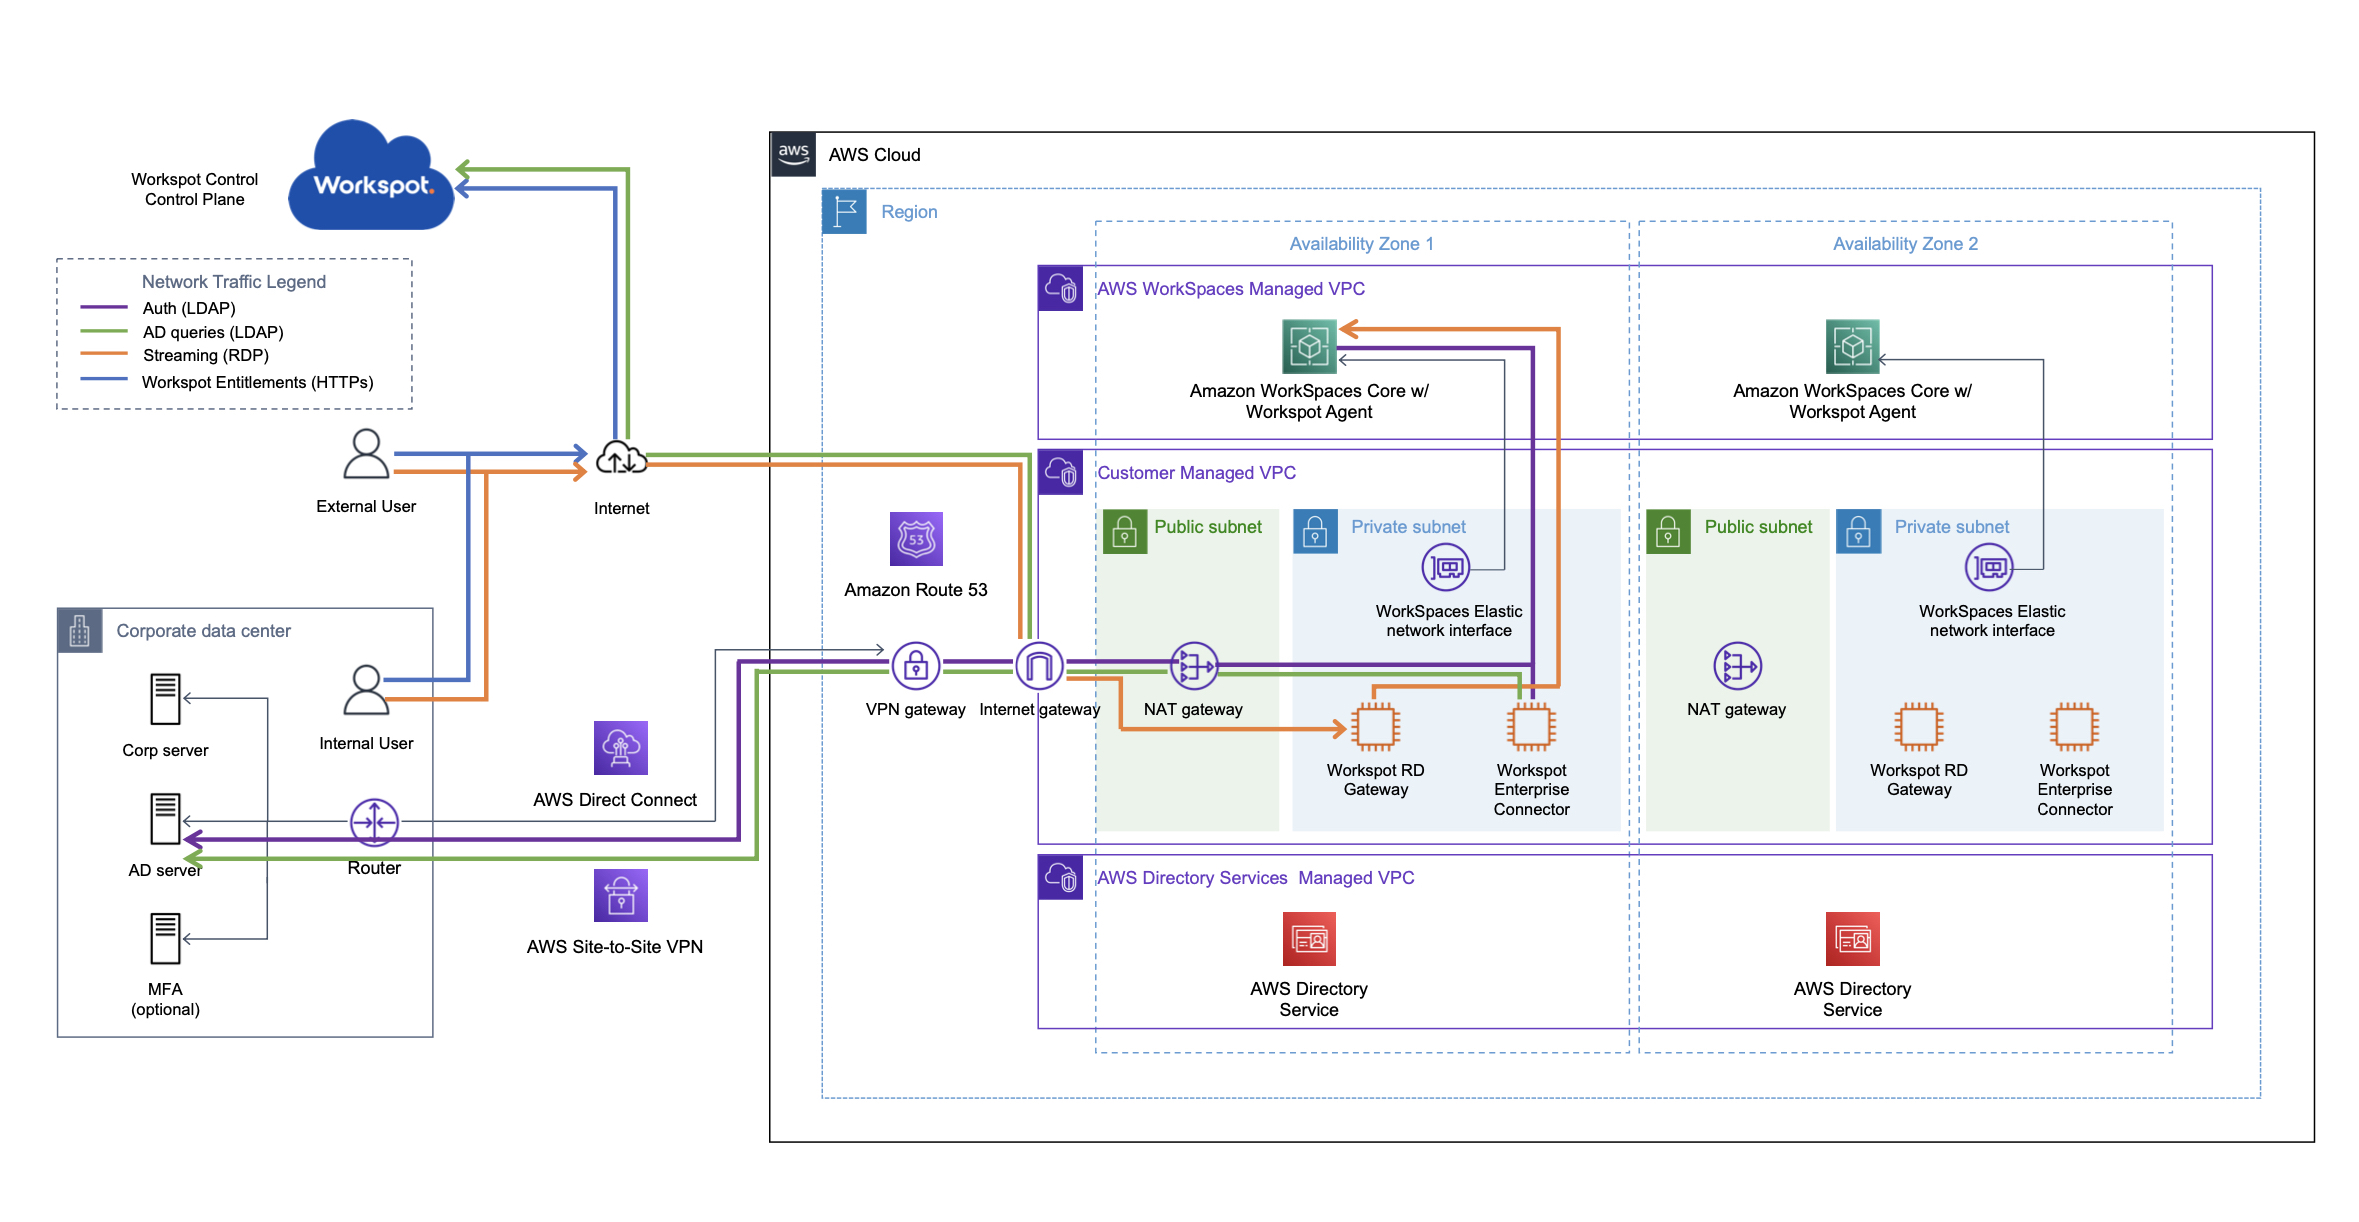
Workspot supports Windows 10 and Windows 11 persistent desktop pools and persistent GPU pools using the Amazon Workspaces Core Cloud (in addition to the Microsoft Azure, Google GCP, and Amazon AWS Clouds). This article tells you how to configure such pools.
Prerequisites
- A working knowledge of Amazon AWs.
- The latest version of the AWS CLI.
- An AWS account.
- An Amazon Virtual Private Cloud (VPC). You can create a new VPC in the region that you are deploying Workspot resources.
- Permissions to create AWS Identity and Access Management (IAM) roles.
- Permissions to perform all the WorkSpaces tasks for BYOL Workspaces.
- Access to Microsoft Active Directory resources in the AWS account.
- WorkSpaces Core requires Microsoft Active Directory for user authentication.
- Amazon WorkSpaces also requires Microsoft Active Directory (AD). You can use a standalone domain or a domain trust with an existing AWS Managed Microsoft AD. You can also utilize your existing AD with AD Connector.
- A Workspot deployment.
Integrating Workspot Control and WorkSpaces Core using IAM AssumeRole
Request ARN from Workspot Support
Open a ticket with Workspot Support to request an Amazon Resource Name (ARN) for an IAM user. This user will be used to integrate Workspot Control and Core via IAM AssumeRole.
With this information, create an IAM policy JSON file and save it as workspot-trust-policy.json. Replace <workspot-arn> with the ARN of the Workspot IAM user sent by Workspot Support.
workspot-trust-policy.json: { "Version": "2012-10-17", "Statement": { "Effect": "Allow", "Principal": { "AWS": "<workspot-arn>" }, "Action": "sts:AssumeRole" } }
Create an IAM Role
Create an IAM role, taking note of the ARN returned so you can use it later.
aws iam create-role --role-name workspot-admin-role --max-session-duration 43200 --assume-role-policy-document file://workspot-trust-policy.json
Attach Policies to the IAM Role
Attach additional AWS managed IAM policies to the IAM role, as shown below.
Amazon Elastic Compute Cloud (Amazon EC2) Read Only Access:
aws iam attach-role-policy --role-name workspot-admin-role --policy-arn "arn:aws:iam::aws:policy/AmazonEC2ReadOnlyAccess"
Directory Services Read Only Access:
aws iam attach-role-policy --role-name workspot-admin-role --policy-arn "arn:aws:iam::aws:policy/AWSDirectoryServiceReadOnlyAccess"
WorkSpaces Admin
aws iam attach-role-policy --role-name workspot-admin-role --policy-arn "arn:aws:iam::aws:policy/AmazonWorkSpacesAdmin"
Verify Your Work So Far
Confirm all three policies are attached:
aws iam list-attached-role-policies --role-name workspot-admin-role
Workspot Support will complete the remaining steps for Assumed Roles. Core will appear under “Setup > Cloud > Public Clouds” in Workspot Control.
WorkSpaces Core Configuration
Below are the steps to set up WorkSpaces Core for this integration. You will configure the account, import an initial image, create a bundle from that initial image, deploy the bundle, install the Workspot agent, and create a final image with all the software we needed.
- Your AWS account must be set up for Amazon WorkSpaces Bring Your Own License (BYOL) and Bring Your Own Protocol (BYOP). See BYOL document on how to request BYOL and BYOP.
- Configure a security group assigned to your WorkSpaces directory that enables communication between your end users, Workspot Connection Servers, and Amazon WorkSpaces. Review Workspot Network Port Requirements and Security for more details on the TCP and UDP ports to open, including 443 and 3391.
- Create a WorkSpaces BYOP base image by following the steps 1 through 5 in the WorkSpaces admin guide.
- Once the image has been imported into EC2, you will then create a WorkSpace based on that imported Amazon Machine Image (AMI).
- Import the image into Amazon WorkSpaces using the AWS Command Line Interface (CLI) found in the reference documentation. (Note, the WorkSpaces console is not supported for BYOP image imports. You must use ingestion-process switch BYOL_REGULAR_BYOP or BYOL_GRAPHICS_G4DN_BYOP).
aws workspaces import-workspace-image --ec2-image-id ami-xxxxxxxxxx --ingestion-process BYOL_REGULAR_BYOP --image-name win10-ent-img01 --image-description “Windows 10 Enterprise” --region region-id - Capture the WorkSpace image and then create a custom bundle.
- The custom bundle is used to deploy WorkSpaces. You can create the custom bundle through the AWS Management Console or using the CLI.
aws workspaces create-workspace-bundle --bundle-name win10-bundle-workspot --bundle-description “Workspot - Windows 10” --image-id wsi-xxxxxxxxx --compute-type “Name=STANDARD” --user-storage “Capacity=10” - Deploy a WorkSpace using the custom BYOP bundle .
- Make a note of the WorkSpaces IP address and computer name. You will need them later when contacting Workspot Support.
- Remotely connect to the BYOP WorkSpace. Since no WorkSpaces protocols are installed by the BYOP import process, you will need to connect to the desktop using the Remote Desktop Protocol (RDP).
- Install and configure the Workspot agent:
- Download and install Agent as a Workspot Administrator and provide your Workspot Control Admin credentials (see Workspot Agent Installation and Configuration).
- As an administrator, browse to the C:\Program Files\WorkspotAgent folder.
- Launch WorkspotConfigEditor.exe.
- Select the option for “Do Not Domain Join” and choose “Submit.”
- Once the Workspot agent has been installed and configured, create another WorkSpaces custom image.
- Create a WorkSpaces bundle with the image containing the Workspot agent, per step 6 previously.
- Make a note of the Workspot bundle name, Workspot bundle id, and bundle configuration (vCPU, RAM, Storage). You will need them later when contacting Workspot Support .
- Workspot Support will use this image to create a template. To do this reach out to Workspot Support and provide the below information.
- IP address – the IP address of the WorkSpace used to create the Workspot BYOP image
- Computer name – the computer name of the WorkSpace used to create the Workspot BYOP image
- Bundle name – the WorkSpaces bundle name using the Workspot BYOP image
- Bundle id – the WorkSpaces bundle id using the Workspot BYOP image
- Bundle configuration – the WorkSpaces bundle configuration (vCPU, RAM, Storage)
- Workspot Control admin email – Workspot Control administrator’s email address
- Region – the AWS Region in which the bundle has been created.
Setup Workspot Enterprise Connector and Workspot RD Gateway
- Create an Amazon EC2 instance in the Workspot infrastructure VPC and install the Workspot Enterprise Connector. See Workspot Enterprise Connector for steps.
- Create an Amazon EC2 instance in the Workspot infrastructure VPC and install the Microsoft Remote Desktop Gateway role. Contact the Workspot Customer Success Team for guidance and assistance.
- Add the Remote Desktop Gateway configuration in Workspot Control by going to “Setup > Gateways > Private Cloud Gateways > Add Private Gateway.” Fill out the “Add Private Cloud Gateway” form.
Create Desktops in Workspot Control
The Workspot Customer Success Team will have created your Workspot template, which is visible under “Setup > Cloud > Public Cloud > cloudname.”
- In Workspot Control, “Resources > Add Pool.”
- Create the pool as described in Workspot documentation, Control: Desktop Pools.
- Once the pool is created, go to “Resources > poolname” to see the individual desktops in the pool.
- Assign desktops individually to end-users with “desktopname > Actions > Assign.”
- Desktops are provisioned upon assignment.
Connect to Workspot Desktops with the Workspot Client
- On a client machine, download and install the latest Workspot Client if necessary.
- Sign into the Client.
- Click on the icon for the Amazon Workspaces Core desktop.
Clean up
To remove the environment you built, terminate the 2 Amazon EC2 instances running the Workspot Enterprise Connector and Workspot RD Gateway and terminate any WorkSpaces Core instances.